DockTag™ Introduction
DockTag™ is a new technology created by Plugable that allows for customized support, asset management, and hotdesking capabilities with Plugable DockTag™-enabled docking station products via a combination of local on-screen informational displays and an online portal, all without running any local software.
Launching first with our UD-7400PD docking station, DockTag™ has two potential usage models. That of the typical home user, and that of both administrators and end-users within a managed business environment.
This document will provide an overview of both usage models, as well as a walkthrough of the available features in each scenario.
Also note, we have made two videos that provide a general overview of the DockTagTM experience as well as an overview from an Administrator perspective that can help provide additional context. The general overview video is available here → LINK and the Administrator video is available here → LINK
DockTag™ Home User Experience
For the typical home user, the DockTag™ experience is very straightforward and is defined by the visibility of three different informational screens.
The ‘Welcome’ Screen
When a Plugable docking station with DockTag™ technology is first powered on, a ‘Welcome’ screen that displays the Plugable logo will appear within monitors connected to the docking station:
** Please note, DockTag™ information screens will only appear within monitors that are driven by a DisplayLink video output within the docking station **
The ‘Connect Device to Host’ Screen
By default, the ‘Welcome’ screen will remain visible for five seconds, and then transition to a ‘Connect device to host’ screen:
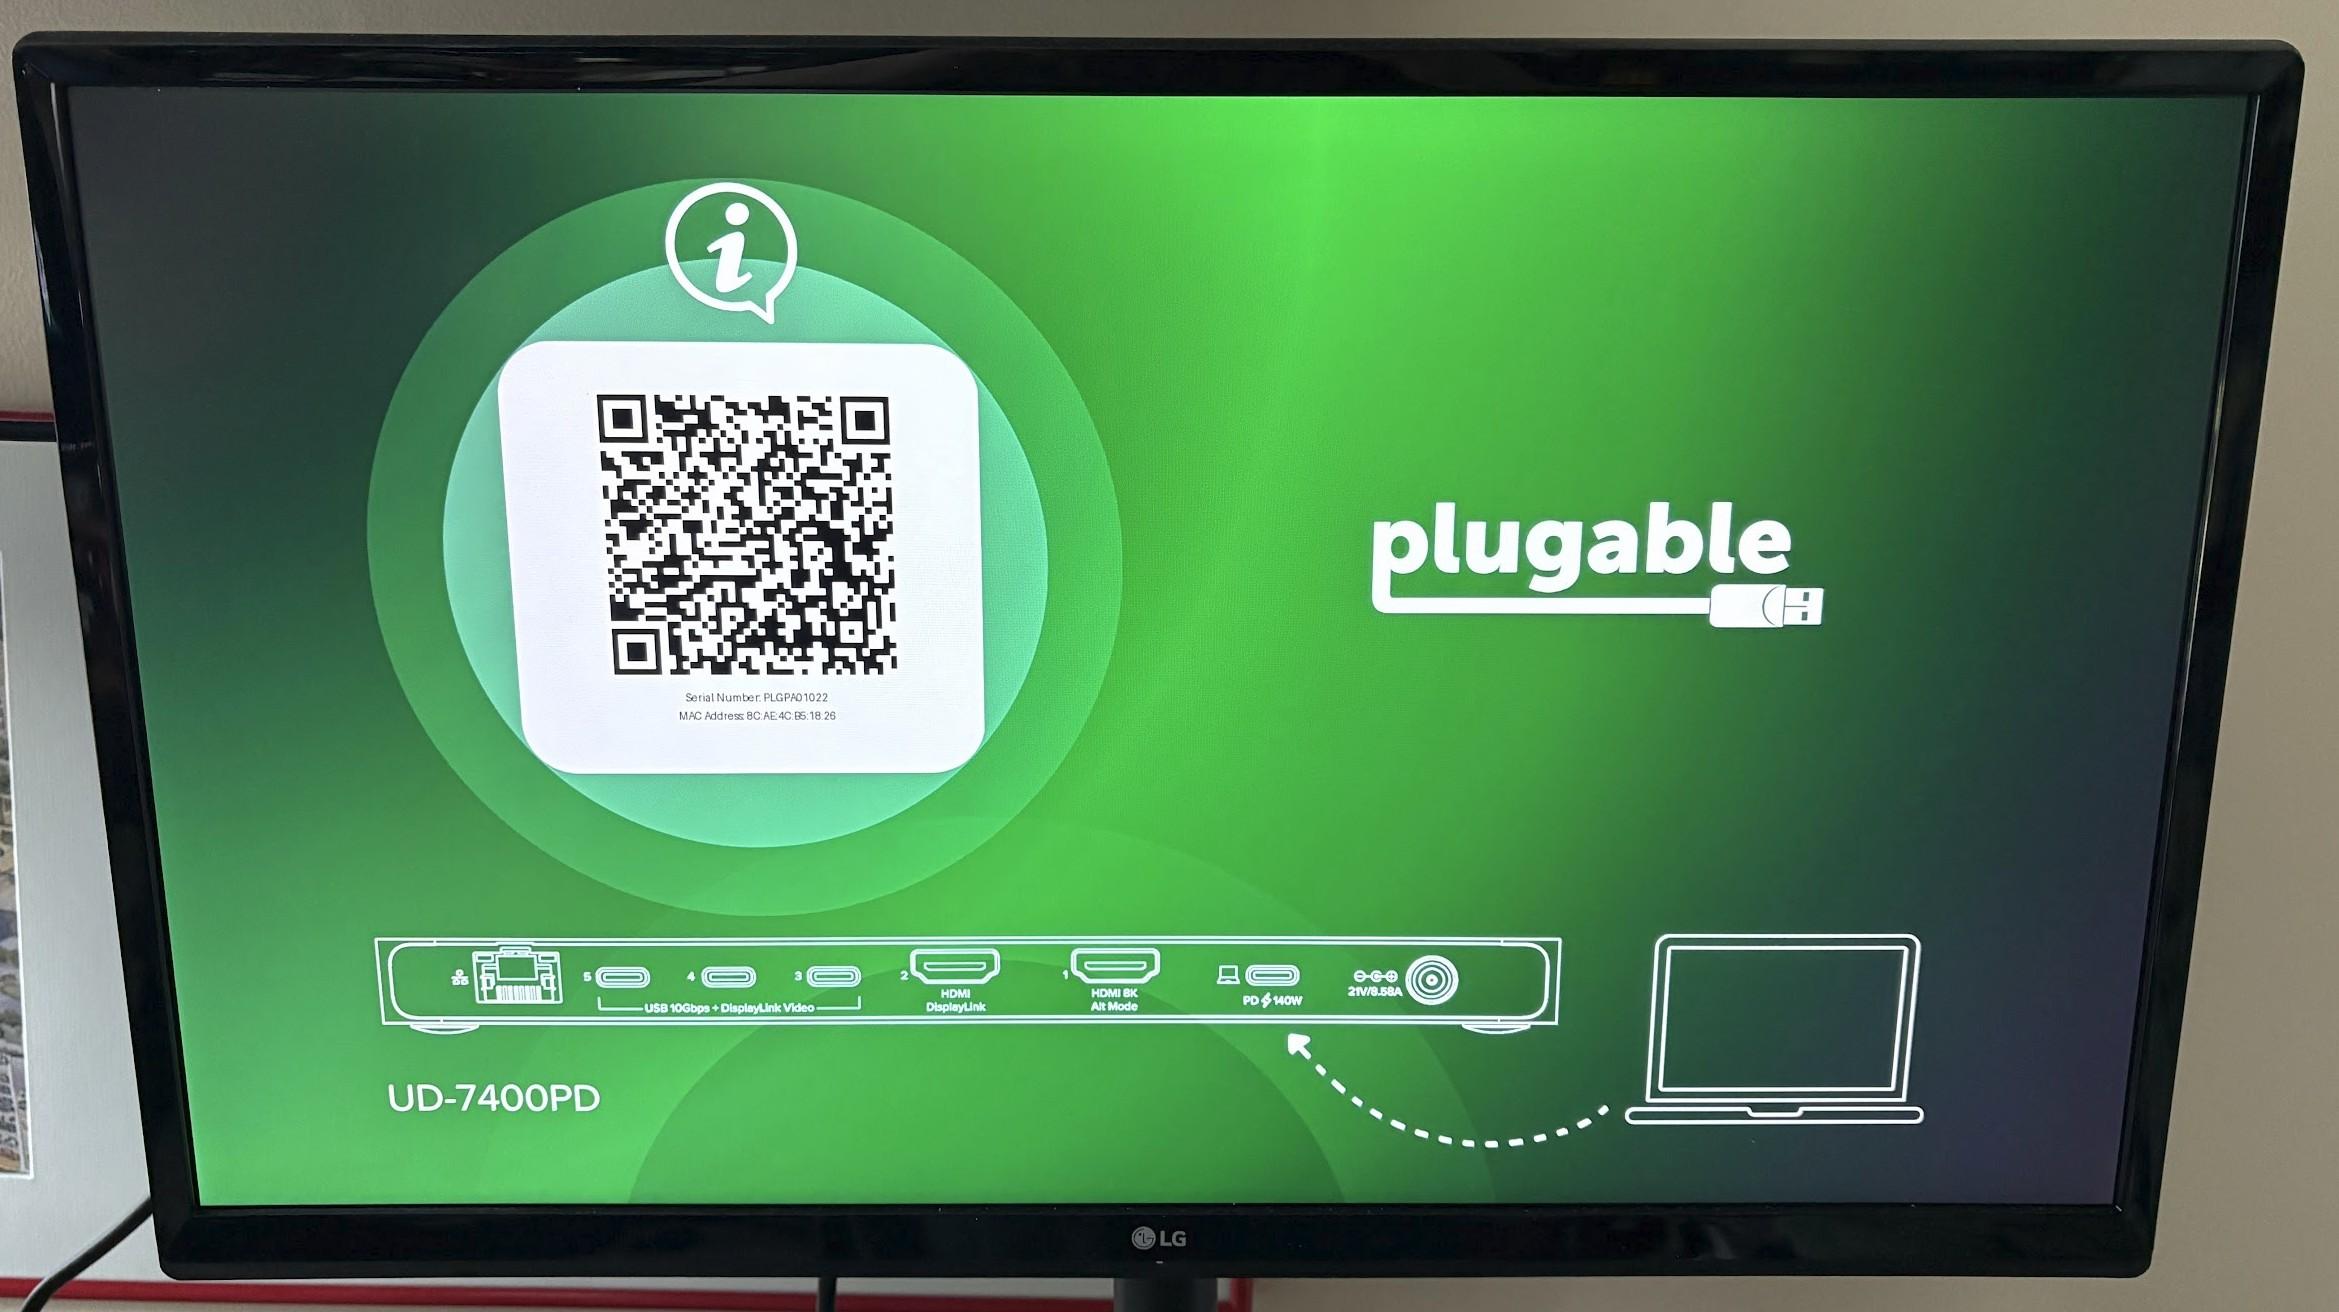
As the name implies, the ‘Connect device to host’ screen prompts the home user to connect their computer to the docking station. The diagram onscreen illustrates how to connect the docking station to the computer, as well as provides information about the specific docking station model in use, the device’s serial number, and the device’s hardware network address (also known as a media access control or ‘MAC’ address).
In addition, a quick-response code (also known as a QR code) is displayed within this screen. Scanning the QR code with a mobile device will direct the home user to a product-specific web page that provides more details about the product and how to get started using the product.
By default, the ‘Connect device to host’ screen will remain visible for 60 minutes. If a host computer is not connected to the docking station within 60 minutes, the ‘Connect device to host’ screen will disappear.
NOTE - There is a utility for both Windows and Mac that allows the timings of the informational screens to be adjusted to suit personal preference. The utility and instructions on its use are available to download from here → LINK
If a host computer is connected to the docking station while the ‘Connect device to host’ screen is still visible, after a few moments the monitors will transition to displaying the extended desktop of the host computer.
** If at any time you wish to view the DockTag™ informational displays again, please power off the docking station momentarily and then power the docking station back on. Doing so will repeat the initial DockTag™ informational screen process as described above **
The ‘Please Install Driver Software’ screen
In order to use a Plugable docking station with DockTag™ technology, DisplayLink software must be installed on the host computer. If the DisplayLink software is not installed, then the monitors connected to the docking station will not work.
If a host computer is connected to the docking station that does not have the DisplayLink software installed, an informational screen will appear that prompts the home user to install the DisplayLink software and provides a web address to access the download:
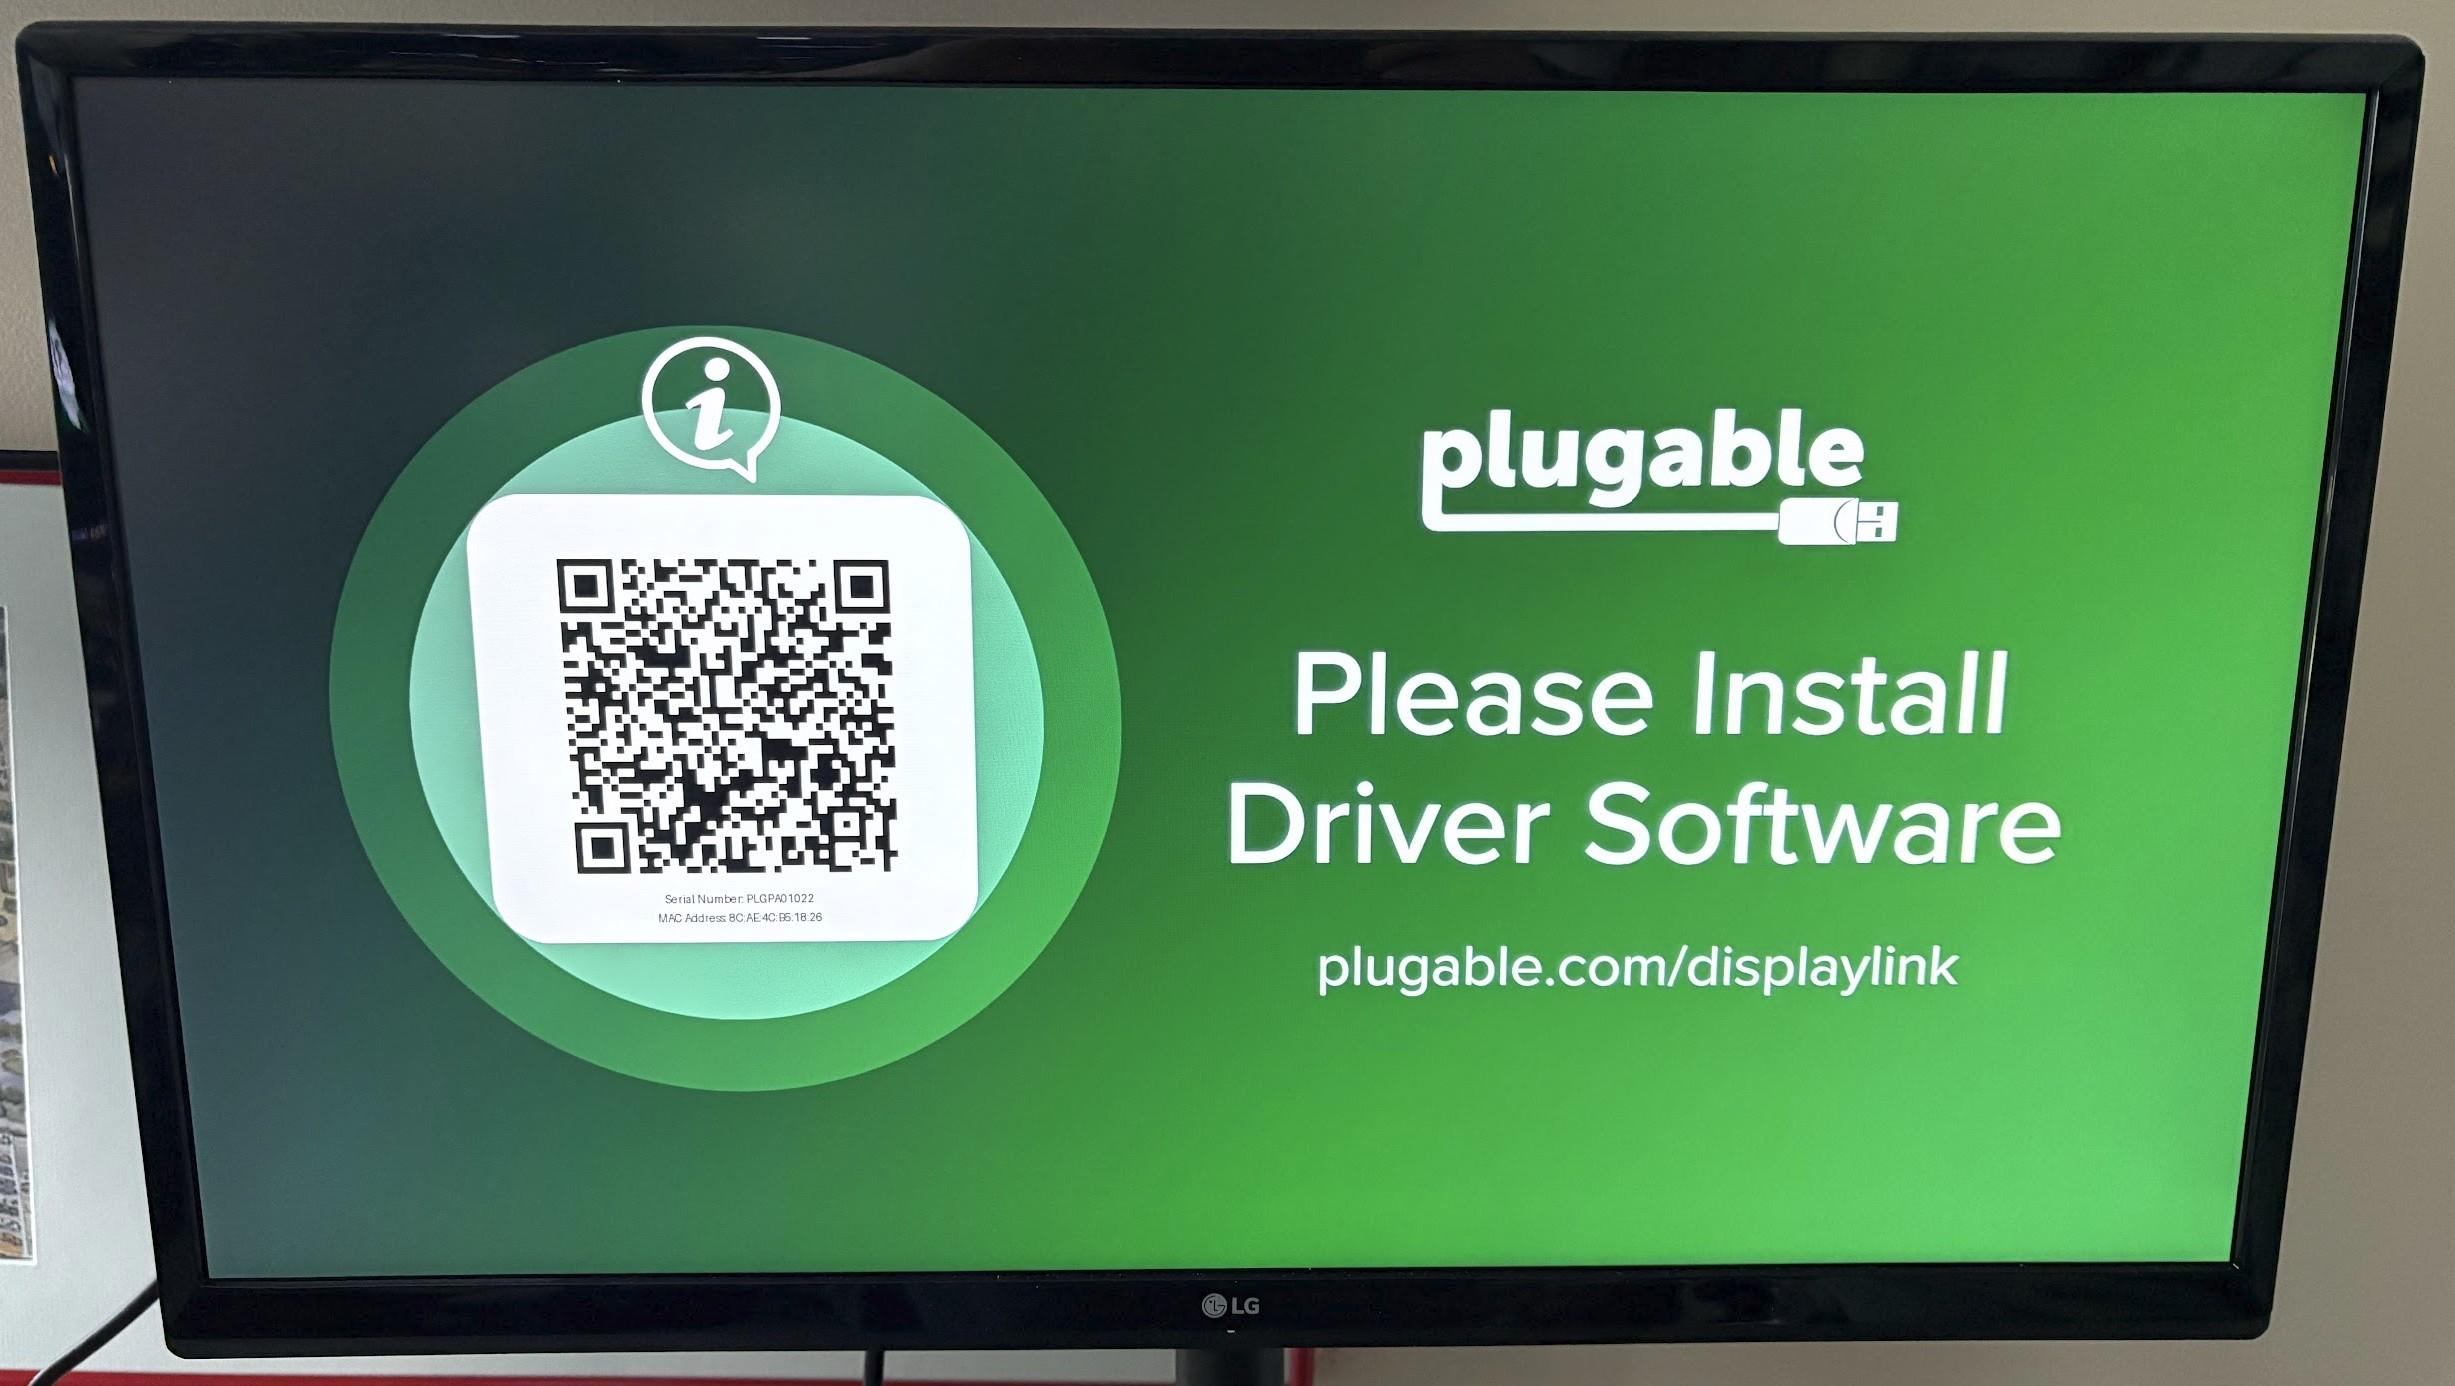
** Please note that if a host computer without DisplayLink software is connected to the docking station, the ‘Please Install DisplayLink’ screen will remain visible for 60 minutes and then disappear. The screen will only disappear if the DisplayLink software is installed on the host computer, or if the host computer is disconnected from the docking station **
Summary and Review
For the home user, DockTag™ is an information and guidance system. By their presence, the informational screens are intended to reassure the home user that the docking station is working, guide them through connecting their computer to the dock, and if necessary installing the required software.
DockTag™ Business User Experience
For business use, in addition to the capabilities described in the previous, ‘DockTag™ Home User Experience’ section, DockTag™ provides asset management, user management and hotdesking capabilities. DockTag™ seat licenses can be purchased via distribution.
These capabilities are driven by a combination of the previously described informational screens and two sets of data entered into an online portal.
The two sets of data are a list of end-users within the system and a list of the DockTag™-enabled assets. In brief, first a list of users are entered into the online portal. Each user is then defined with a specific role & a specific organization, which allows them to administer or simply access the system’s hotdesking capabilities (if the organization’s settings are defined as such). Organizations also reserve the option to not require authentication to hotdesk assets, in which case, the unauthenticated user would then be akin to a STANDARD user for the organization.
Once the list of users has been defined, DockTag™-enabled assets are then registered within the online portal. There are two methods for entering this data. The first is by manual entry, and the second is by scanning a quick-response code (also known as a QR code).
Once registered, detailed information about the assets can be viewed online, including the product model number (aka SKU), the product serial number, and the network hardware address (also known as a media access control or ‘MAC’ address).
In addition, the physical location of each asset can be designated, general notes about the specific asset can be entered, and the asset can be used for hotdesking.
In the following sections, we will first demonstrate how the end-user will interact with the DockTag™ system for hotdesking. We will then demonstrate the DockTag™ administrative processes for user management and asset management.
DockTag™ End User - Hotdesking
Overview
For those unfamiliar, ‘hotdesking’ is a general term used to describe the process of having multiple hardware assets available for reservation and use in an ad hoc manner.
From the end user’s perspective, the hotdesking process is fairly straightforward. Using their mobile device’s camera, the end user will scan the QR code visible within the ‘Connect Device to Host’ informational display.
Once the QR code is scanned, the end user will automatically be redirected to a page about that specific asset. From there, the end user can reserve the asset for use for a period of time, and if necessary extend or delete the reservation as needs dictate.
** Please note, a DockTag system administrator has options when configuring their system in regard to the level of authentication necessary to hotdesk. **
Depending on the options selected, the end user may or may not be required to login using their DockTag credentials in order to hotdesk. Please reach out to support@plugable.com if you need to change the authorization requirement configuration for your account. **
End User Process
1. The end user will approach a DockTag™-enabled docking station. By default, the docking station should be powered off in order to conserve electricity.
2. The end user will power on the DockTag™-enabled docking station. The informational ‘Welcome’ screen will appear for five seconds, followed by the ‘Connect Device to Host’ screen which will appear for 30 seconds (similar to the example below):

3. The end user will use their mobile device’s camera in order to scan the QR code visible within the ‘Connect Device to Host’ screen.
4. After having scanned the QR code, the mobile device’s web browser will automatically redirect the end user to a page with details about the specific asset in question.
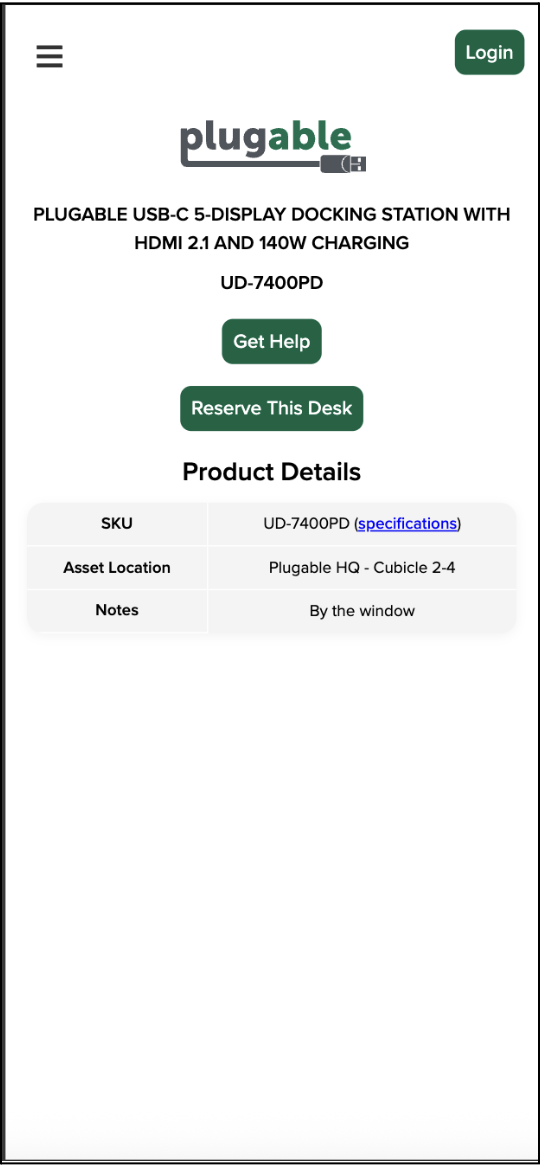
5. From within the detail page, the end user can choose to reserve the asset by clicking on the ‘Reserve This Desk’ button. The page will refresh and ask the end user for their email address, and the duration of time they wish to use the asset. Note that if you are already authenticated, the email will be pre-populated & immutable.
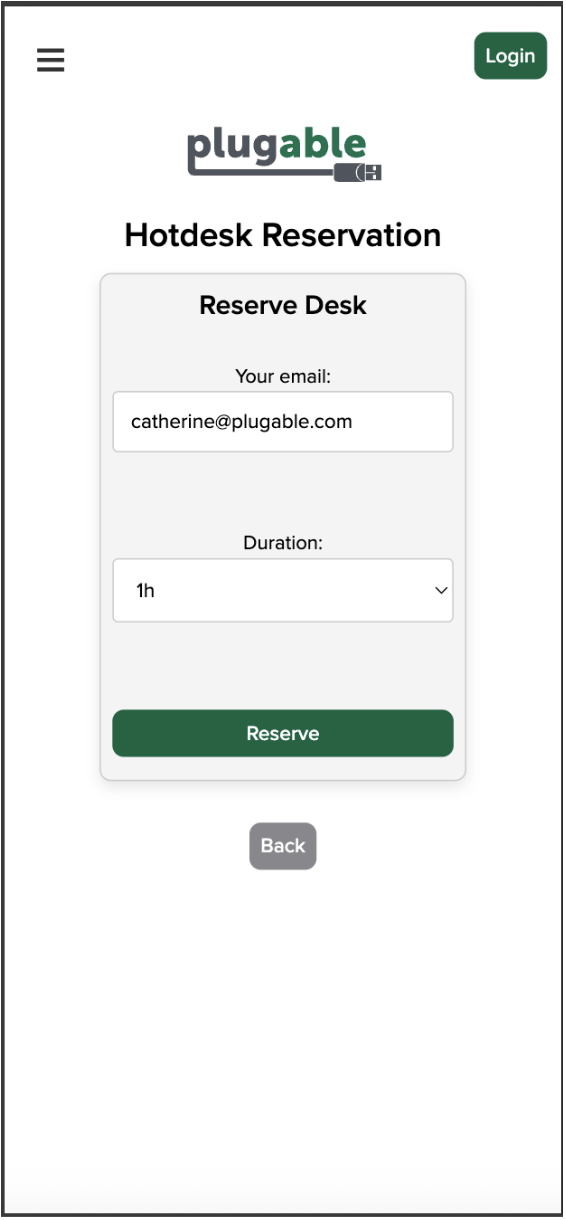
6. The page will refresh, and confirm the details of the reservation:
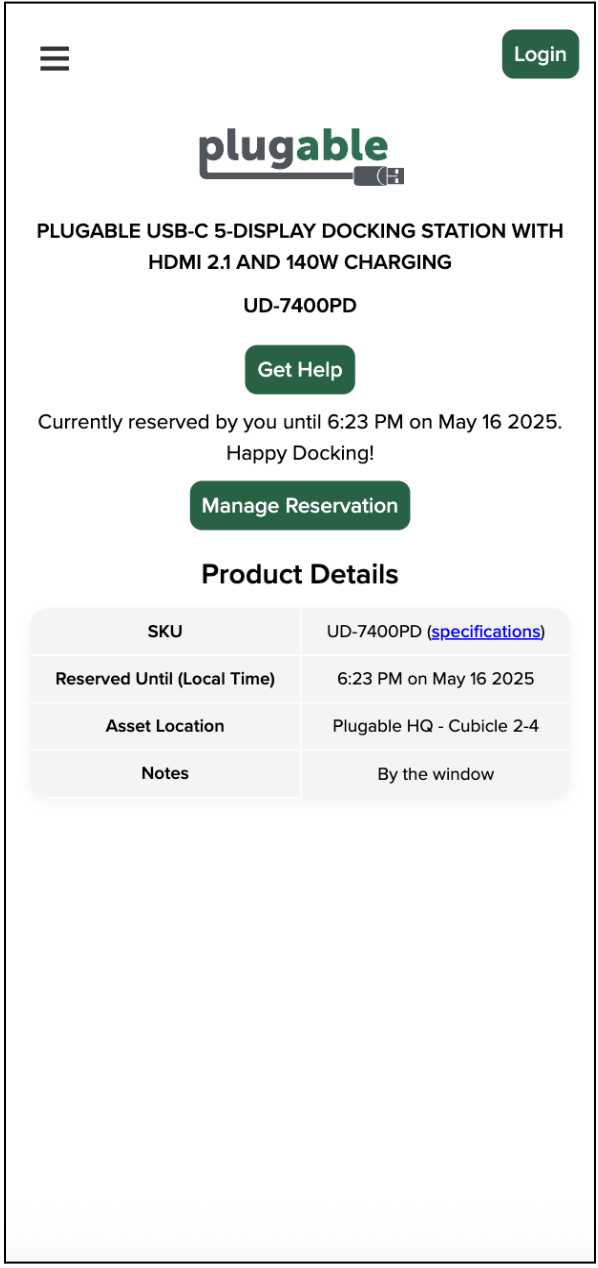
7. The end user will connect their computer to the docking station, and use the resource as necessary.
** Note - if the end users computer does not have the required DisplayLink software installed, the information screen will change to inform them of the need to install the software and provide a download link **
8. If necessary, the reservation can be extended by clicking on the ‘Manage Reservation’ button:
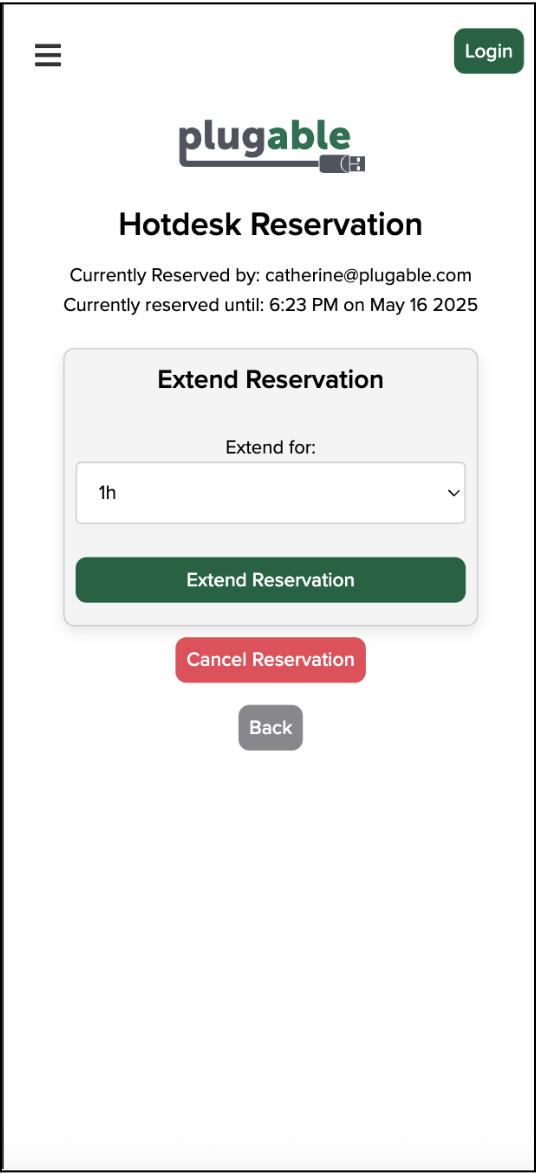
9. Once the end user has finished using the docking station, the end user will disconnect their computer from the docking station and power the docking station off in order to both conserve electricity and also to prepare the asset for use by the next end user.
DockTag™ Administrator
After having purchased a DockTag™ subscription through distribution and contacting support@plugable.com to onboard your organization in the system, the first step as an administrator is to log in to the DockTag™ online portal as an administrator and add users. In the examples that follow, we will create users and assets within a Plugable office environment organization, administered by a person named ‘Bob’.
** Please note, Plugable recommends using the Google Chrome Browser for the best user experience. **
** Please note, if after having been logged in for 60 minutes, the system will automatically log out as a security precaution. Five minutes prior to this event, a notification will be displayed onscreen **
Logging in
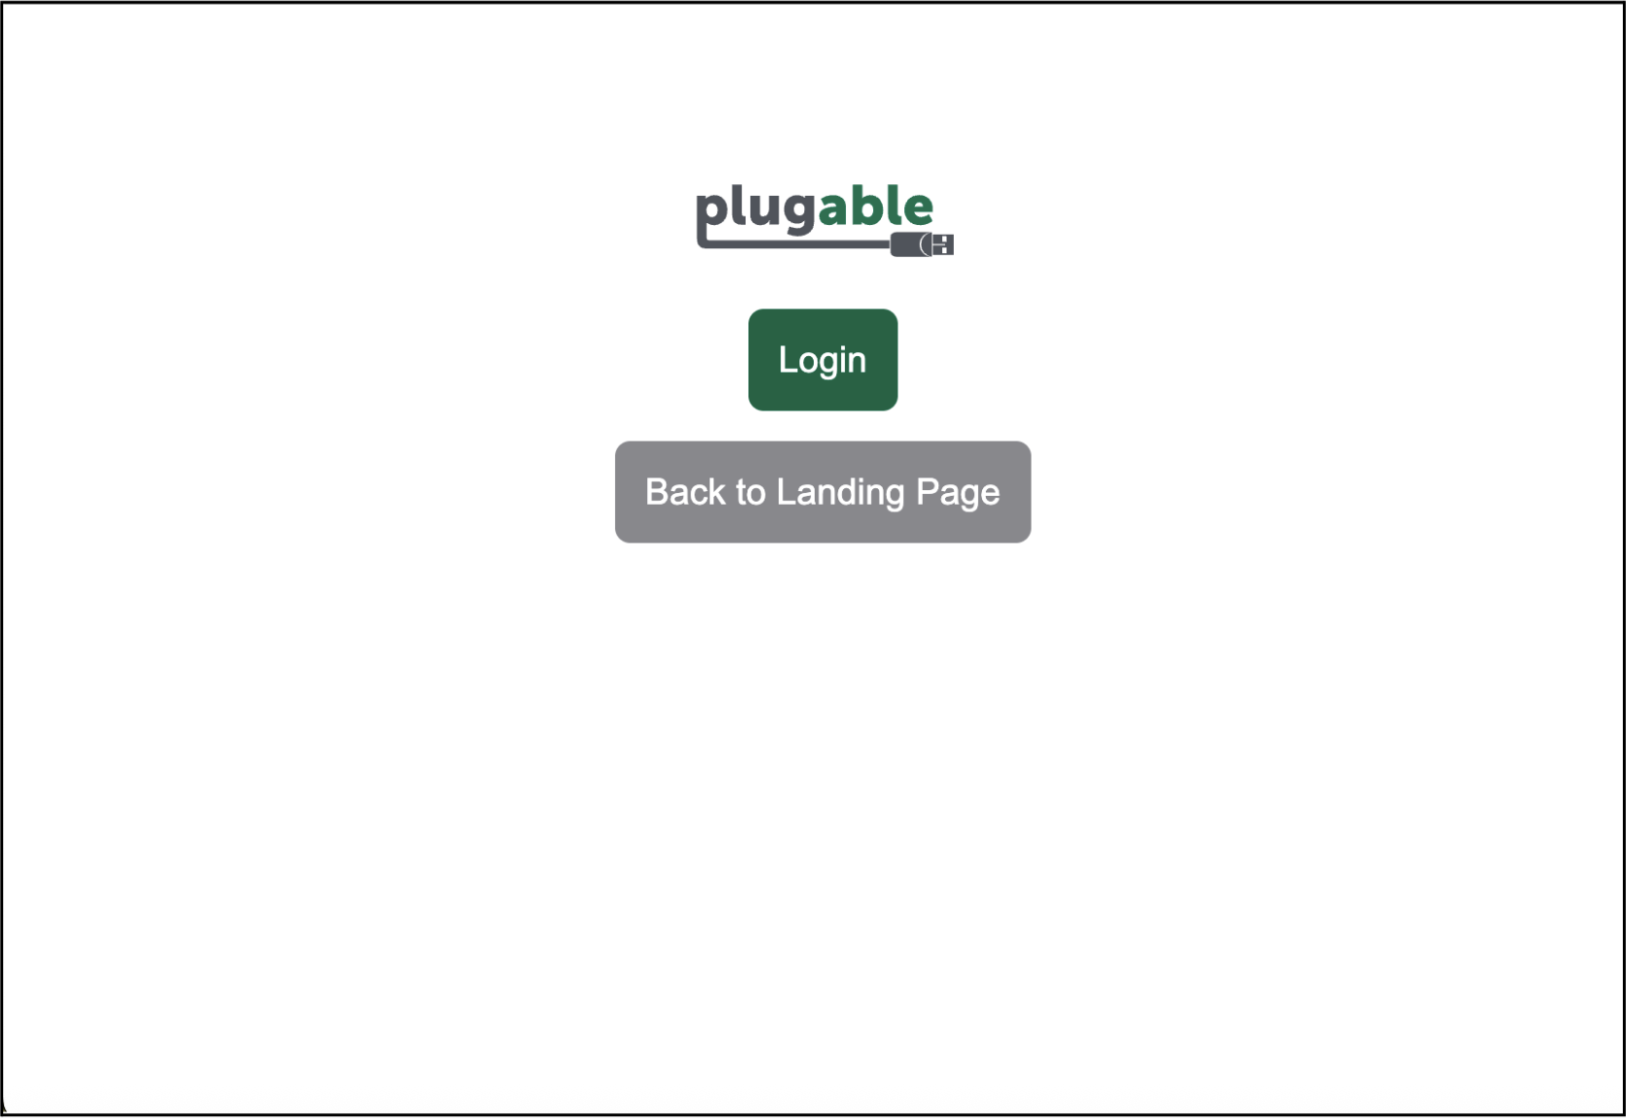
1. Access the DockTag™ administrative login page → https://osd.plugable.com/admin
User Management
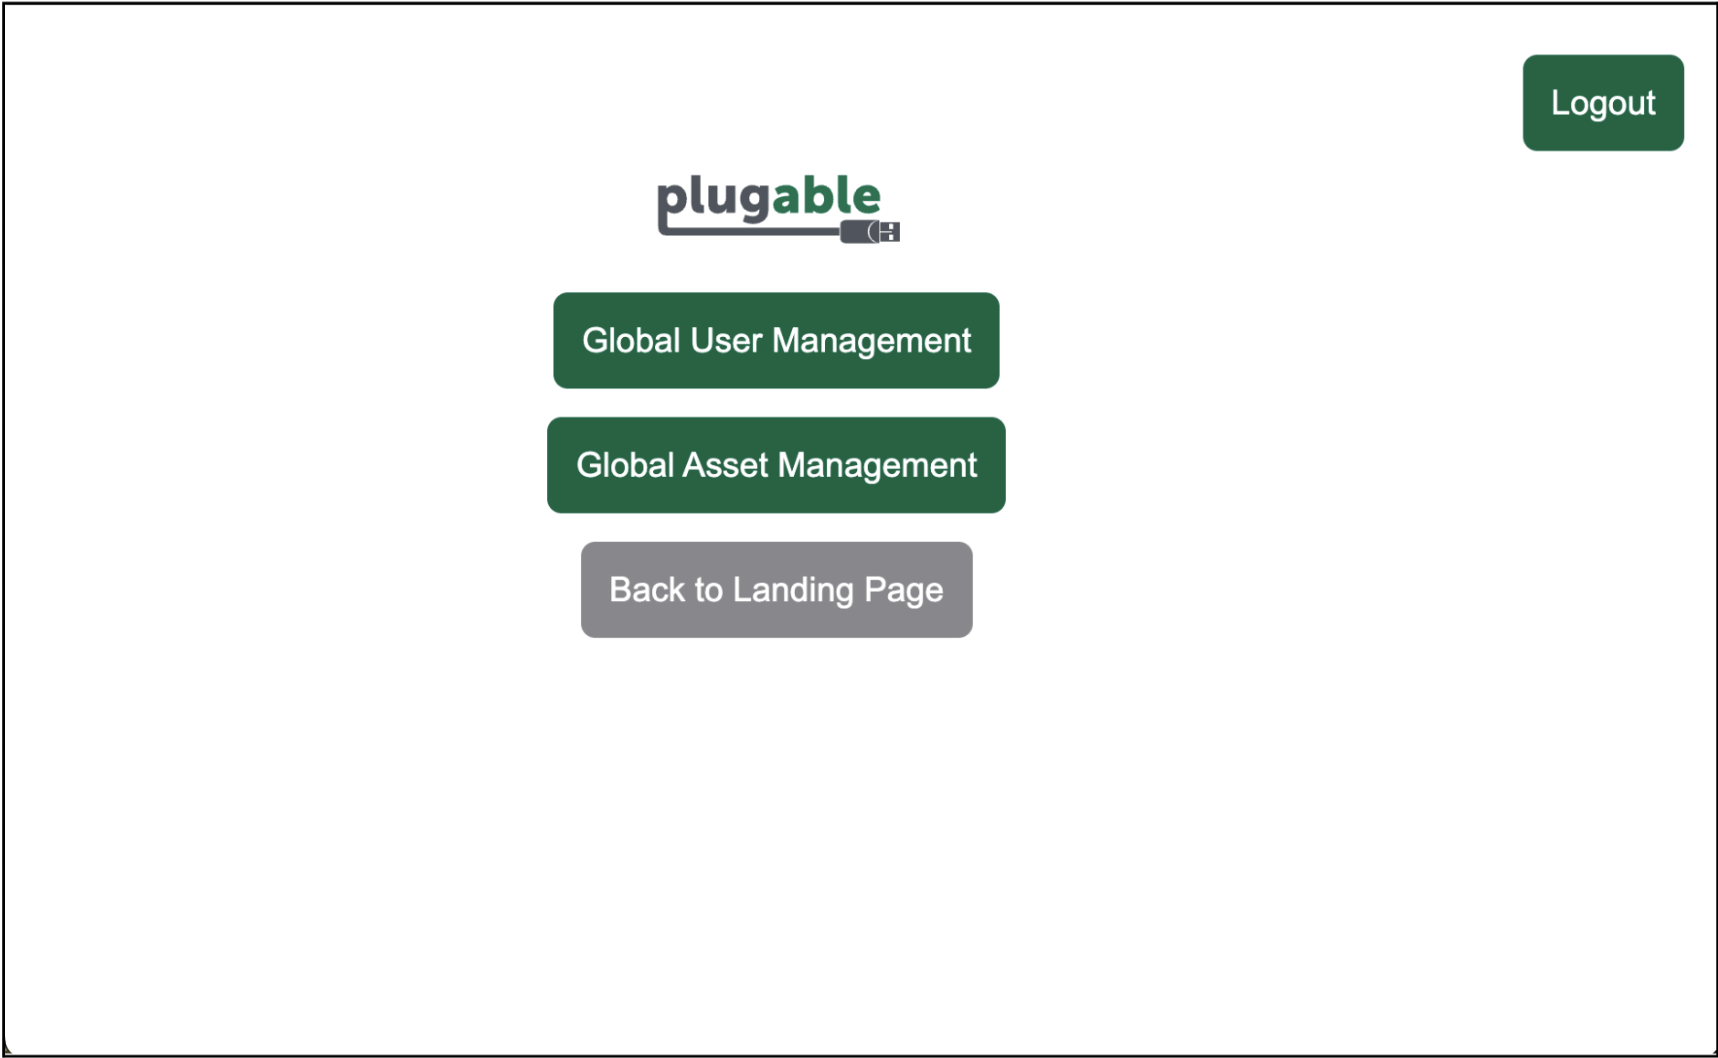
2. Once logged in, a menu will appear with two options, ‘Global Asset Management’ and ‘Global User Management’. Click on the option for ‘Global User Management’.
Viewing User List
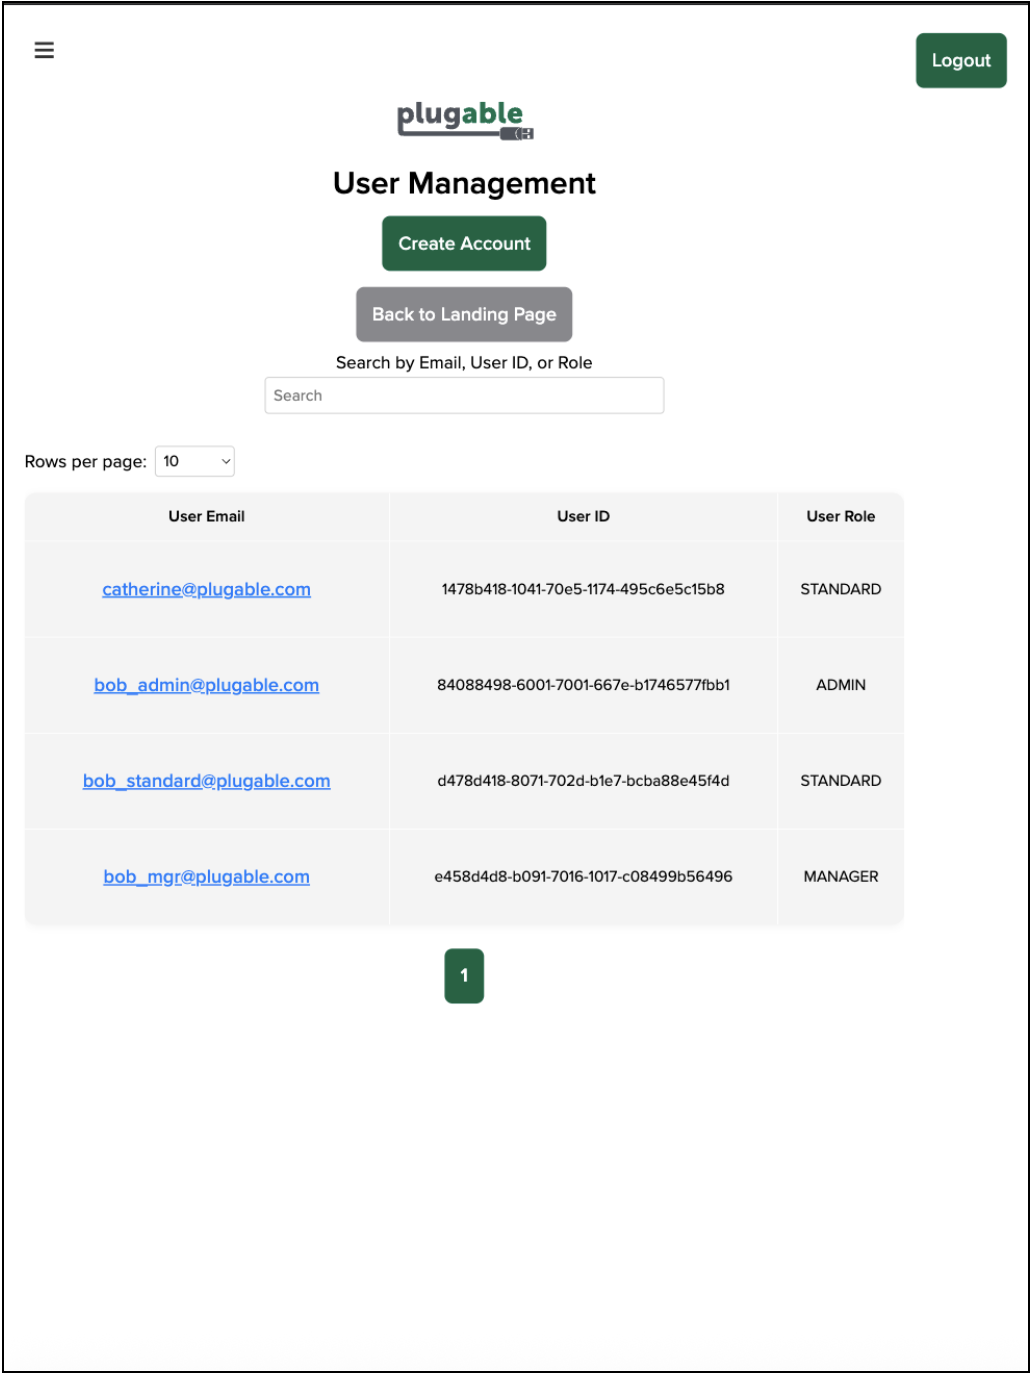
3. A list of users currently registered in the system will be displayed. The list will provide the user’s email address, a unique ‘User ID’, and ‘User Role’, similar to the example below:
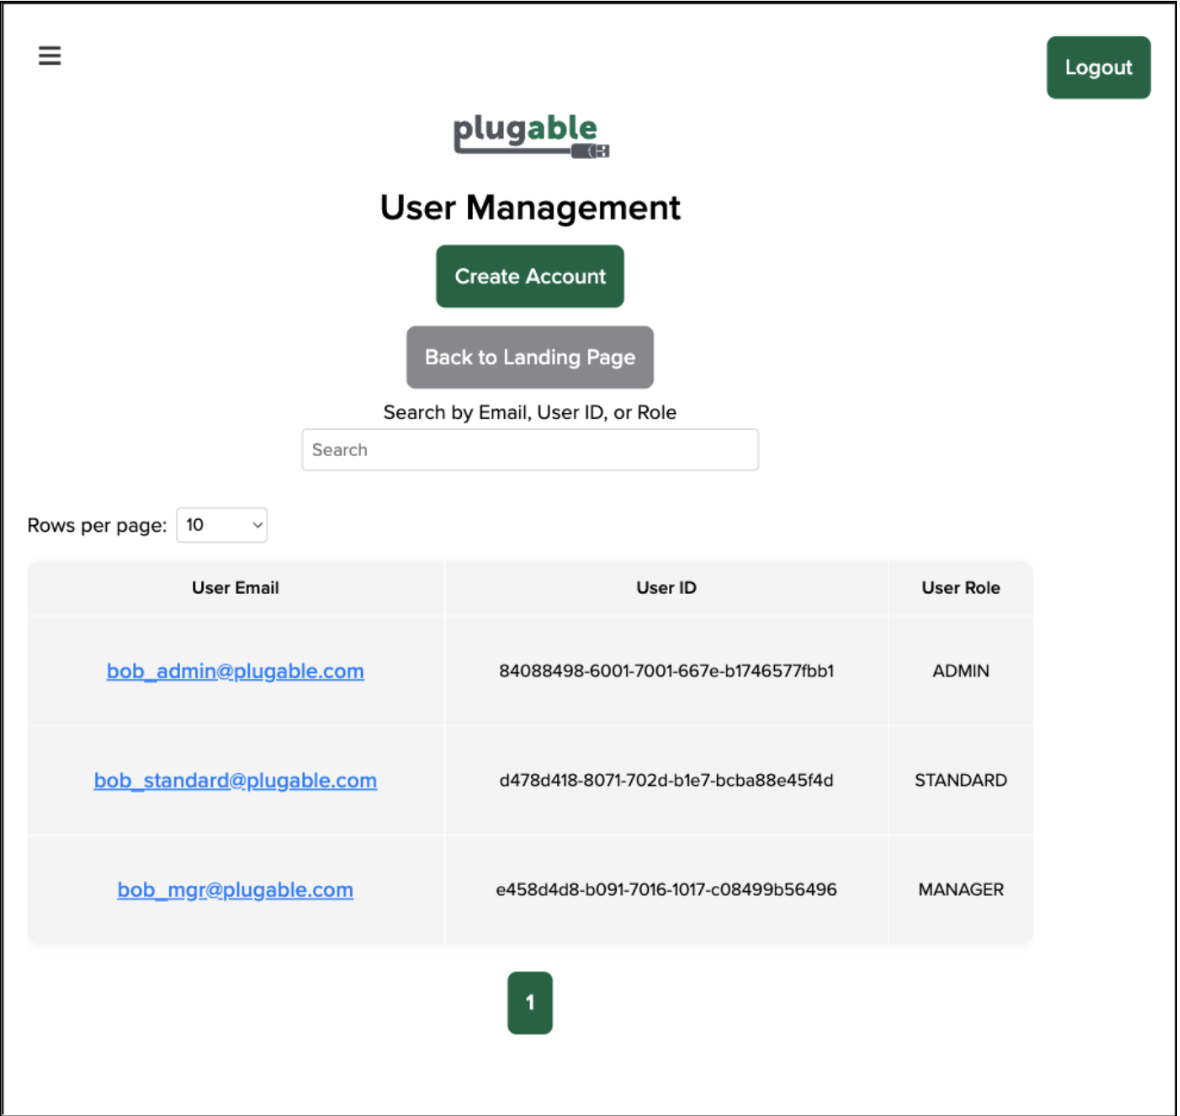
In our example, three users have already been defined, each with different roles assigned. There are three different roles available:
ADMIN - The highest level role, the ‘ADMIN’ user can use all options within the DockTag™ system (including user management)
MANAGER - The mid-tier level role, the ‘MANAGER’ user can perform all operations except user management
STANDARD - The lowest level role, the ‘USER’ can only use the hotdesking, and view asset information
Adding Users
4. Click the ‘Create Account’ button in order to create a new user. Two pieces of information must be provided, the user’s email address and the user’s role. Enter the required information and then click the ‘Sign Up’ button.
** Note - The ‘Organization ID’ is assigned automatically after the DockTag™ subscription is initiated, and cannot be changed. **
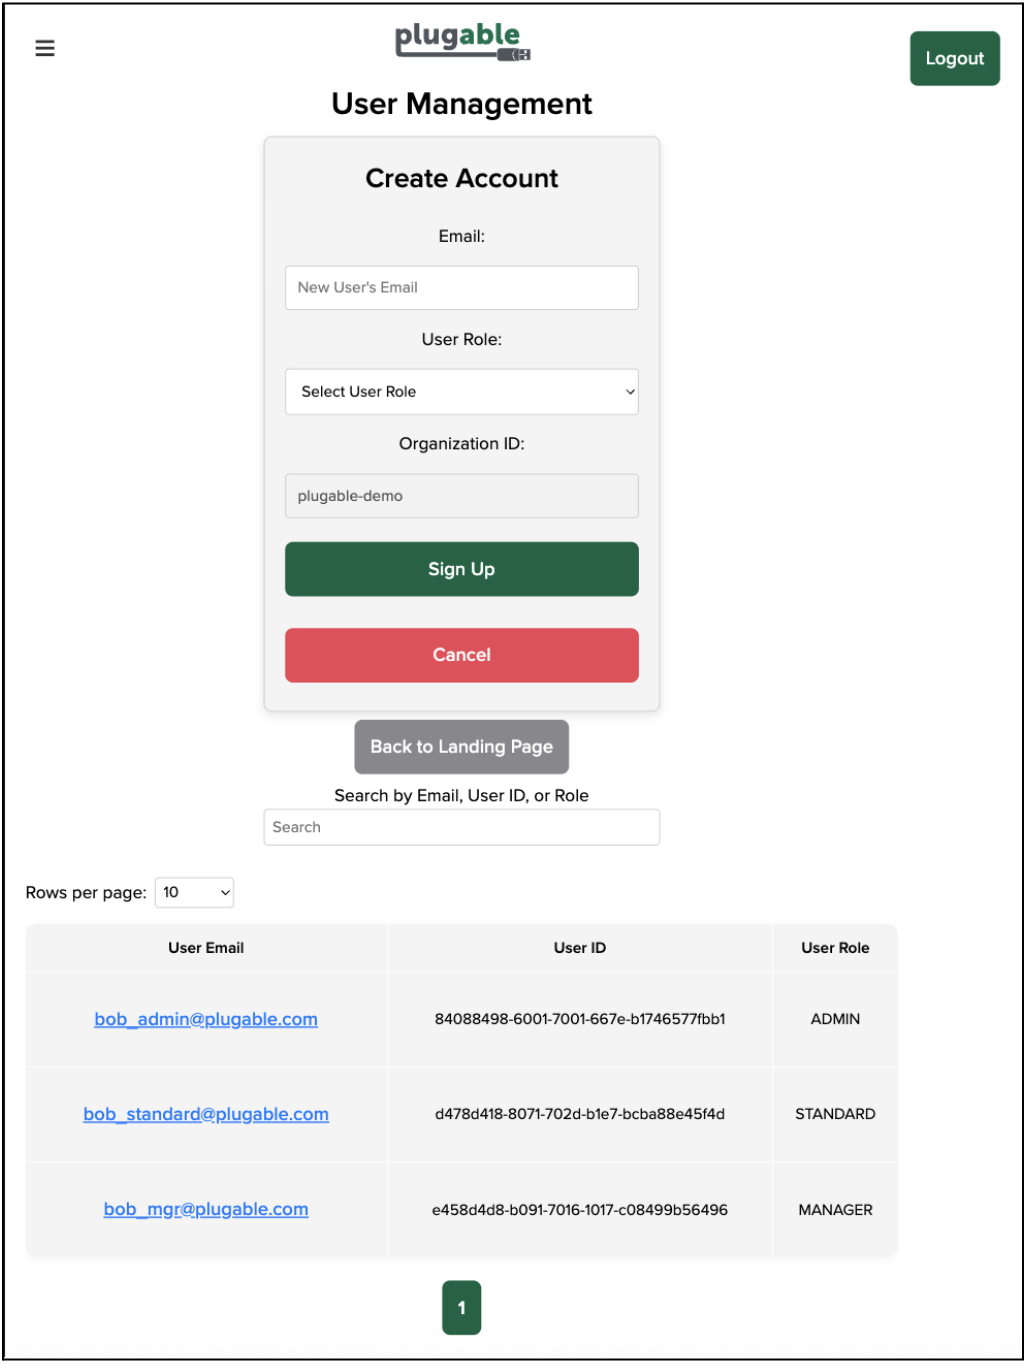
5. Once the new user has been created you will return to the User Management list screen, and the new user will be listed. In this example, we created a new user named ‘Catherine’ with a ‘Standard’ Role.
** Note - when a new user is created, an email will be sent to the user’s email address with a temporary user password. When logging on to the DockTagTM system for the first time the user will be prompted to change their password. **
** Note - when a new user logs on to the DockTagTM system for the first time via their business email on Google SSO, they will become a STANDARD user for the organization defined by their email domain (for example, a user signing on using bob@org1.com will become a STANDARD user for the org1 organization).**
** Note - the number of users displayed on a single page can be controlled by accessing the ‘Rows per page’ dropdown box **
** Note - the user list can be dynamically searched using the search box located at the top of the list by email address, User ID number, or User Role **
Modifying Users
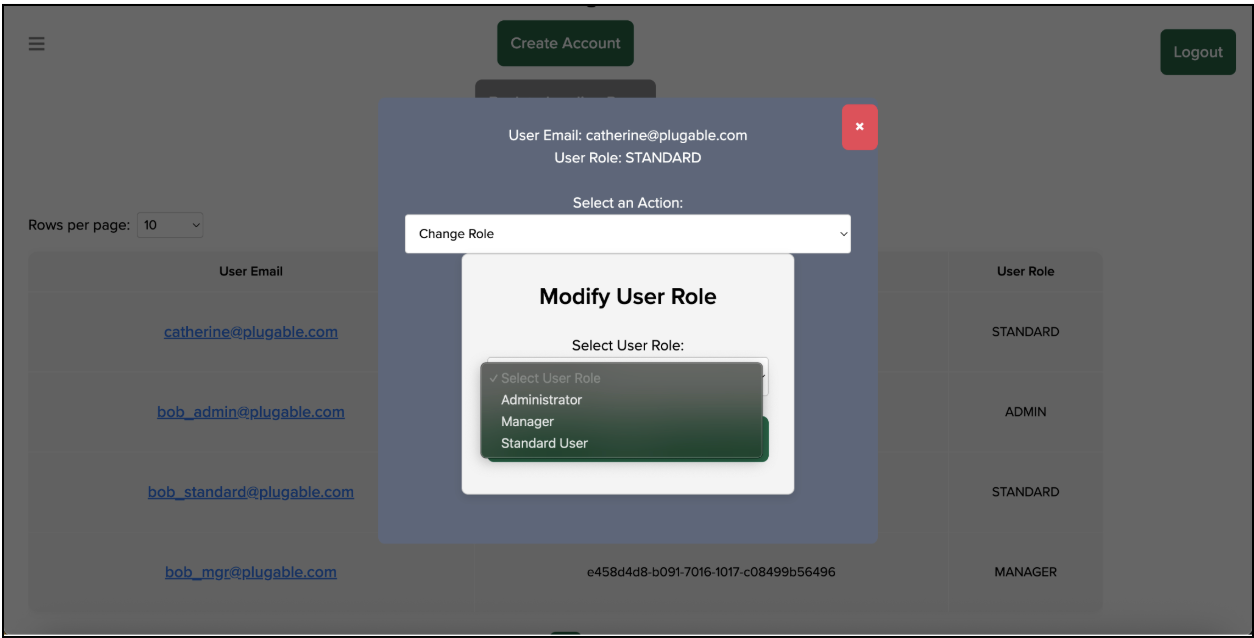
6. A user account can be modified in one of two different ways after having been created. The user’s role can be changed, or the user account can be deleted.
These options can be accessed by clicking on the user’s email address within the list of users.
Changing User Role
Deleting User
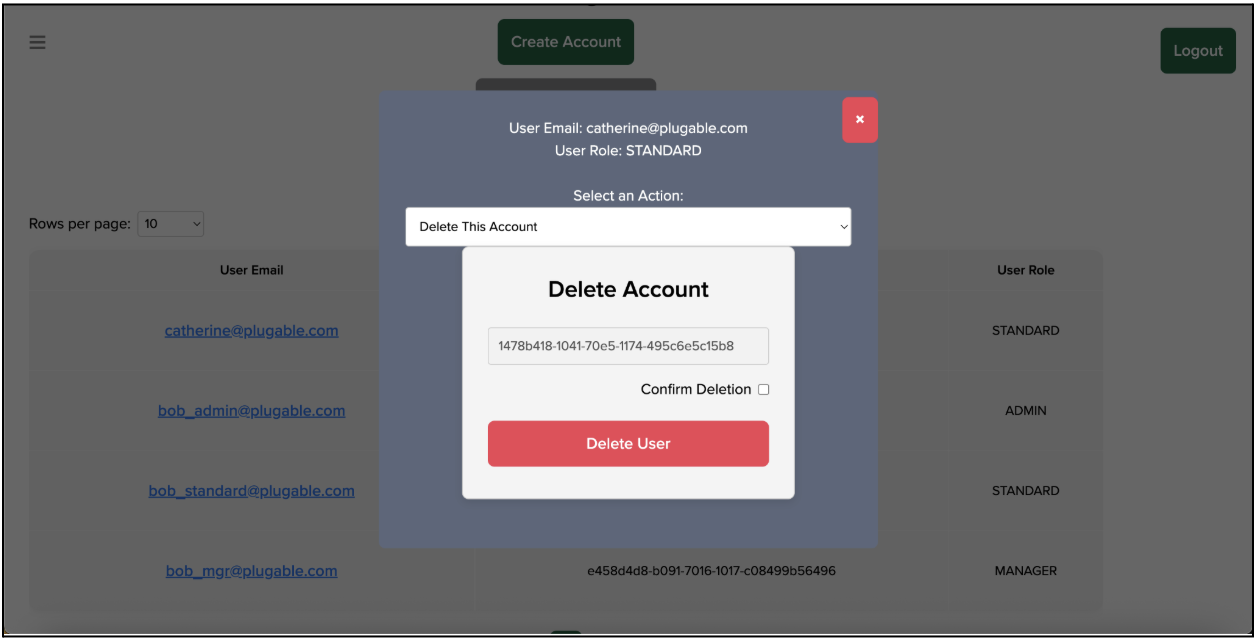
** Note - to delete a user account, a check must be placed in the checkbox located next to the ‘Confirm Deletion’ label **
Asset Administration
After users have been created, DockTag™-enabled assets must be added to the DockTag™ system so that they can be both tracked and utilized for hotdesking. Assets can be added to the DockTag™ system in one of two ways. The first is by manually entering the relevant information for a DockTag™-enabled product via the online portal.
The second is by using a mobile device in order to scan a QR code visible within the DockTag™ ‘Connect Device to Host’ informational display.
Manual Asset Entry
To manually enter assets into the DockTag™ system, please follow these steps:
1. While logged in to the DockTag™ system as an Administrative user, click on the ‘Global Asset Management’ button:

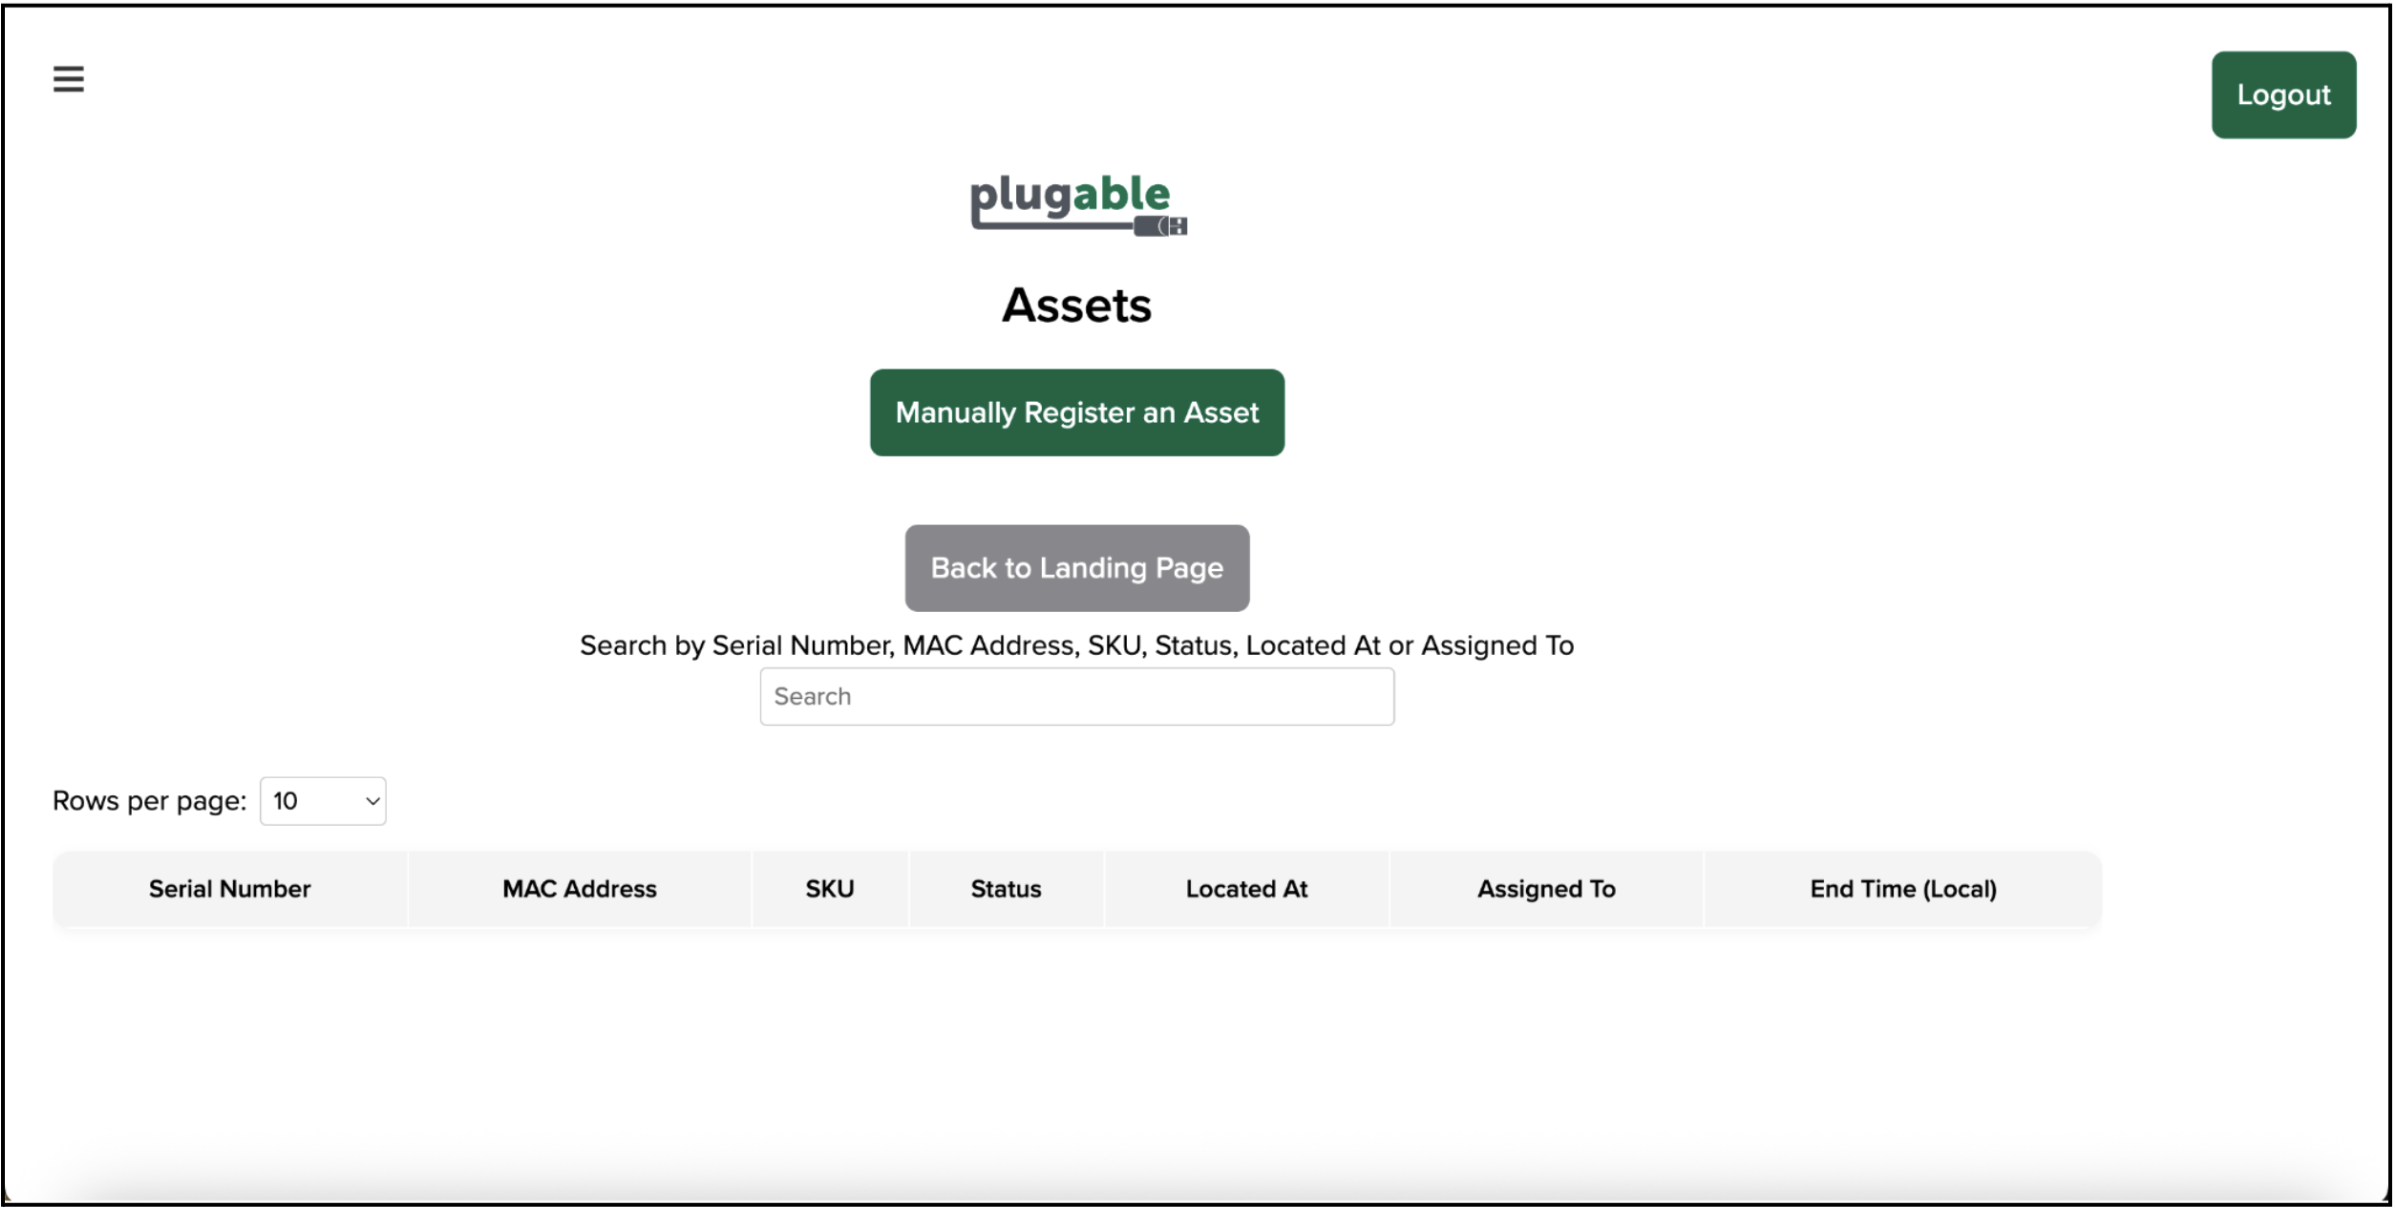
2. By default, the Assets page will be empty. Click on the ‘Manually Register an Asset’ button in order to register an asset:
3. The ‘Manually Register Asset’ page will appear and prompt for several pieces of information, such as the device serial number, MAC address, product SKU (aka model number), device location, and general notes.
** Please note - the ‘Organization ID’ is automatically determined and cannot be changed. **
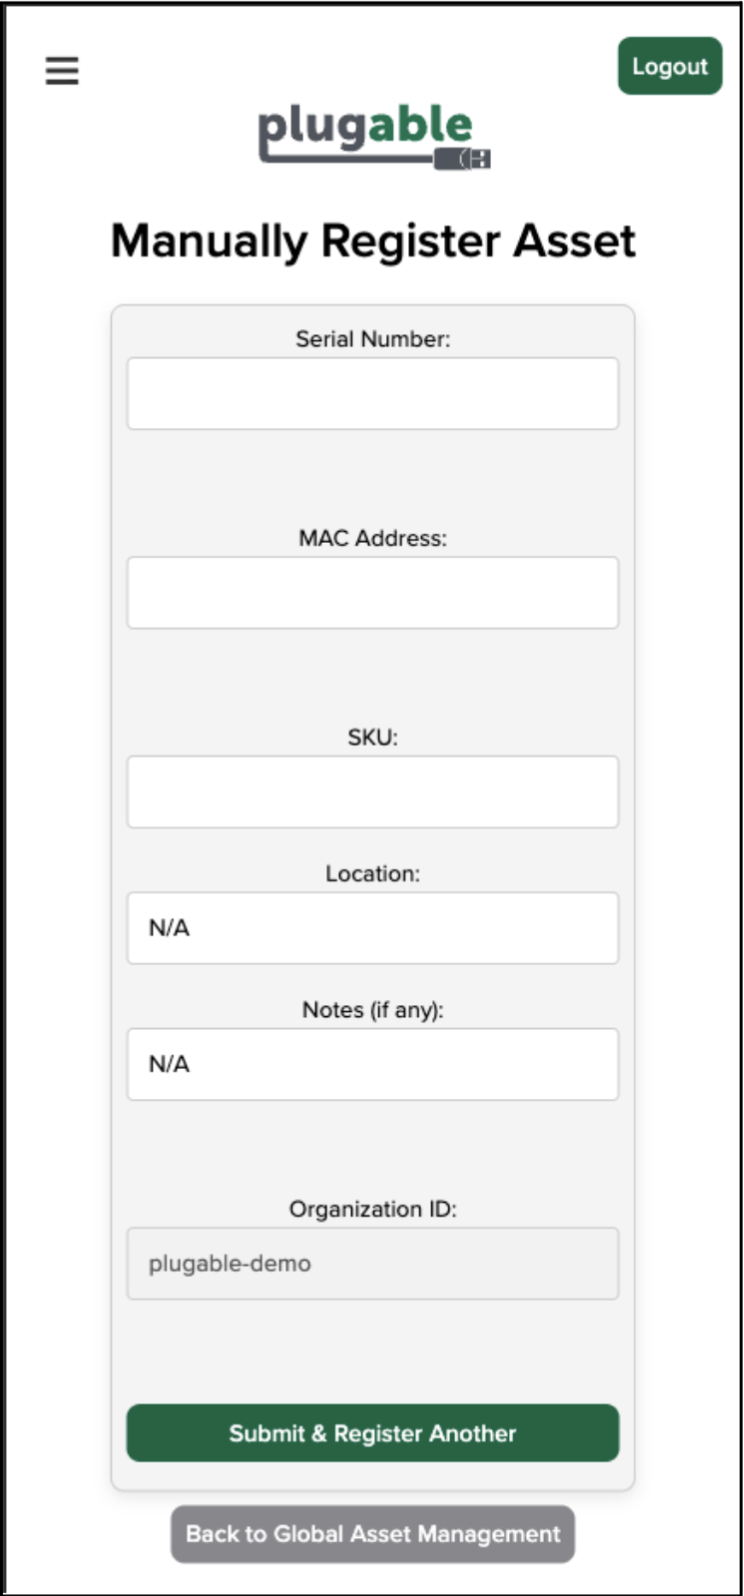
4. Manually enter the information requested and click the ‘Submit & Register Another’ button in order to add the asset.
In this example, we are adding information for a Plugable UD-7400PD docking station:
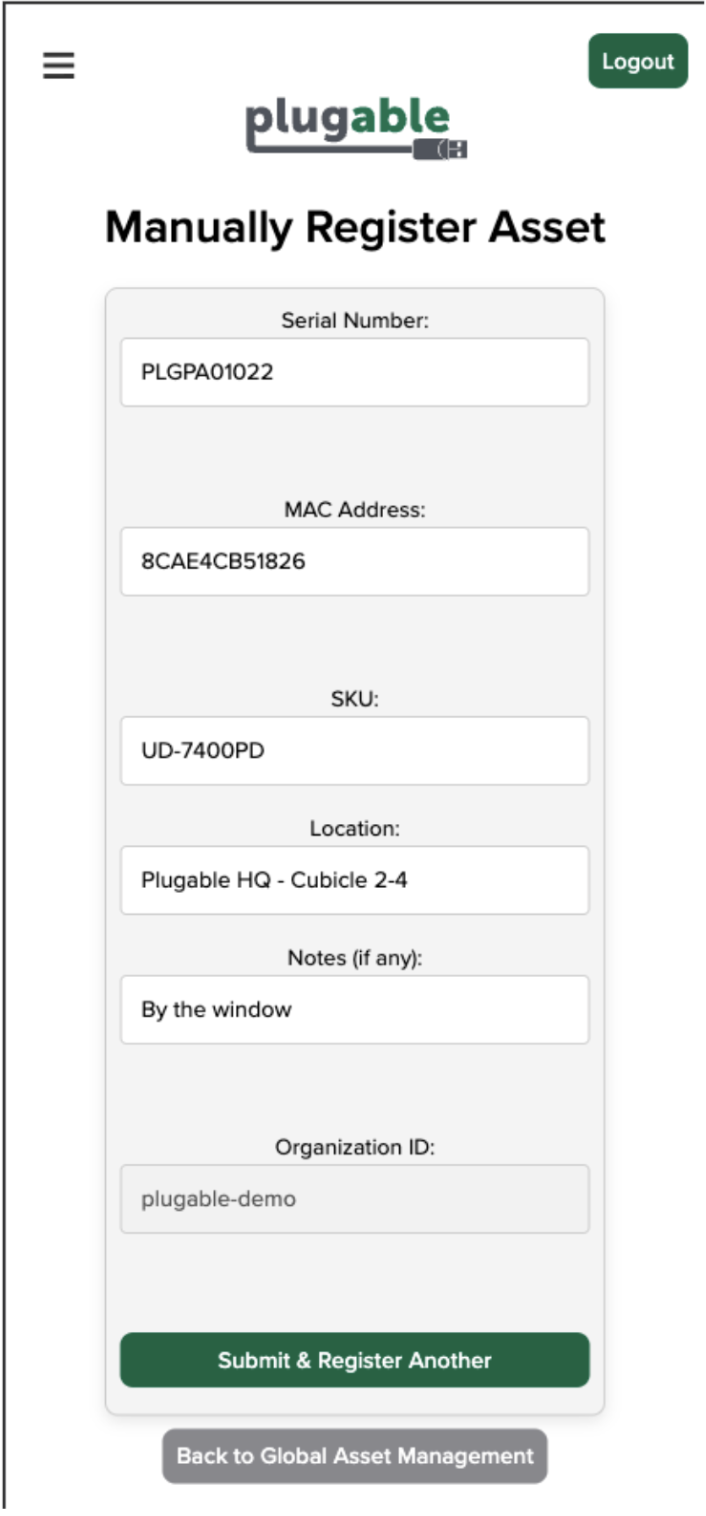
For reference, all DockTag™-enabled products will have the unit serial number and network hardware address printed on the exterior of the product packaging. All DockTag™-enabled products will also have the unit serial number and network hardware address printed directly on the product itself.
This information allows for a DockTag™-enabled product to be added to the DockTag™ system without even having to open the product box. Should the product become separated from its packaging, the information will still be readily available.
** Note - the printed serial number information and network hardware address information will also be represented on both the product box and product itself with a standard one-dimensional barcode. This means that one could choose to use an inexpensive USB barcode scanner in order to rapidly enter asset information into the DockTag™ system during large-scale deployments **
5. By default, clicking the ‘Submit & Register Another’ button does exactly what the name implies. It registers the asset, and then resets the fields so that another asset can be added in succession.
If done adding assets, simply click on the ‘Back to Global Asset Management’ button in order to return to the list of registered assets:
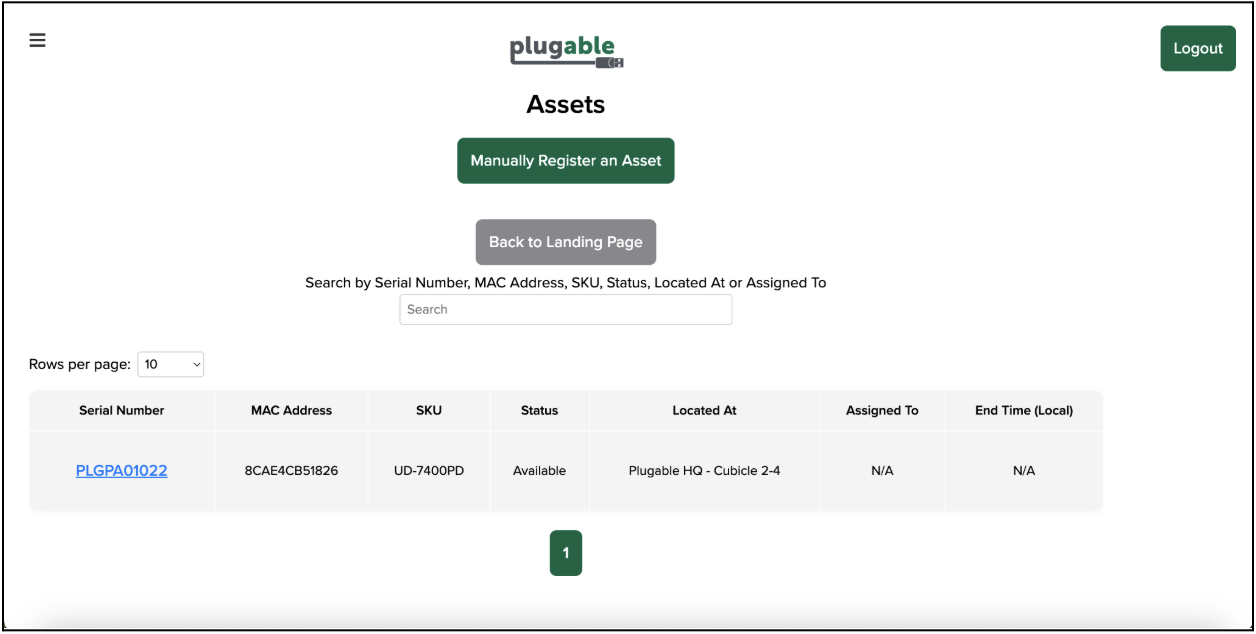
** Note - the asset list can be dynamically searched using the search box located at the top of the list by serial number, MAC address, SKU, Status, Located At or Assigned to fields **
Mobile Asset Entry
As an alternative to manual asset entry, Administrators can add unregistered assets to the DockTag™ system using a mobile device to scan a QR code visible within the DockTag™ ‘Connect Device to Host’ informational display.
** Note - the following example screenshots are taken from an iPad for legibility **
1. Access the DockTag™ administrative login page on your mobile device → https://osd.plugable.com/admin and log in with Admin credentials.
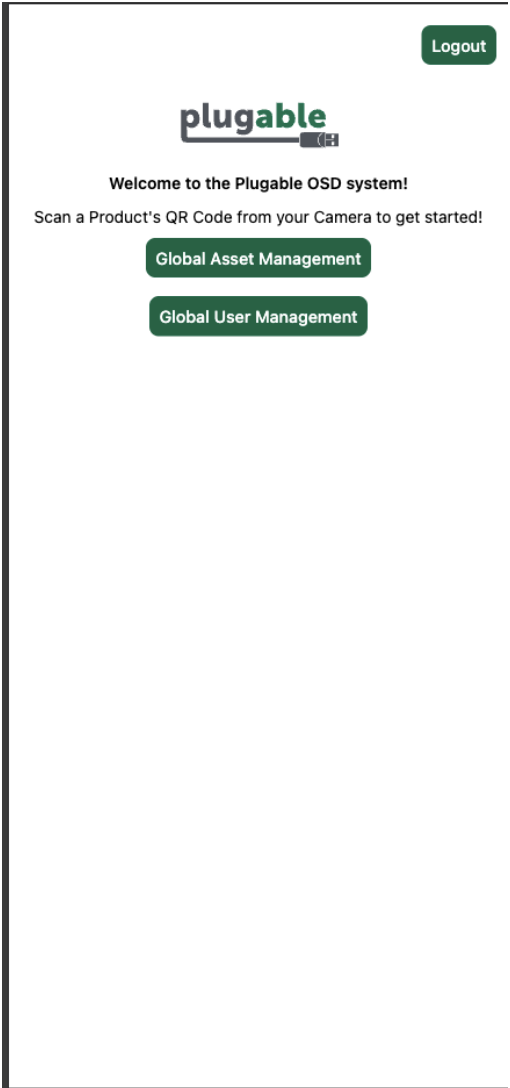
2. Power on the DockTagTM-enabled docking station in order to access the on-screen informational displays.
3. Using the mobile device referenced in step #1, scan the QR code displayed on the ‘Connect Device to Host’ screen.
The DockTagTM system will automatically redirect you to a new page that contains the product name, product model number (aka Stock Keeping Unit or SKU), the device’s serial number, and the device’s network hardware address.
The DockTag system will also present an option to register the device within the DockTagTM system.
Click on the ‘Register Product’ button to continue.
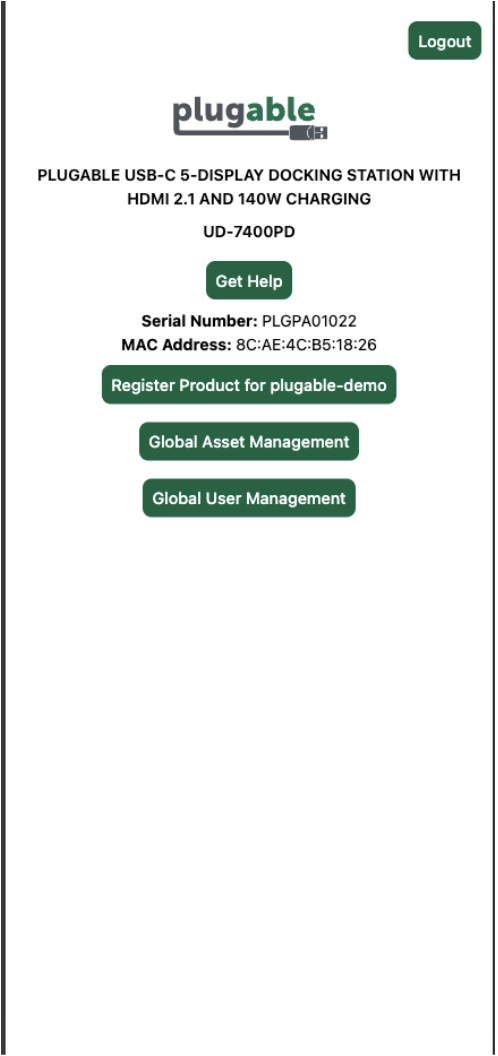
4. As a result of clicking the ‘Register Product’ button, a new ‘Register Asset’ page will appear.
The Serial Number, MAC Address and SKU fields will be prepopulated using information provided within the device’s unique QR code:
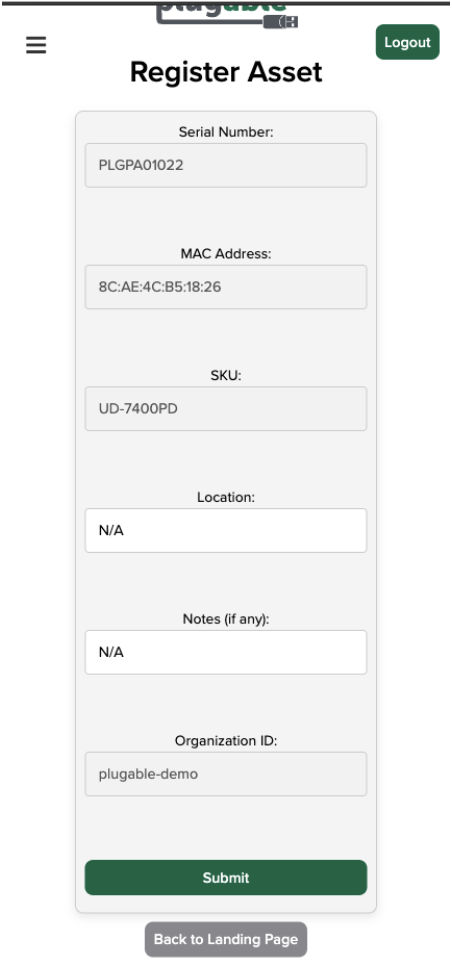
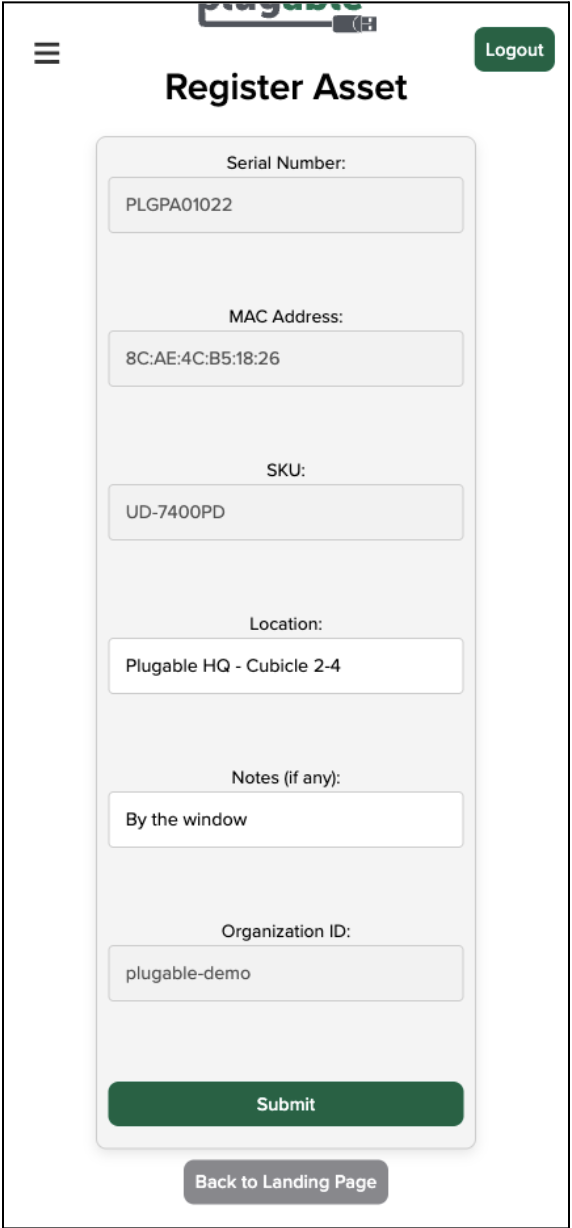
5. If desired, information about the device’s physical location or general notes about the asset can be added. Once complete, click the ‘Submit’ button to register the device:
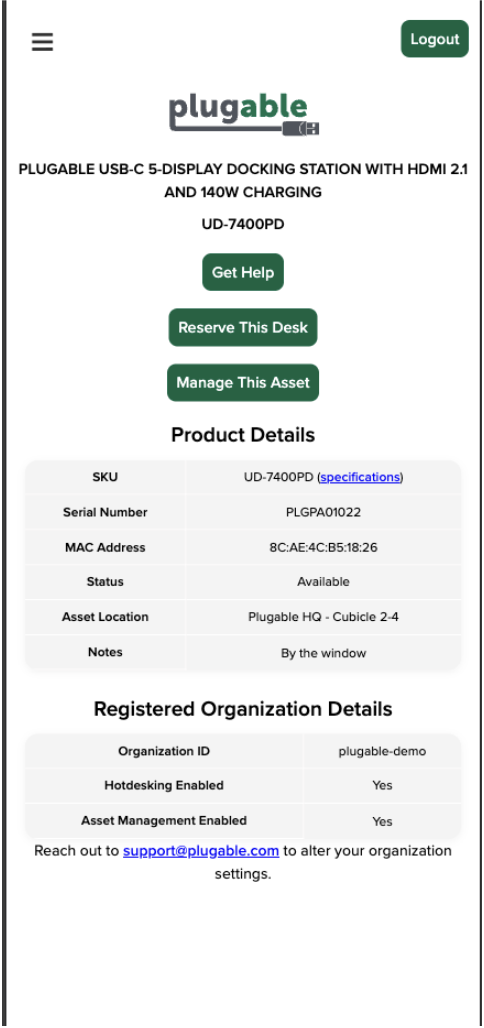
6. Once the asset has been registered, the page will refresh and display all of the details about the specific asset. Options will also be presented that will allow the asset to be reserved for hotdesking use, or managing the asset further.
Asset Status
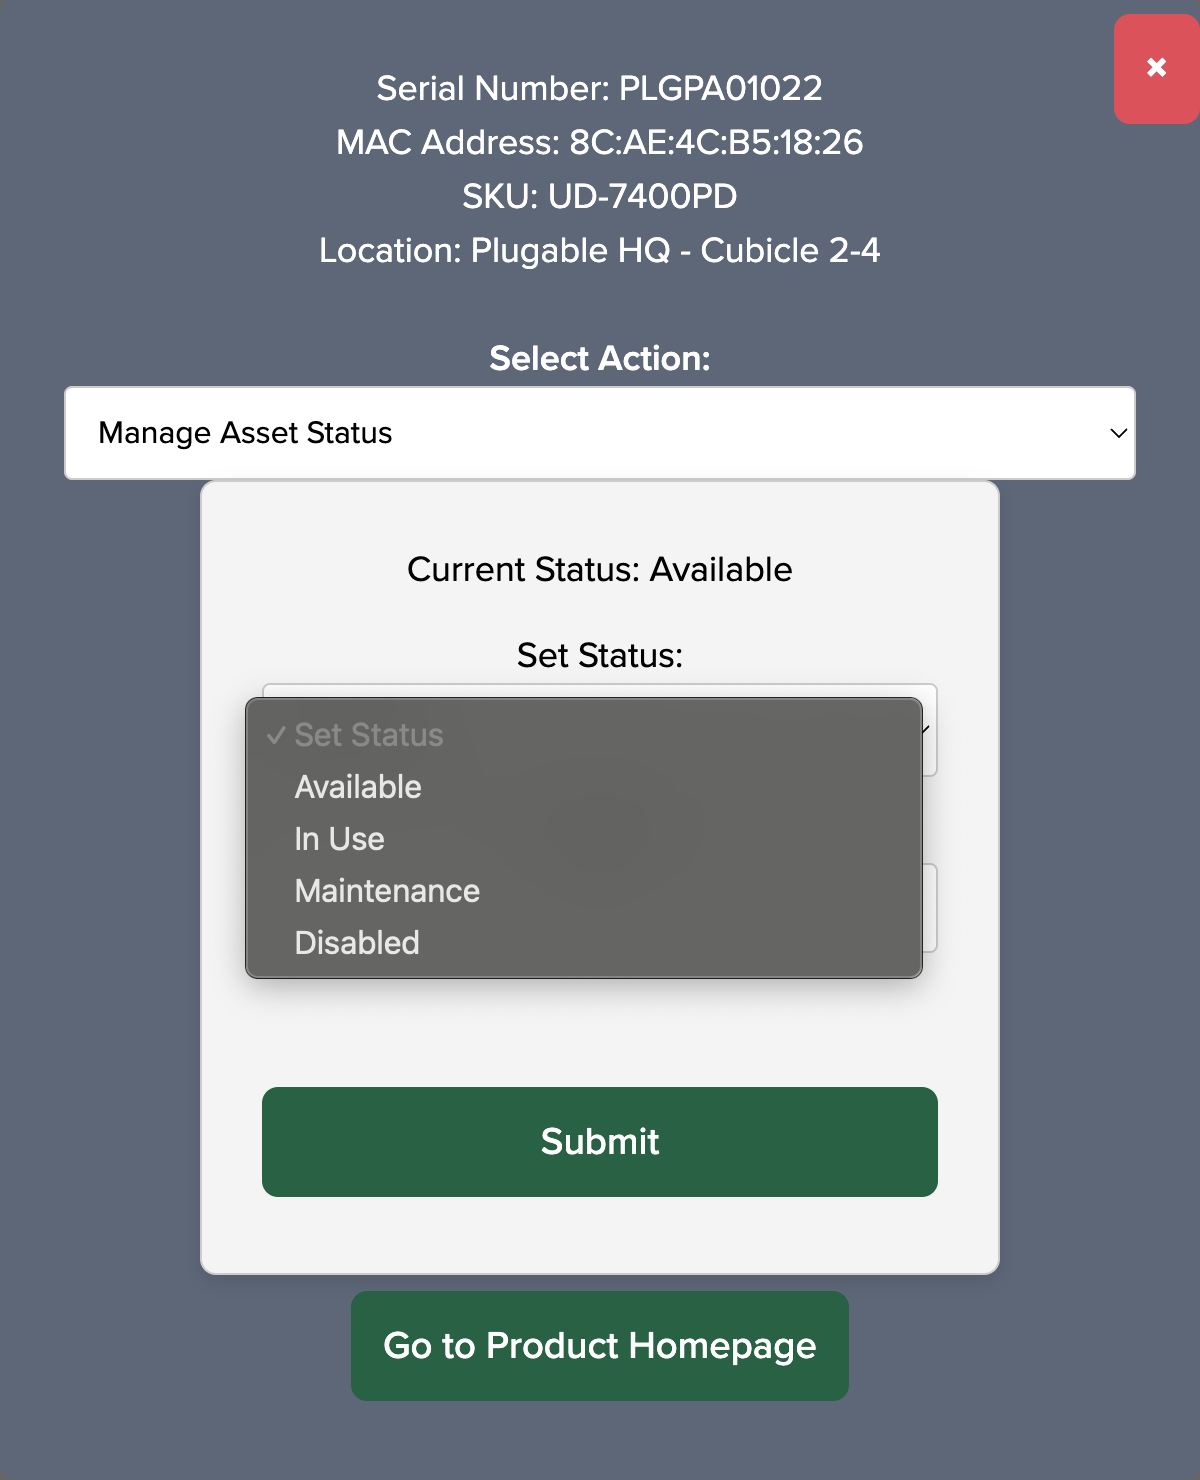
Notice that in our previous examples, the newly added asset is assigned a ‘Status’ of ‘Available’ by default. The status of an asset determines if the asset is available for hotdesking use, and status can be changed by clicking on the ‘Serial Number’ link for a specific asset and selecting the ‘Manage Asset Status’ option from the dropdown menu.
The choices for an asset’s status are:
Available - The device is available to hotdesk
In Use - The device is presently in use via a hotdesk reservation
Maintenance - The device requires or is undergoing maintenance, hotdesking not available
Disabled - The device cannot be used for hotdesking (for other non-maintenance reasons)
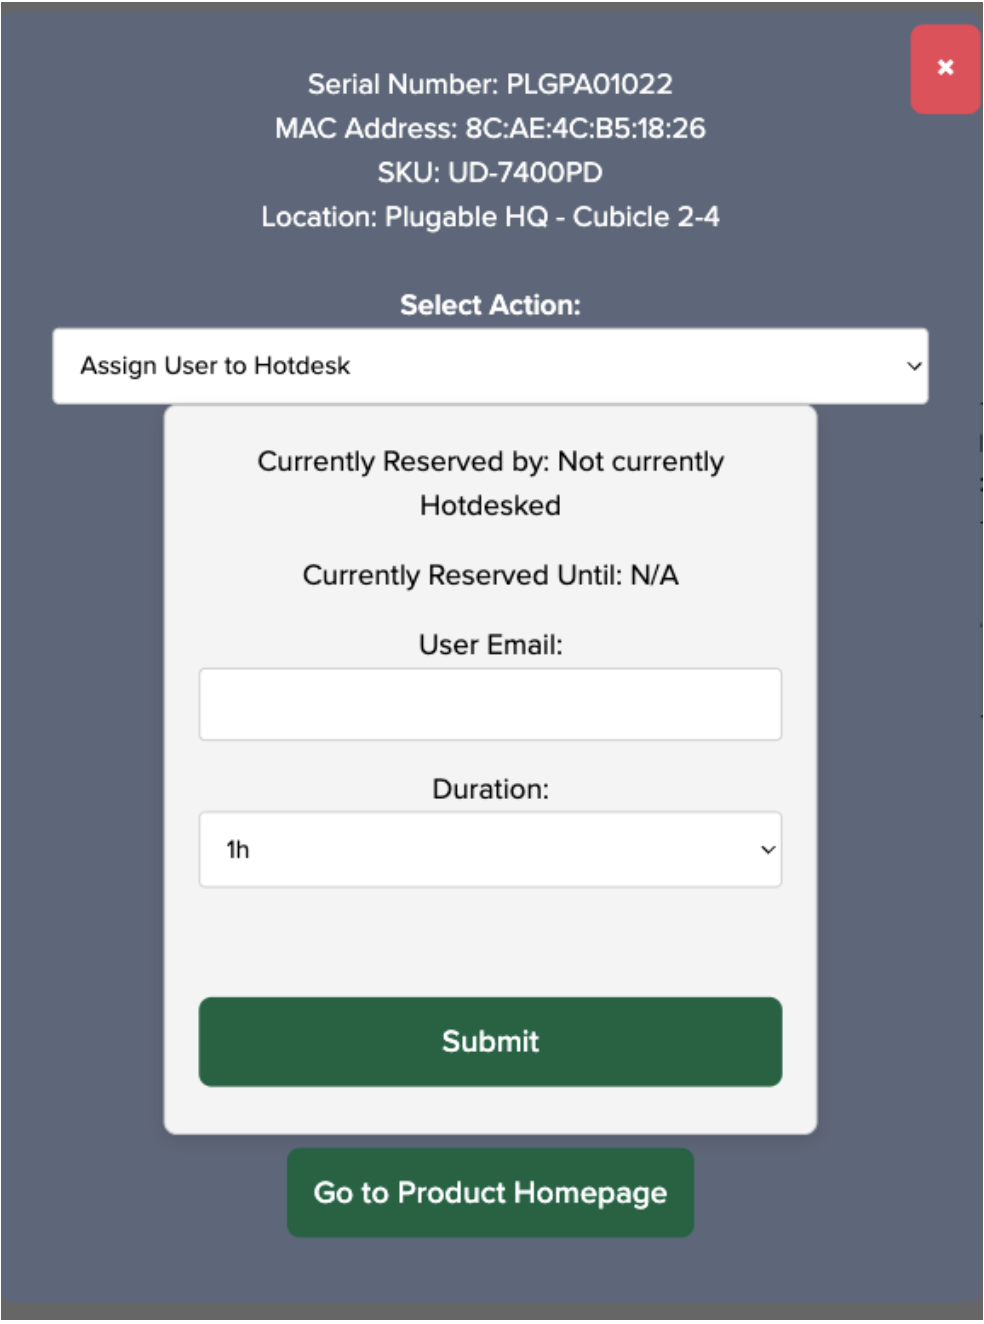
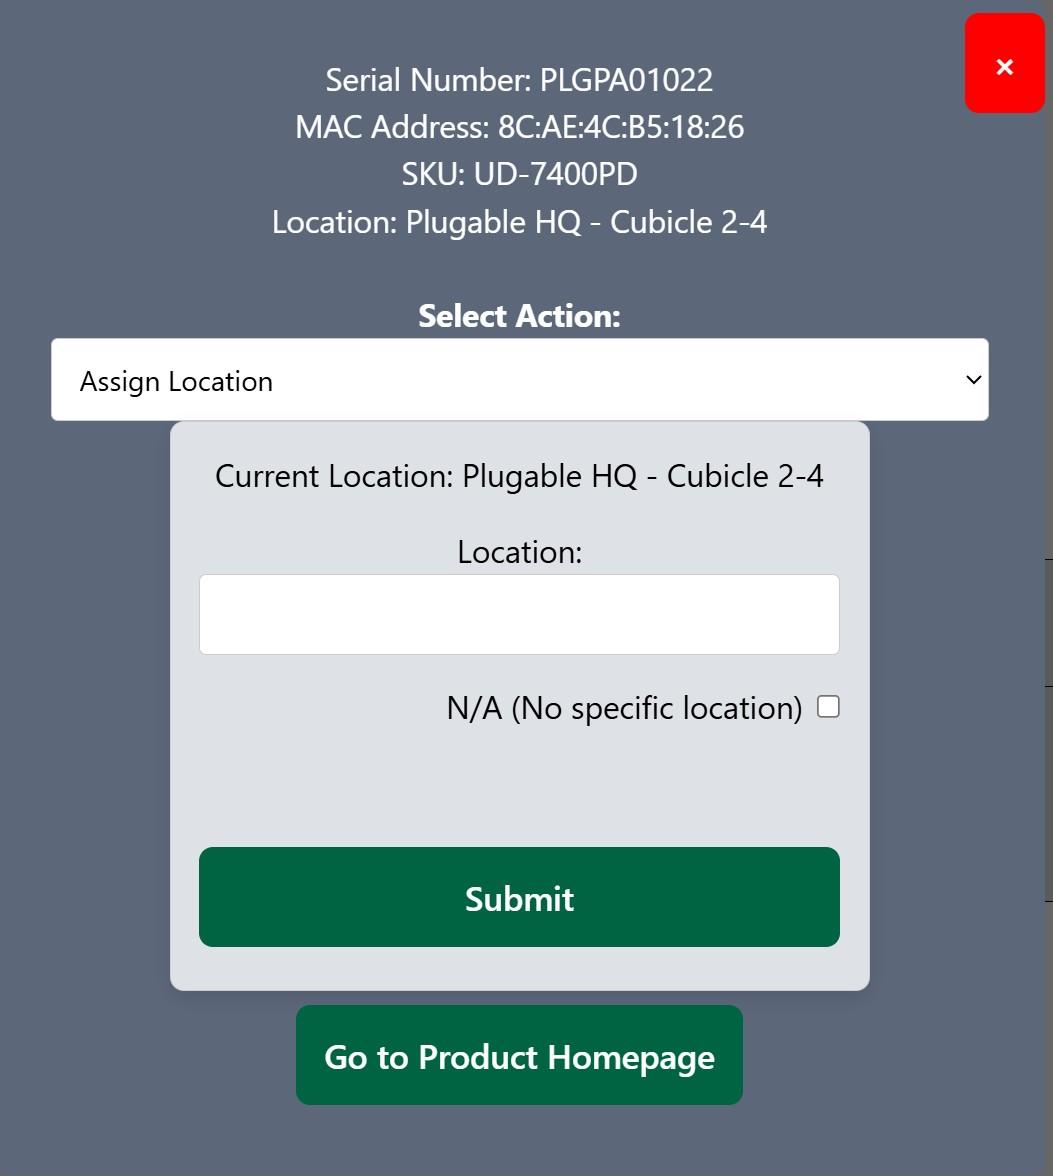
In addition to the ‘Status’ of an asset, three other parameters are available to change:
Assign User to Hotdesk - Manually assign a specific user to hotdesk at this asset for a specific amount of time
Assign Location - If not already assigned, assign a location to an asset. If already assigned, change the location as desired. If necessary, the location can be removed entirely by placing a checkmark in the ‘N/A (No specific location)’ box
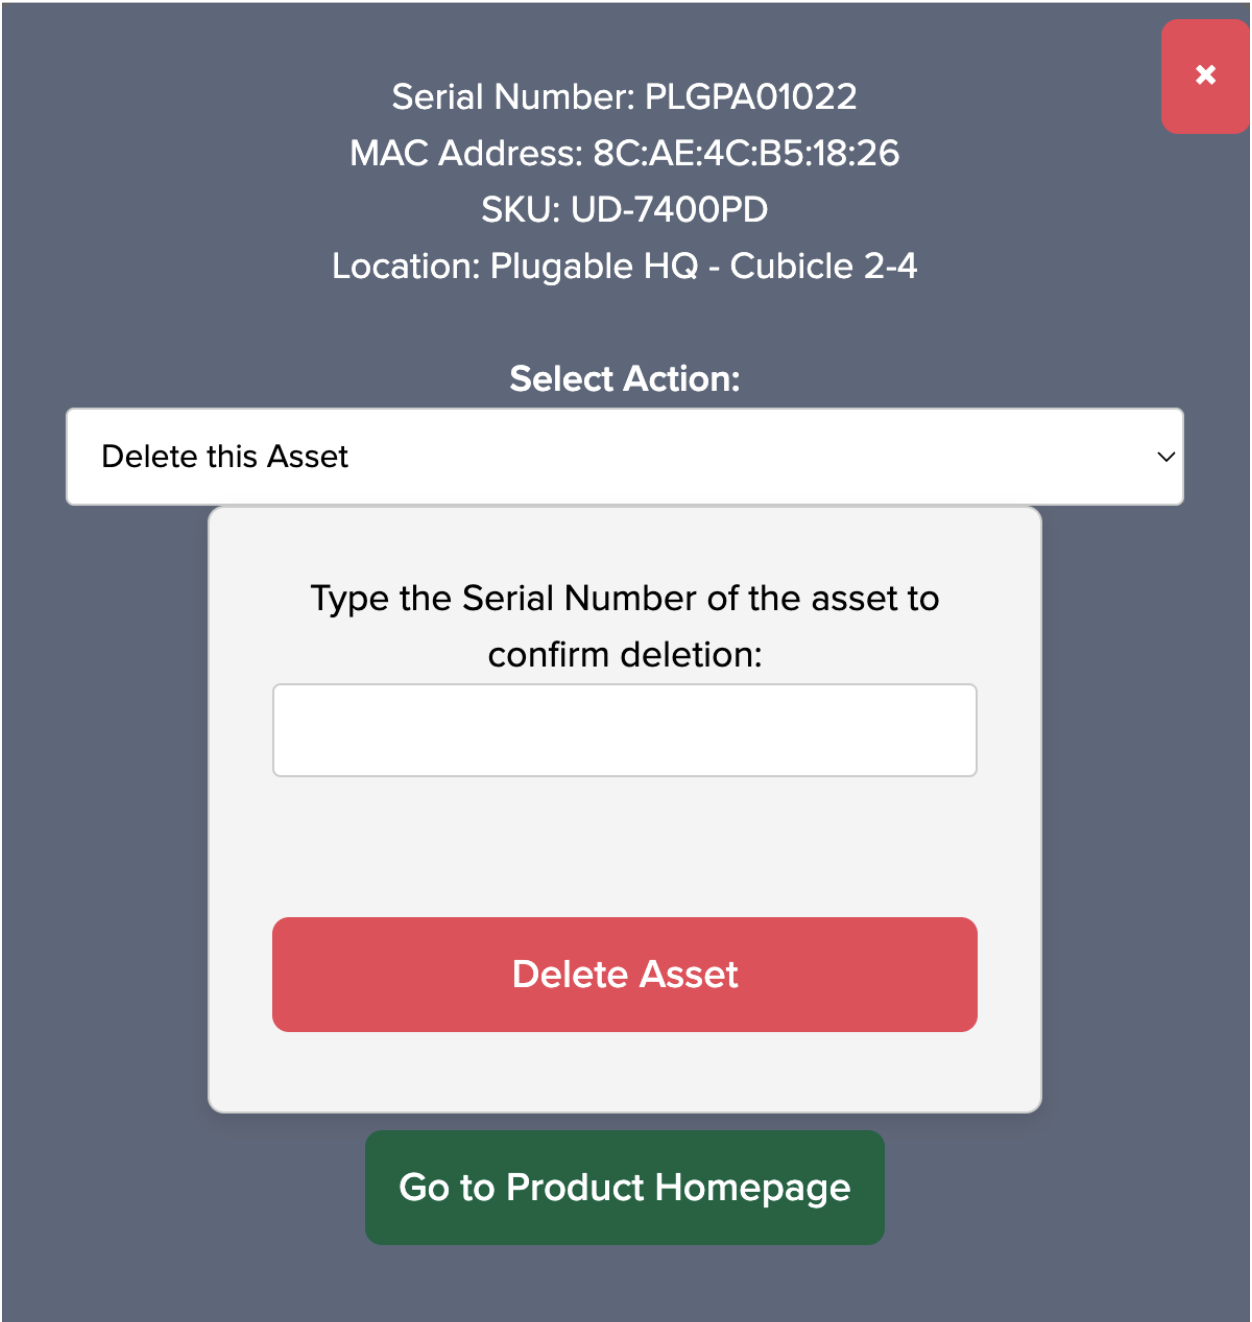
Delete this Asset - Delete an existing asset. The system will prompt you to enter the serial number of the existing asset as a confirmation mechanism prior to deletion.
