
**This is a legacy article. Please check the product pages for our USB-EASY-TRAN, and USB3-TRAN transfer cables for up to date information.
Plugable Windows Transfer Cables transfer files between computers using the Bravura Easy Computer Sync software. Your purchase of a cable includes a full license to this software, which manages the connection and transfer process and includes all needed drivers.
A Product Key is required to use the Bravura Easy Computer Sync software and is included with the Windows Transfer Cable (a $19.95 retail value). This Product Key is a 16-character alphanumeric code located on a tag attached to the cable. The key can be used for any number of computers.
If you purchased your Windows Transfer Cable before December 2017:
Windows Transfer Cables purchased before December 2017 do not have the Product Key attached to the cable. Customers who purchased their cable before December 2017 should have received an email containing their Product Key. If you are unable to locate this key and purchased your Windows Transfer Cable before December 2017, please contact support@plugable.com for assistance.
There are three common scenarios for using a Windows Transfer Cable:
- Upgrading to a new computer
- Transferring files back and forth between two computers on an ongoing basis (synchronizing)
- One-time transfer of a few files or folders
The Bravura Easy Sync software is used for each scenario. Instructions for each scenario are given below after the install instructions.
Installation Instructions:
1. The first step, is to download and install the Easy Computer Sync software onto both computers. The download also includes and installs the most recent drivers for your Windows Transfer Cable.
2. After clicking the link above, you will typically see a dialog box like this:
3. Click Run. The Easy Computer Sync installer will download to your computer. After the download finishes, you will see another dialog box like this:
4. Again, click on Run to run the Easy Computer Sync installer. Now the installer will appear.
Typically, in each page of the installer, you should accept the default options and click Next, or the option similar to it. This installs the Easy Computer Sync on your computer, and starts it after the installer finishes.
During installation, you will be prompted for a Product Key for the Bravura software. This Product Key is a 16-character alphanumeric code located on a tag attached to the cable.
Note: Windows Transfer Cables purchased before December 2017 do not have the Product Key attached to the cable. Customers who purchased their cable before December 2017 should have received an email containing their Product Key. If you are unable to locate this key and purchased your Windows Transfer Cable before December 2017, please contact support@plugable.com with your Amazon order number.
Starting Easy Computer Sync
Once installed, there are three ways to start the Easy Computer Sync software:
- Double-click its icon on your desktop.
- In Windows XP, Vista, or Windows 7, click on Start Menu > All Programs > Easy Computer Sync, and select “Easy Computer Sync,” or in the Windows 8, 8.1, and 10 Start menu, just type “Easy Computer Sync,” and click on it in the search results.
- Plug the Windows Transfer Cable into a USB port on your computer and select it from Autoplay menu if it appears:
Upgrading to a New Computer
1. Follow the instructions above to install the software on both the old computer and the new computer.
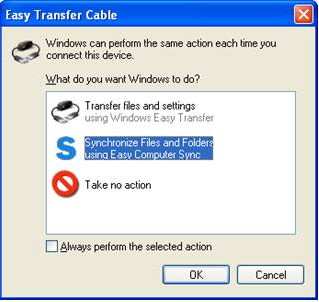
2. Plug the cable into a USB port on both computers. On Windows 8 and earlier computers, you may be prompted to start another program called Windows Easy Transfer in a window like the one below. Do not start Windows Easy Transfer. Instead, start the Easy Computer Sync software you just installed.
(If you don’t see this window when you plug in the cable, start Easy Computer Sync according to the instructions above. If a window asks you to allow the program to make changes to your computer, click Yes.)
3. Click Next on both computers until you reach a window that says “Waiting for connection.” When both computers are ready, this will change to “Connection Detected” and a new window will be displayed asking you to Select how you want to transfer data. Select, Transfer Data to New Computer. If the software is stuck on “Waiting for Connection” for more than a short time, please temporarily disable any antivirus and firewall software on your computer and try again.
4. You will be asked if this is your old or new computer. From your old computer, select This is my old computer. A window will appear asking you to select items to be transferred.
5. On the old computer, select the folders that contain the data you want to transfer to your new computer. You do not need to select anything on the new computer. Only the most commonly used folders are included by default. You can add more folders by clicking the Add Folder button. If your computer has a second drive or you want to customize your transfer beyond the default folders, you might find this blog post useful.
- Note: The Public Data option will transfer all items in your Shared/Public My Documents\Pictures\Music\Videos folders. Un-check this selection if you do not wish to transfer data from your Shared/Public folders.
- Tip: it is strongly recommended that you do not simply put a check mark in the “My Computer” selection, or the entire “C:” drive box below it. This will transfer a huge amount of unnecessary information to the new PC, wasting hard drive space and substantially increasing the time required for the transfer.
6. On the same window, click Options. For Transfer Files select Only to other computer. For If there is a conflict, select Make Copies. Click OK. The display will return to the previous window.
7. Click Next. The files in the folders you selected will be transferred to the new computer. On the final screen, you can click View Log to see a list of the transferred files.
Product Unboxing and Step-By-Step Instructions
Syncing Folders Between Two Computers
The Sync Files option lets you quickly select folders to synchronize between your computers.

1. After a connection between the two computers is established through the cable, the Select how you want to transfer data window will appear. Select Sync Files. The Select Folders to Synchronize window will appear.
2. Place a check mark next to the folders you would like to synchronize between the two computers. Please note, this will not only copy data from the first PC to the second, but also from the second PC to the first.
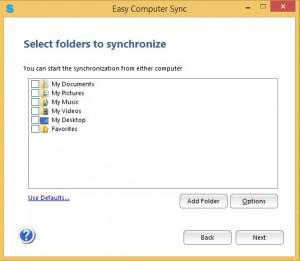
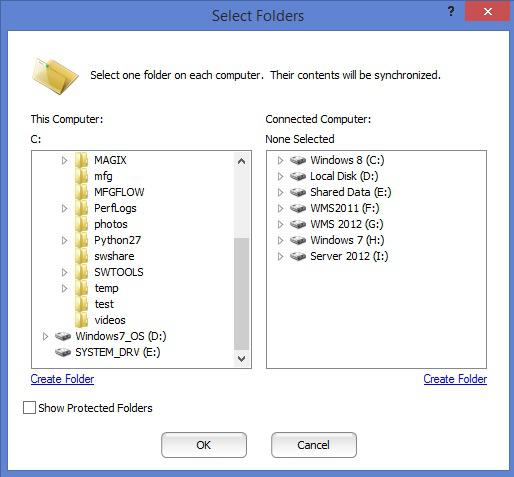
3. If you want to synchronize folders that are not in the list of default folders, select Add Folder. To show all non-hidden folders on the computer, select Show Protected Folders. See this blog post for more details on setting other folders and drives.
4. Click Options to set how duplicate files are handled. Information on these settings can be found here.
5. Click Next. The files in the folders you selected will be synced between the computers. On the final screen, you can click View Log to see a list of the transferred files.
One-time Transfer of a few files or folders
The Drag & Drop Files function allows you to transfer one or more manually selected files and folders to the second computer using a Windows File Explorer-style interface.
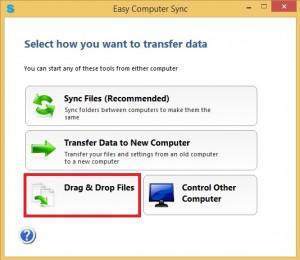
1. After a connection between the two computers is established through the cable, the Select how you want to transfer data window will appear. Select Drag & Drop files. The Simple File Transfer window will appear. This window has a menu section and four panes. The top-left pane shows the folders on the first computer (where you started Drag & Drop). The top-right pane shows the contents of the folder currently selected on the left. The bottom two panes show the same things for the second computer.
2. To see your user folders, such as Documents, Pictures, Music, and the like, click Show System Folders at the upper right of the menu section. They will appear in the folder pane under Users > Your_User_Name.

Tip:Please be aware that with the “Show System Folders” view enabled, you have access to copy data to and from protected folders on the drive. With great power comes great responsibility – be careful when transferring data via this method! Generally speaking, it is unlikely that you will need to move information to/from any of the “Program Files” or “Windows” folders, so it’s safest to ignore those folders unless you have a specific need to access them. Also, do not move any hidden folders under your User name unless you know exactly what you are doing. They could overwrite important information on the new computer.
Finding the information you want
Generally the most commonly transferred information is documents, pictures, music, and the like—the irreplaceable stuff. By default, most programs save this data in your User folders, a set of folders created by Windows for every user name on the system. The location of your User folders will differ depending on which version of Windows is on the system, and will (usually) share the same name as your Windows login.
- For Windows XP, the location will be: C:\Documents and Settings\Your_User_Name\My Documents\My Pictures, Music, Desktop, etc.
- For Windows Vista, 7, 8, 8.1, and 10, the location will be C:\Users\Your_User_Name\Documents, Pictures, Music, Desktop, etc.
If you have any problems using your transfer cable that isn’t answered here, please feel free to contact us at support@plugable.com
