From time to time it may be necessary to remove the operating system drive from a Windows computer and connect it to another system to recover the data. While we always recommend keeping at least two separate backups of all important data there are times where a system failure may occur between backups or backup processes may fail.
Considerations
The state of the system - if the computer is not powering on, completing the Power On Self Test (POST) process, or not loading the operating system from the drive then the drive itself may be damaged, failing, or failed. Attempting data recovery from a failed drive can worsen the issues potentially making data unrecoverable even at professional data recovery services.
Windows 11 does not default to enabling BitLocker drive encryption, but if this is manually configured the encryption key will be required to recover data from the drive. The BitLocker encryption key is stored in the TPM module on the original computer ( separate from the drive ), a recovery key is provided either at the time of encrypting the drive in case the drive needs to be connected to another Windows system. This recovery key is necessary to unlock ( decrypt ) the drive for access on another system.
Some ultra-thin, or highly integrated computers like Chromebooks and MacBooks do not have removable storage, instead the storage is soldered directly to the system main board and may not be independently recovered, for these systems keeping an up to date backup of important data is very important.
Hardware Requirements
The most common operating system drives for both desktop and notebook computers are NVMe SSDs connecting to the computer with an M.2 edge connector. Older computers may use SATA SSDs (generally 2.5-inch or "laptop" form factor) while still older computers may use a spinning disk drive either 2.5-inch or 3.5-inch form factors for desktop computers.
Plugable's USB Type-C to M.2 NVMe Toolfree Enclosure supports M.2 NVMe SSDs from the 2230 (22mm wide, 30mm long) up through 2280 (22mm wide, 80mm long) form factors.
Plugable's USB Type-C SATA Vertical Hard Drive Dock supports 2.5-inch and 3.5-inch Serial ATA SSDs and Hard Drives.
You will also need a destination computer to recover the data to, this can be the same as the original computer after installing a new NVMe SSD and operating system, or another computer with Windows 10 or Windows 11.
Connecting to the New Computer
The drive to be recovered may be installed as a secondary into a desktop PC, or connected to a notebook or desktop using a USB adapter.
After installing the drive into a hard drive dock or NVMe enclosure, our first step is to ensure the computer is detecting the drive:
1. Right-click on the Start Menu and select Device Manager from the pop-up menu, expand the Disk drives section

2. Connect the drive to the computer, after a moment the drive should be detected in the Device Manager window

Next we check to see how Windows is detecting the partition table and file system(s):
3. Right-click on the Start Menu and select Disk Management from the pop-up menu

4. If the drive letter is not assigned to the old drive's largest partition we can manually assign the drive letter by right-clicking on the partition and selecting "Change Drive Letter and Paths...", follow the on screen prompts to assign the next available drive letter to the external drive.


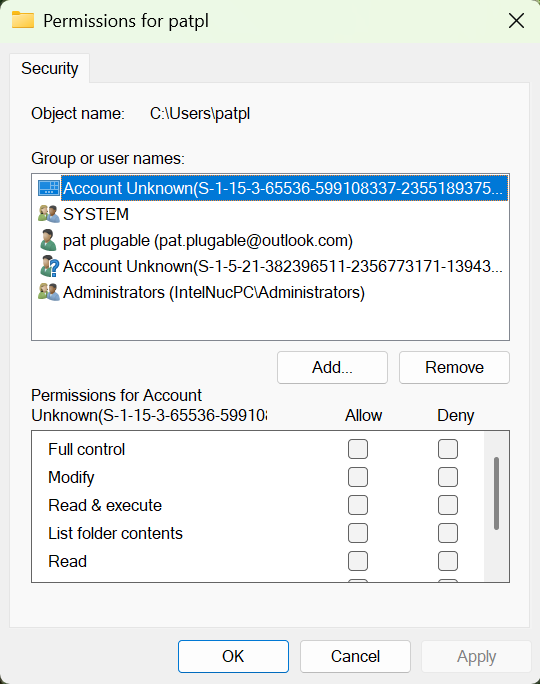
5. To access the user data you will need to change permissions on the file system, this does modify the contents of the drive and could have an affect on the Windows operating system if you were to boot to this drive in the original computer again.

6. You should now have access to all of your user data stored on the computer. Some data may be stored on OneDrive by default ( for example the Desktop and Documents directories ) and not have local copies on the operating system drive.

7. After changing the permissions, the drive can still load into Windows on the original computer. In this case the user account logged in correctly but we can see the "Account Unknown" permission changes.

Windows BitLocker
If the computer had Windows BitLocker configured to encrypt the operating system drive then you will need to input the recovery key to gain access to data on the drive.
After connecting the drive to the computer a locked drive will be available in the Windows File Explorer left-most column.
1. Open Windows File Explorer, and select the locked drive from the left column

2. In the BitLocker prompt, type in or copy and paste the recovery key to unlock the drive, you should now have access to the file system and access the user account folder

When configuring BitLocker you are given the option to save the recovery key to your Microsoft Account, a file system ( only an external or secondary drive ), or to print the recovery key. If the recovery key is lost than data will not be recoverable and we highly recommend always keeping a backup of the recovery key, as well as physically separated backups of all important data.
Looking for more details? Check out our Plugable product pages for specs, frequently asked questions, and compatibility information.
USB Type-C to M.2 NVMe Toolfree Enclosure
USB Type-C SATA Vertical Hard Drive Dock
If you have any questions please feel free to contact us at support@plugable.com and we'll be happy to assist!

