
2023年2月23日更新: DisplayLink Manager アプリケーションの導入が正しく完了しない場合には、原因やその対処法に関するこちらの記事も参照してください。
2022年7月7日更新: DisplayLink Manager バージョン 1.7.1 の新機能について説明を追加しました。
A. 初めに
当ページでは macOS 11.x および 12.x のシステムに、「DisplayLink Manager グラフィックス・コネクティビティ」アプリケーションのバージョン 1.6 以上を使ってドライバを導入し構成する手順を説明します。このバージョン以降のアプリケーションは、macOS 10.15.x 以前では使用できない点に注意してください。
自分のシステムに導入された macOS バージョンを確認したい場合は、メニューバー内の「アップルアイコン」をクリックし、「この Mac について」をクリックします。新しく開いたウィンドウ内に、macOS バージョンが表示されます。
(もしも macOS 10.15 以前のシステムに ver 1.5 の DisplayLink Manager アプリケーションを導入したい場合は、こちらを参照してください。)
DisplayLink macOS 用ドライバに関する情報として、「Plugable 社 DisplayLink 技術使用製品と macOS のサポートについて」についても必ずご参照ください。
DisplayLink Manager グラフィックス・コネクティビティ アプリケーション導入手順
下記のビデオを参照してください。
文章とスクリーンショットによる手順は下記から確認できます。
1. DisplayLink Manager を、Plugable 社ドライバ・ページからダウンロードします。
2. ダウンロードした DisplayLink Manager グラフィックス・コネクティビティ・パッケージ (DisplayLink Manager Graphics Connectivity n.x.pkg) を開きます。
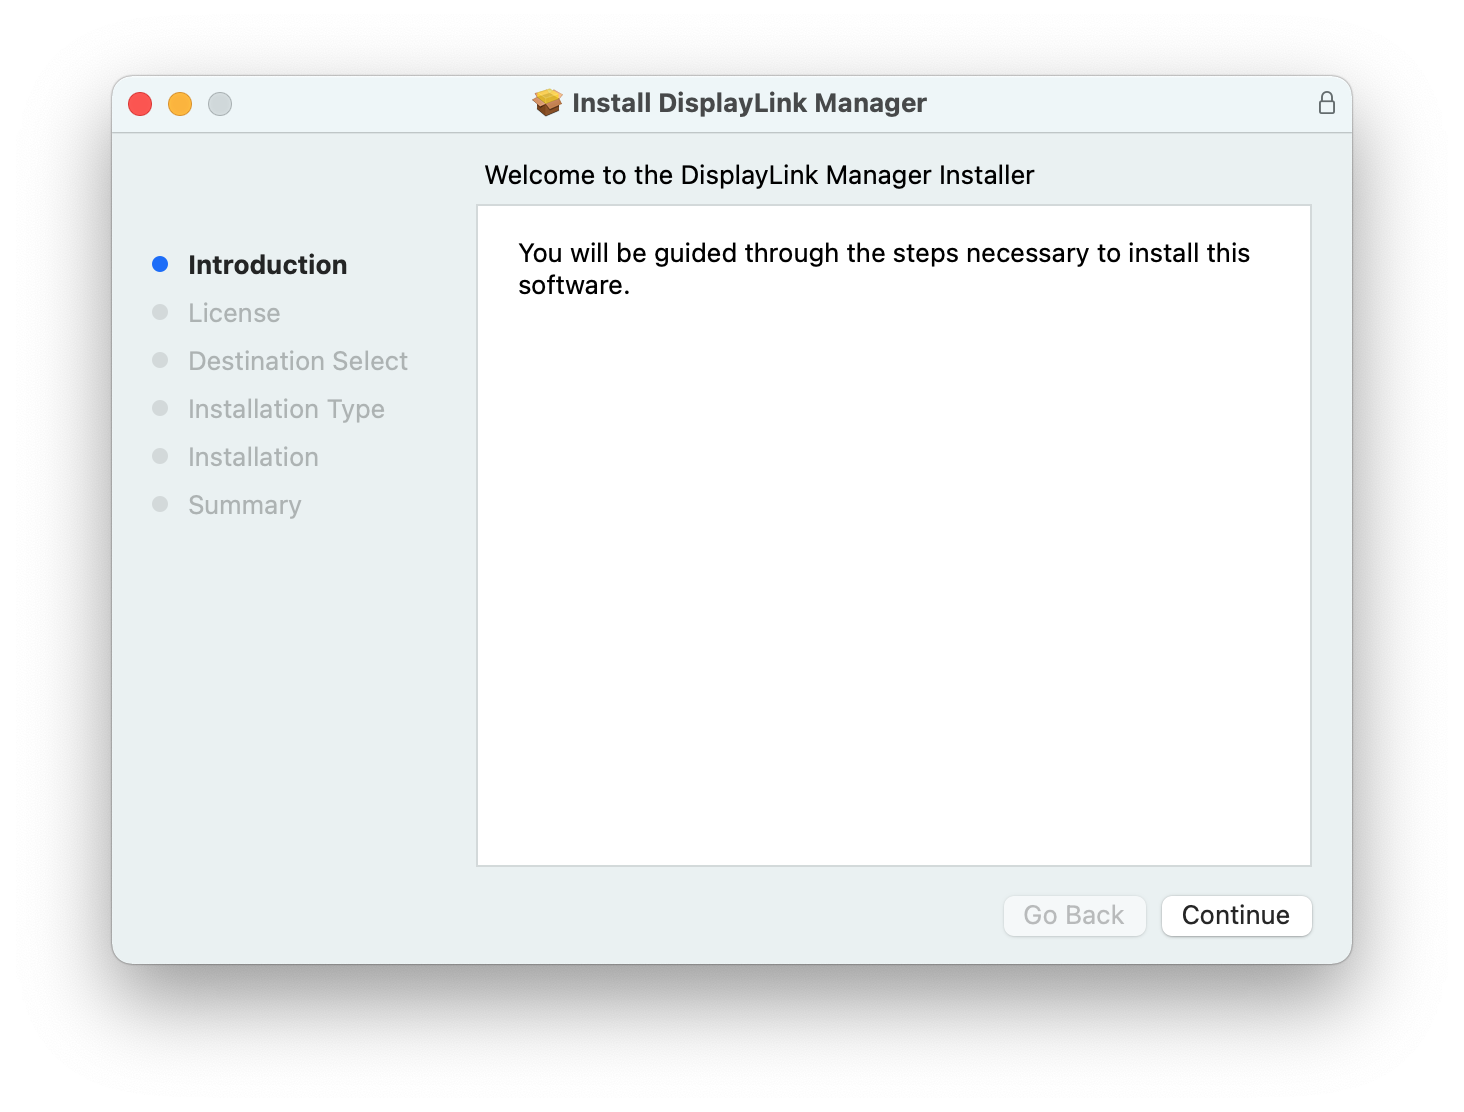
3. 「はじめに」のページで「続ける(Continue)」ボタンをクリックします。
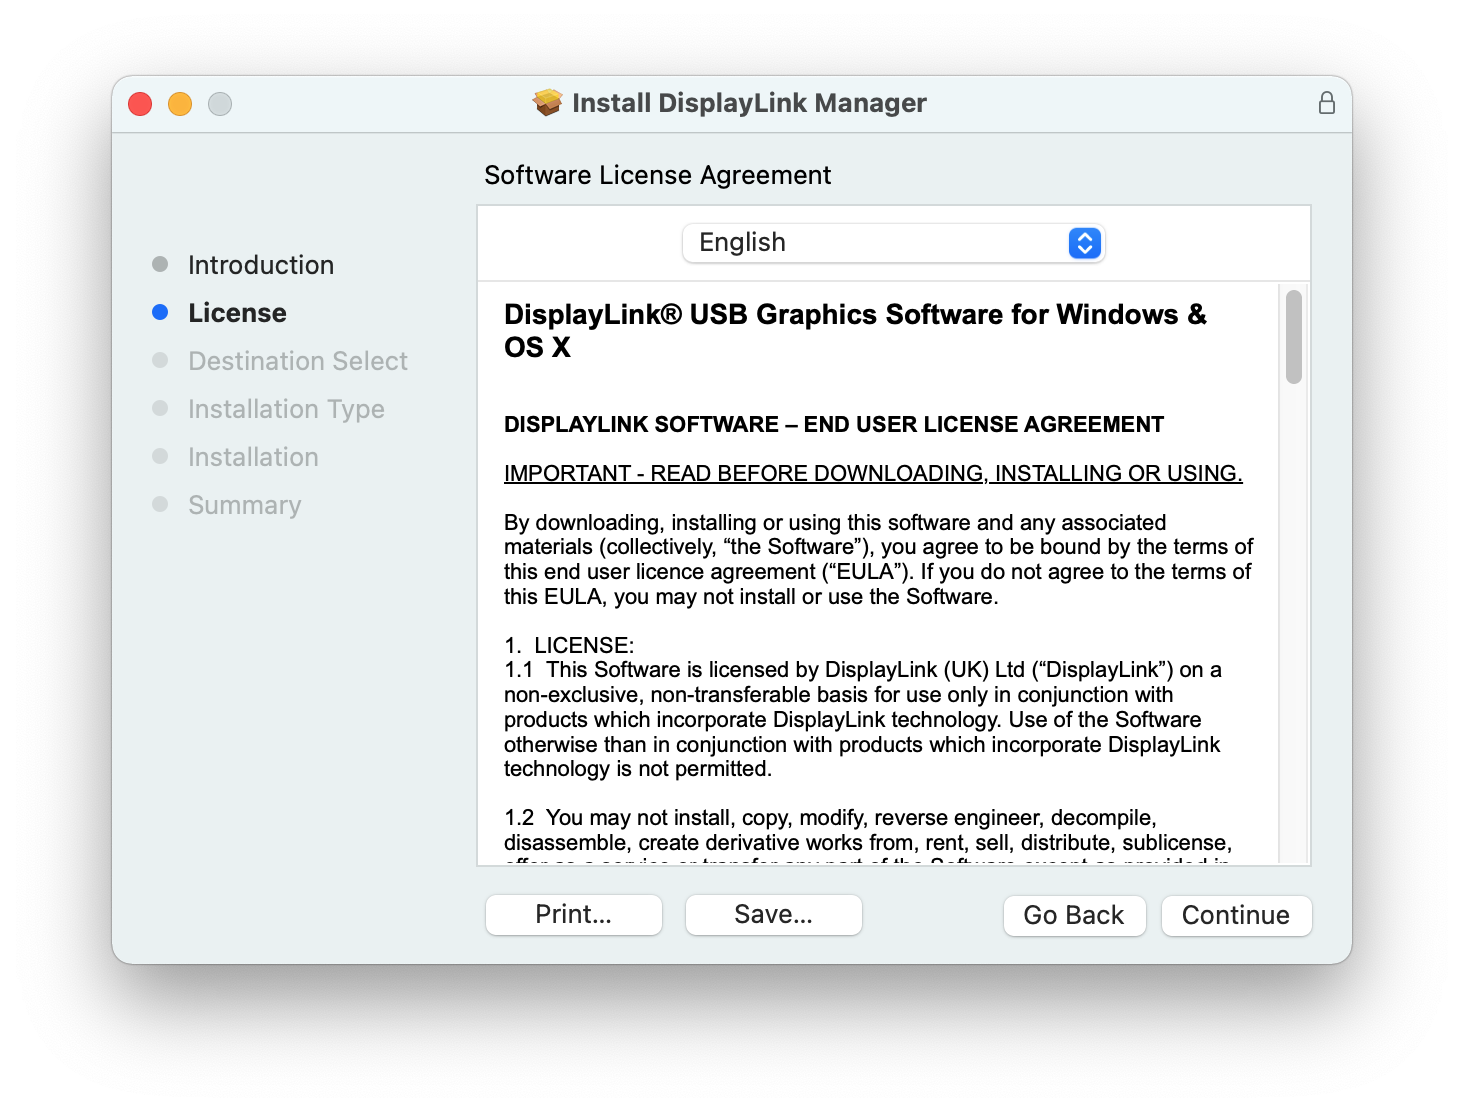
4. 「ライセンス」ページで「続ける(Continue)」ボタンをクリックします。
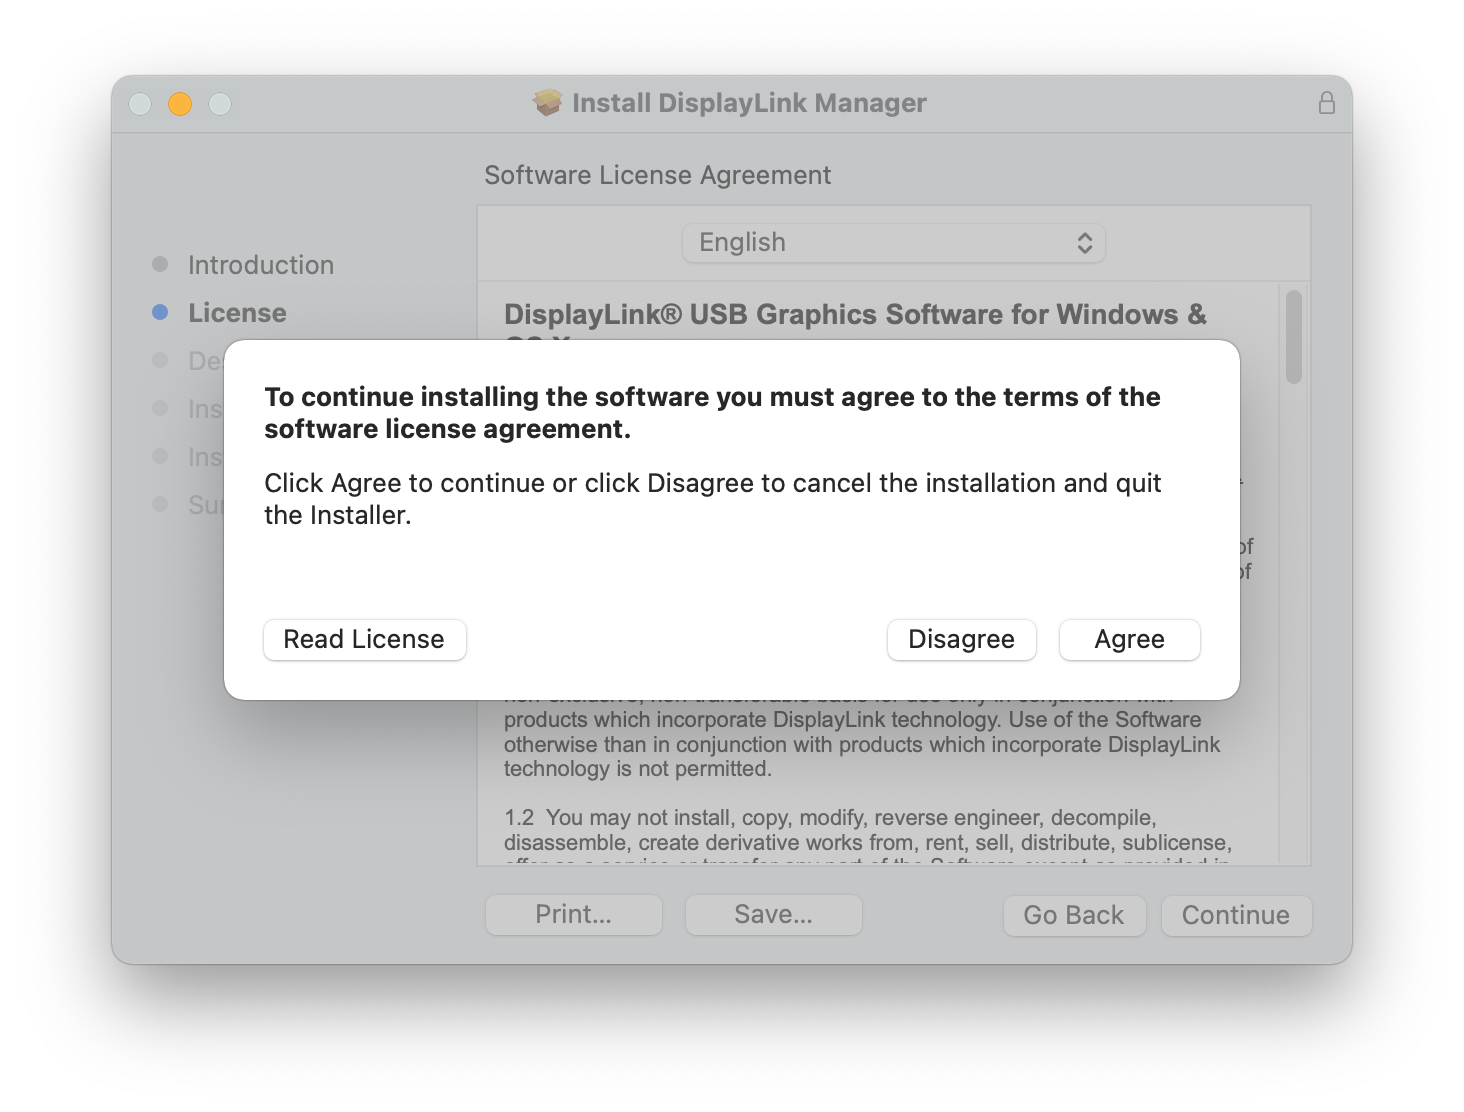
5. プロンプトが表示されたら、「同意する(Agree)」をクリックします。
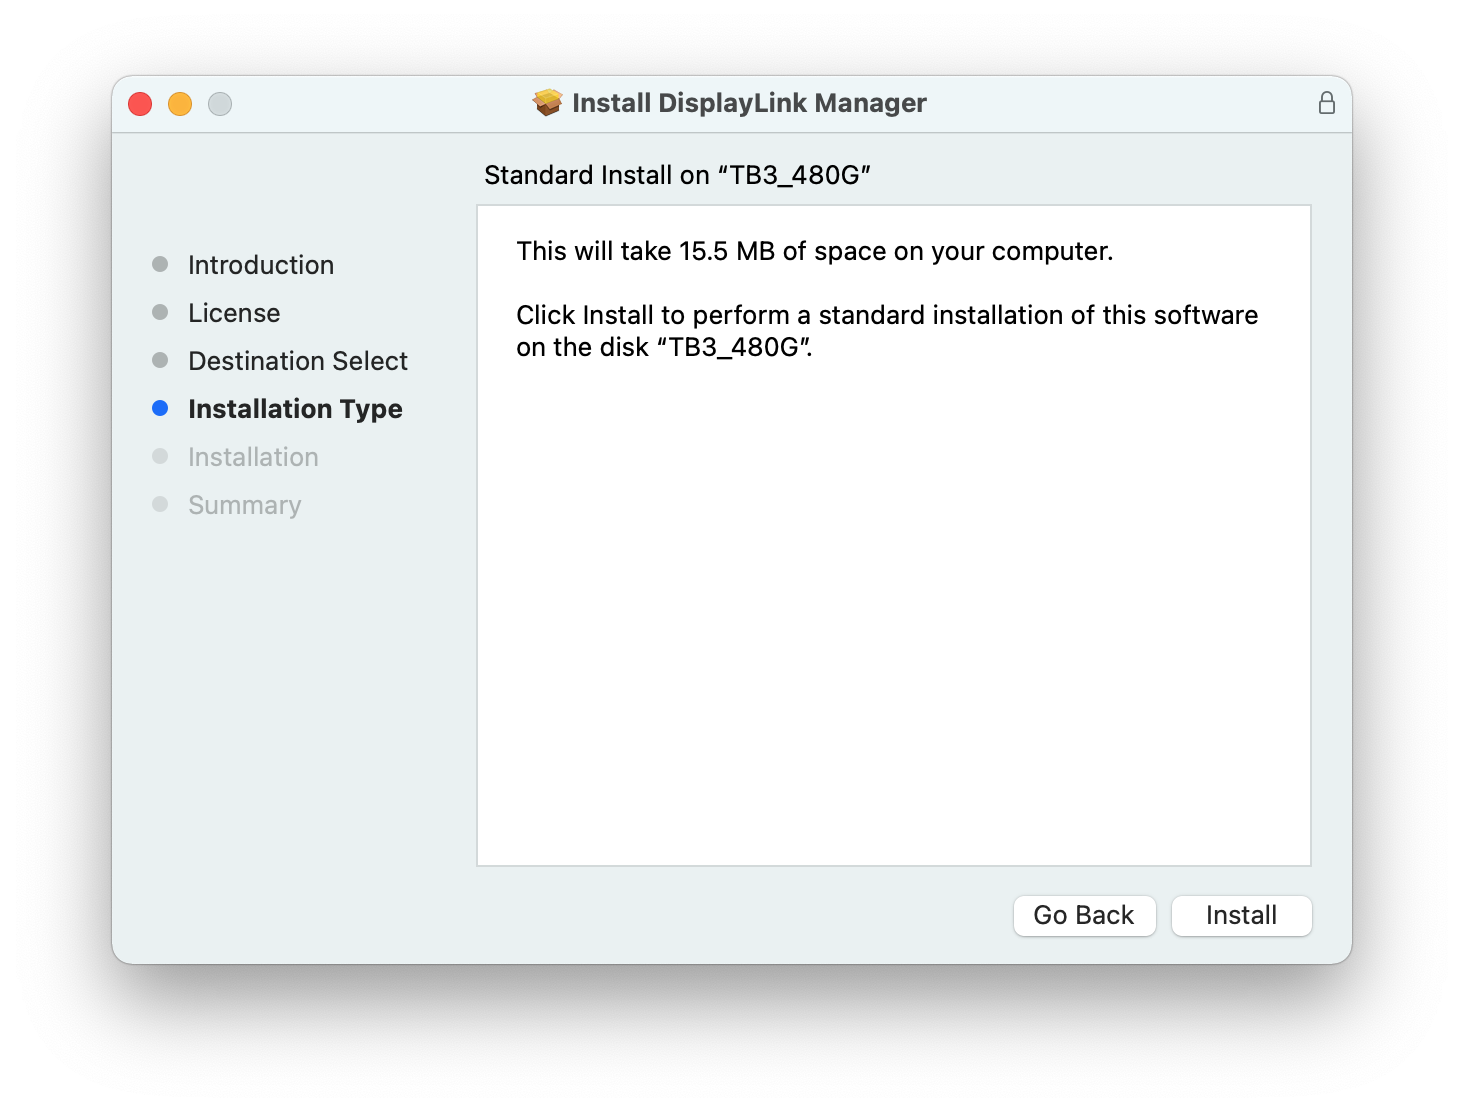
6. 「インストールタイプ」ページで「インストール(Install)」をクリックします。
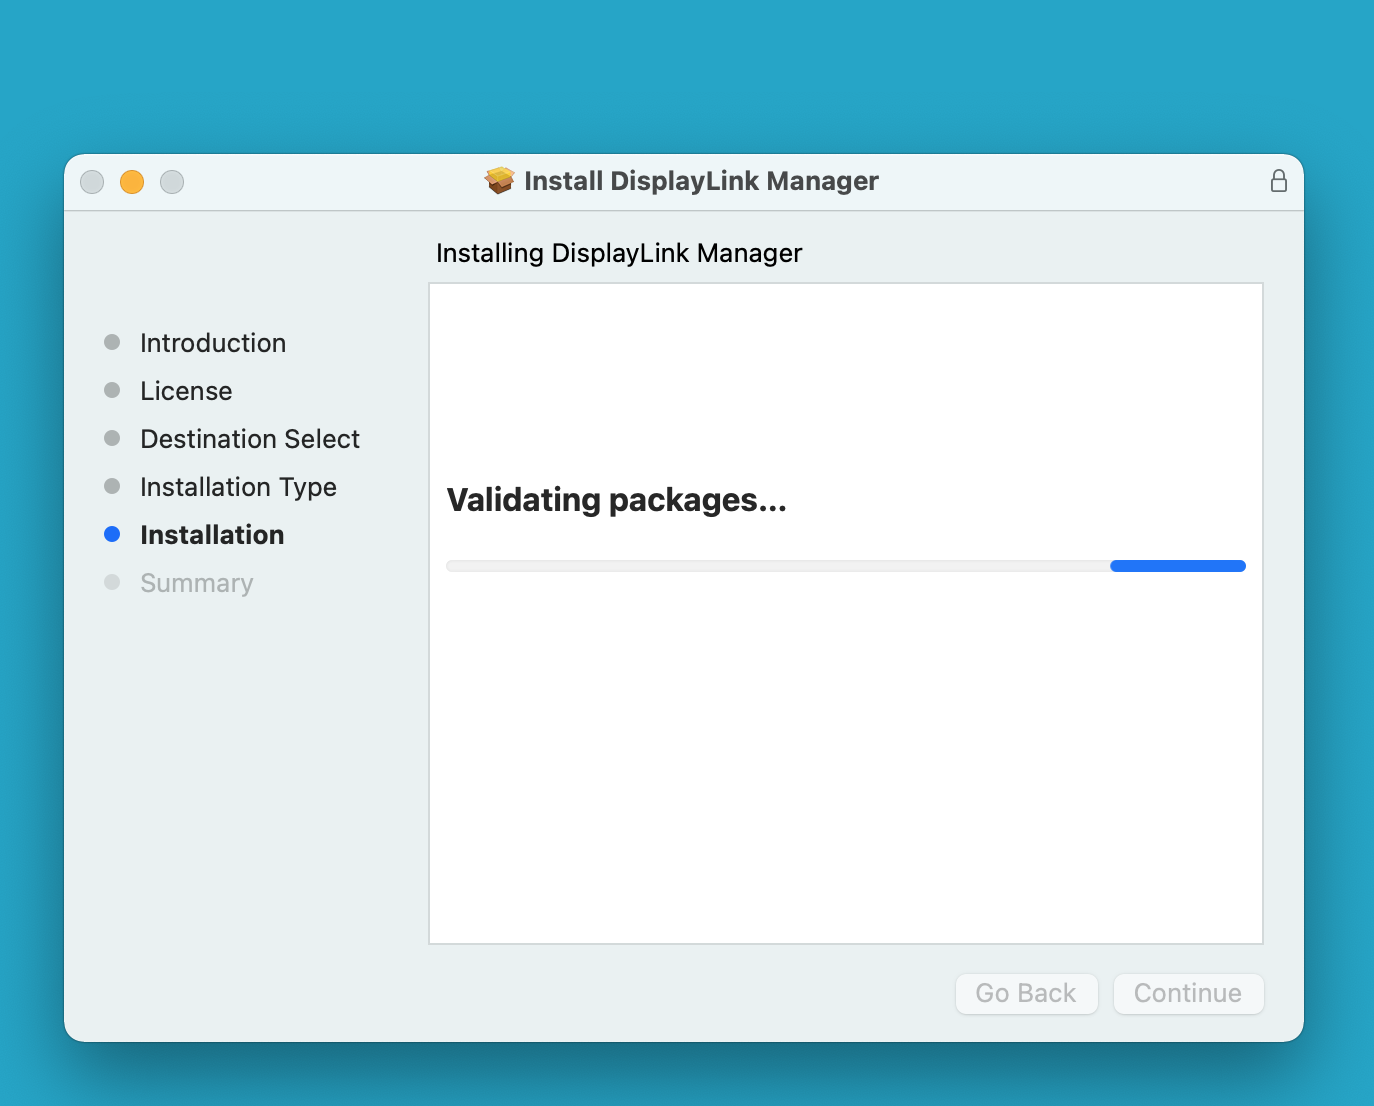
7. パスワード画面が表示されたら、パスワードを入力して「ソフトウェアの導入(Install Software)」ボタンをクリックします。

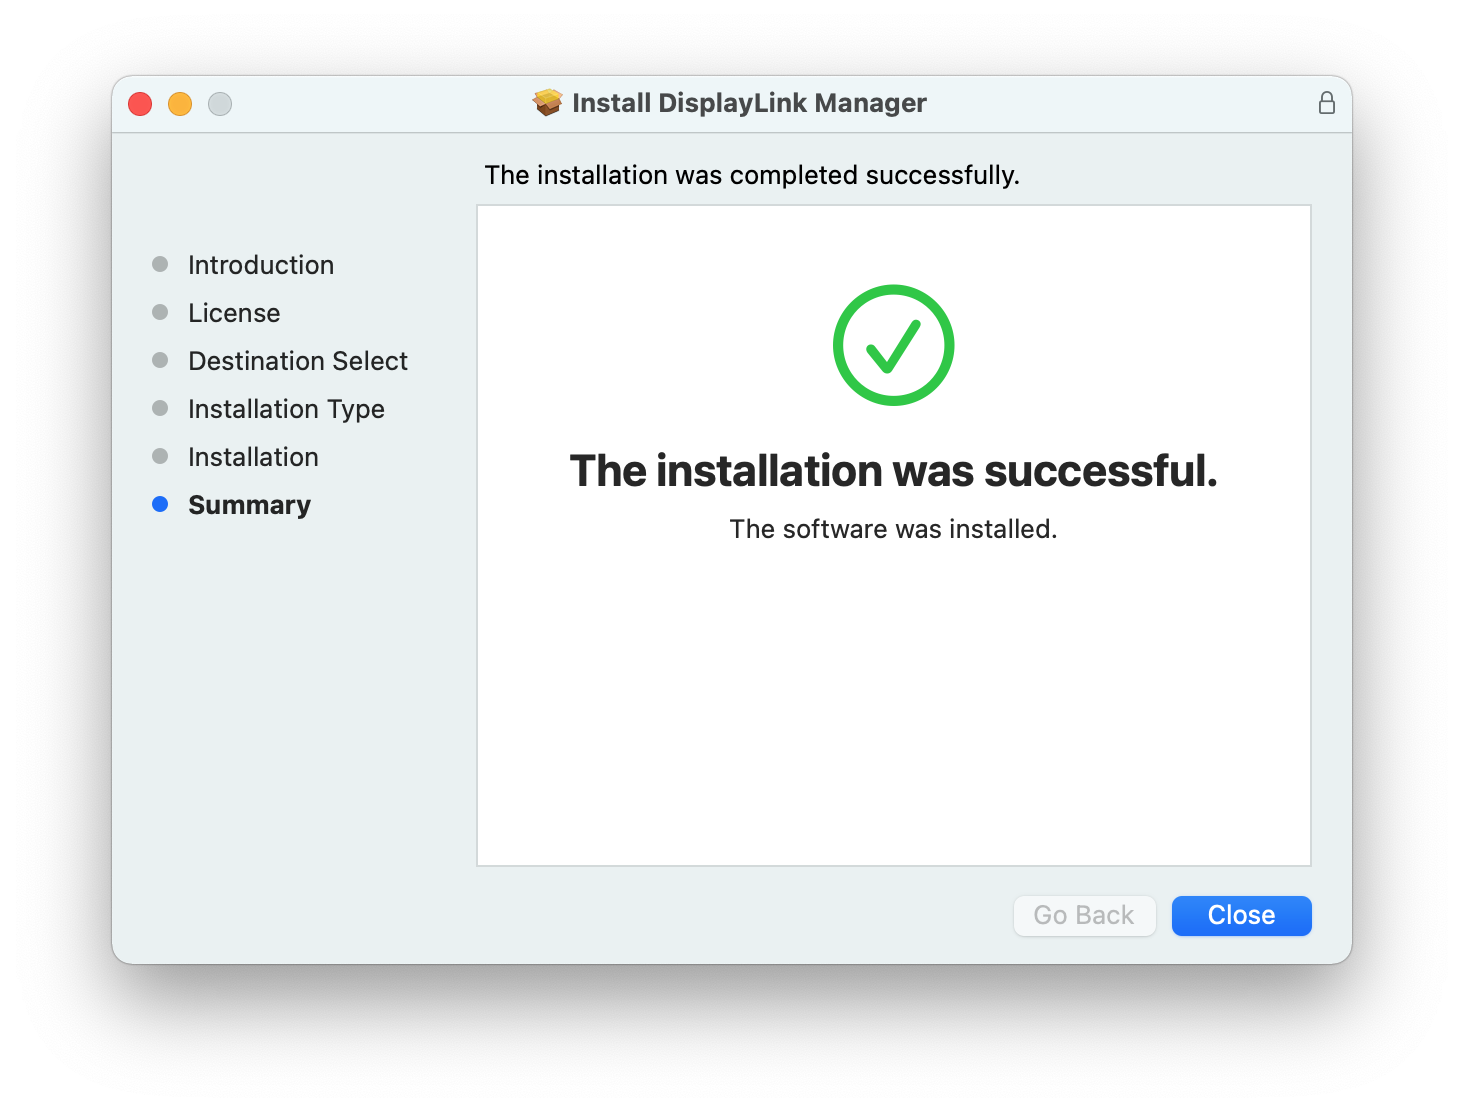
8. インストール完了後、「閉じる(Close)」ボタンをクリックします。
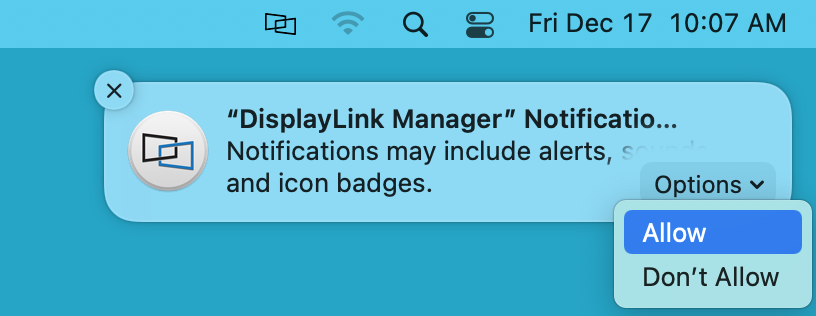
9. 次に、「DisplayLink Manager」はアプリの通知をオンにするかどうかを尋ねてきます。「オプション」ボタンをクリックし、「許可(Allow)」を押してください。
10. アプリケーションのインストールが終了したら、DisplayLink 機器(ドッキングステーションやグラフィック変換アダプター)を Mac システムに接続します。
11. DisplayLink 機器が接続されると、macOS が「DisplayLink Manager」が「画面収録」する許可を求めている旨の通知が表示されます。これを許可するために、「システム環境設定を開く(Open System Preferences)」ボタンをクリックします。
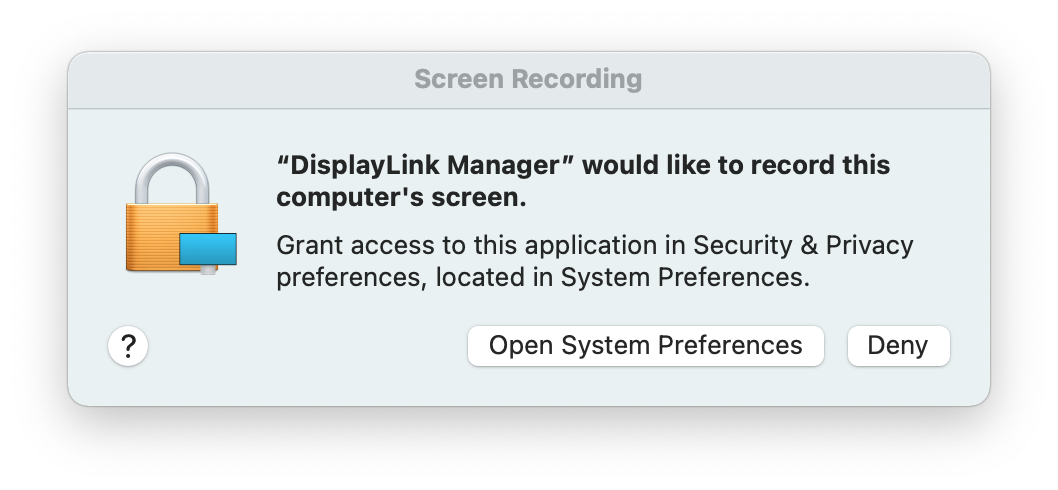
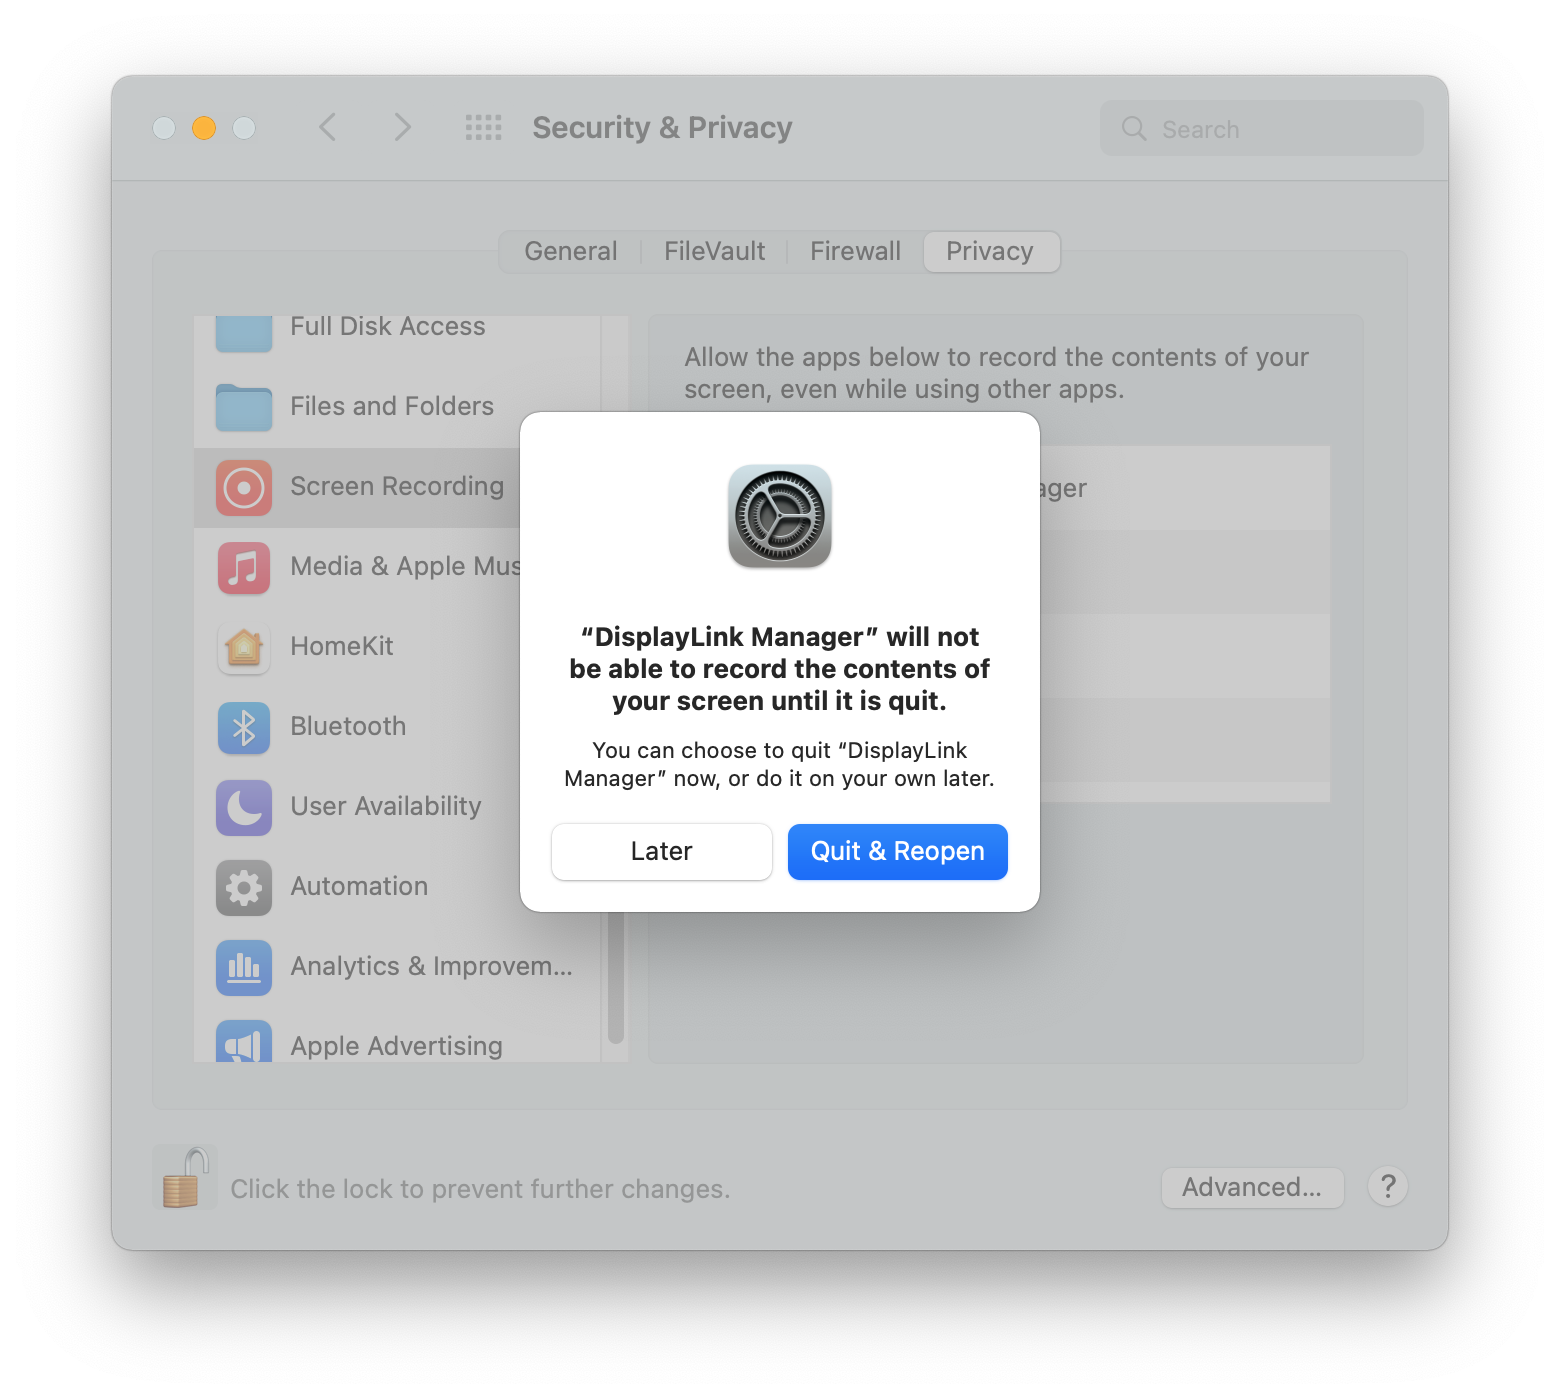
12. 「セキュリティとプライバシー」が表示されます。「プライバシー」タブの中の「画面収録」オプションが選択されています。
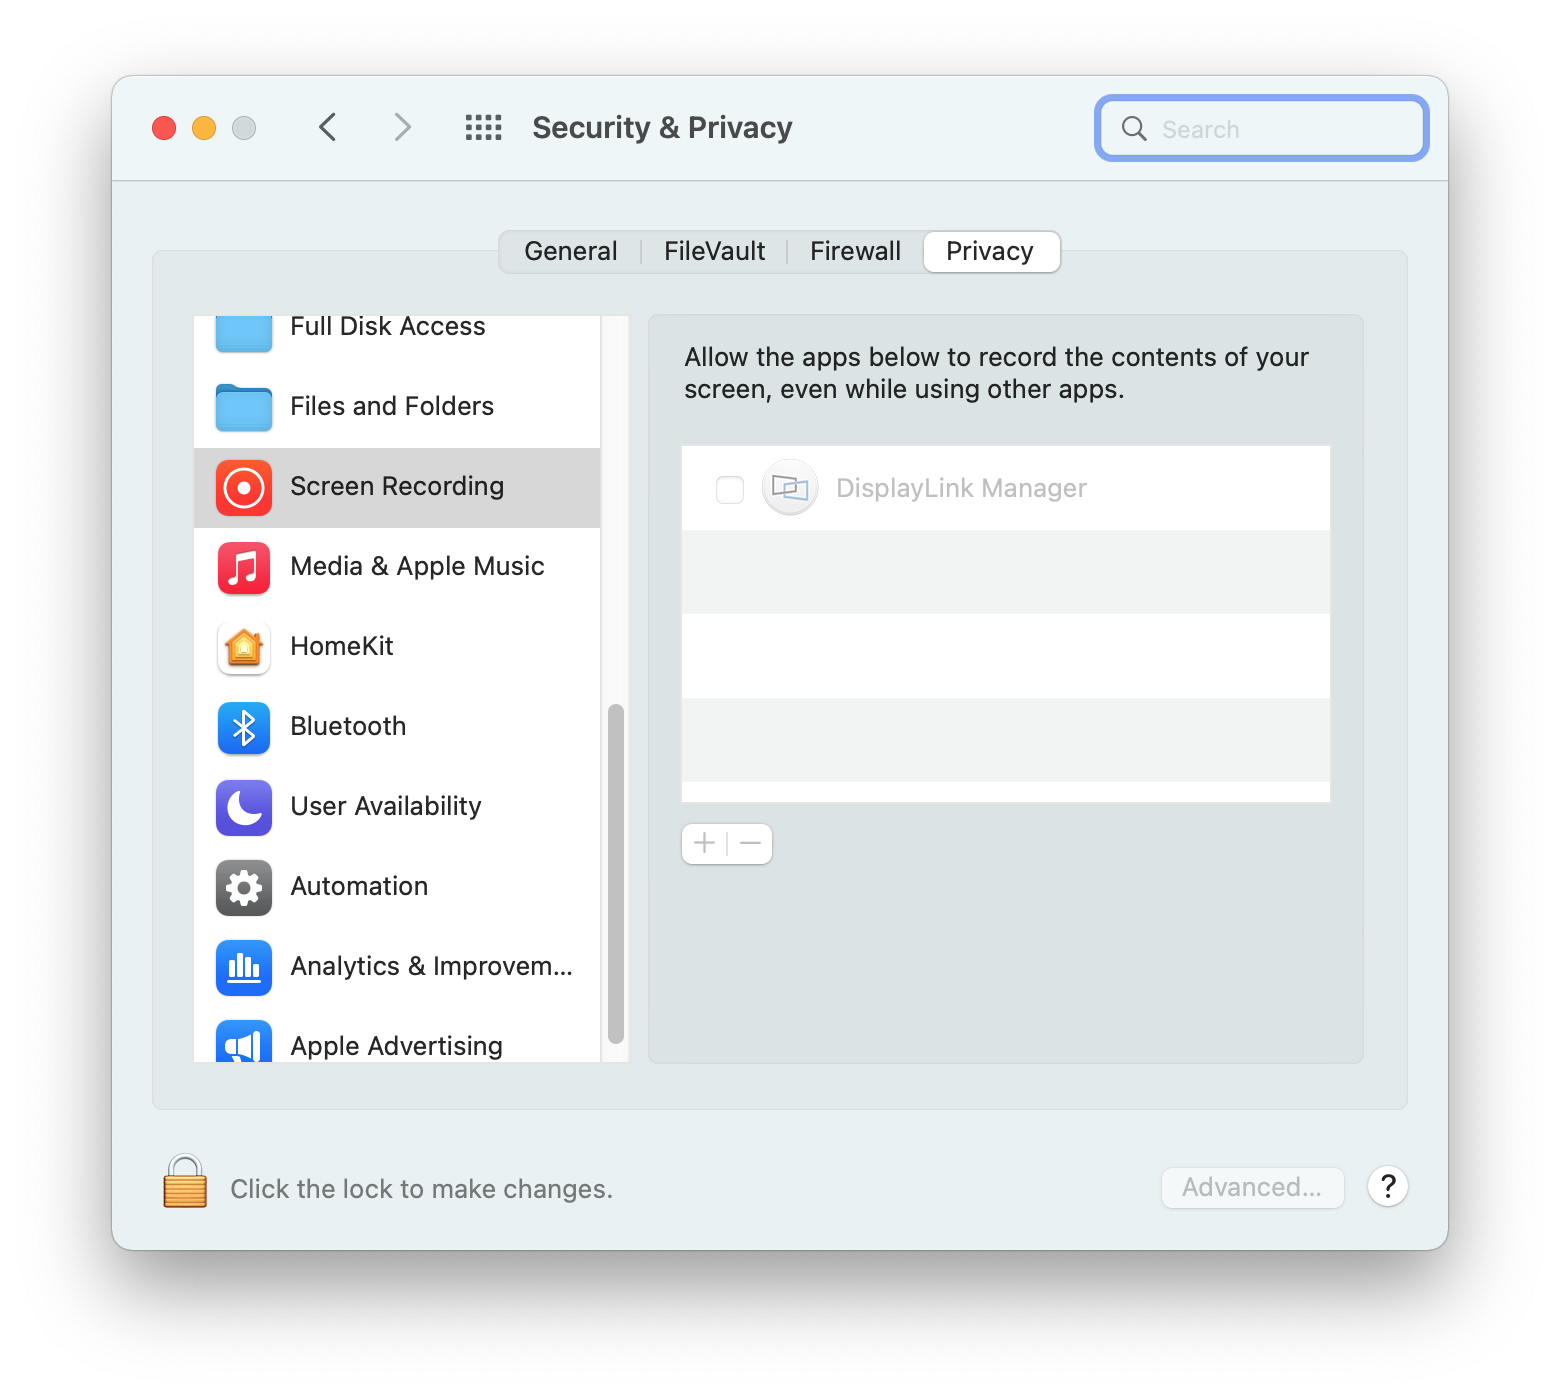
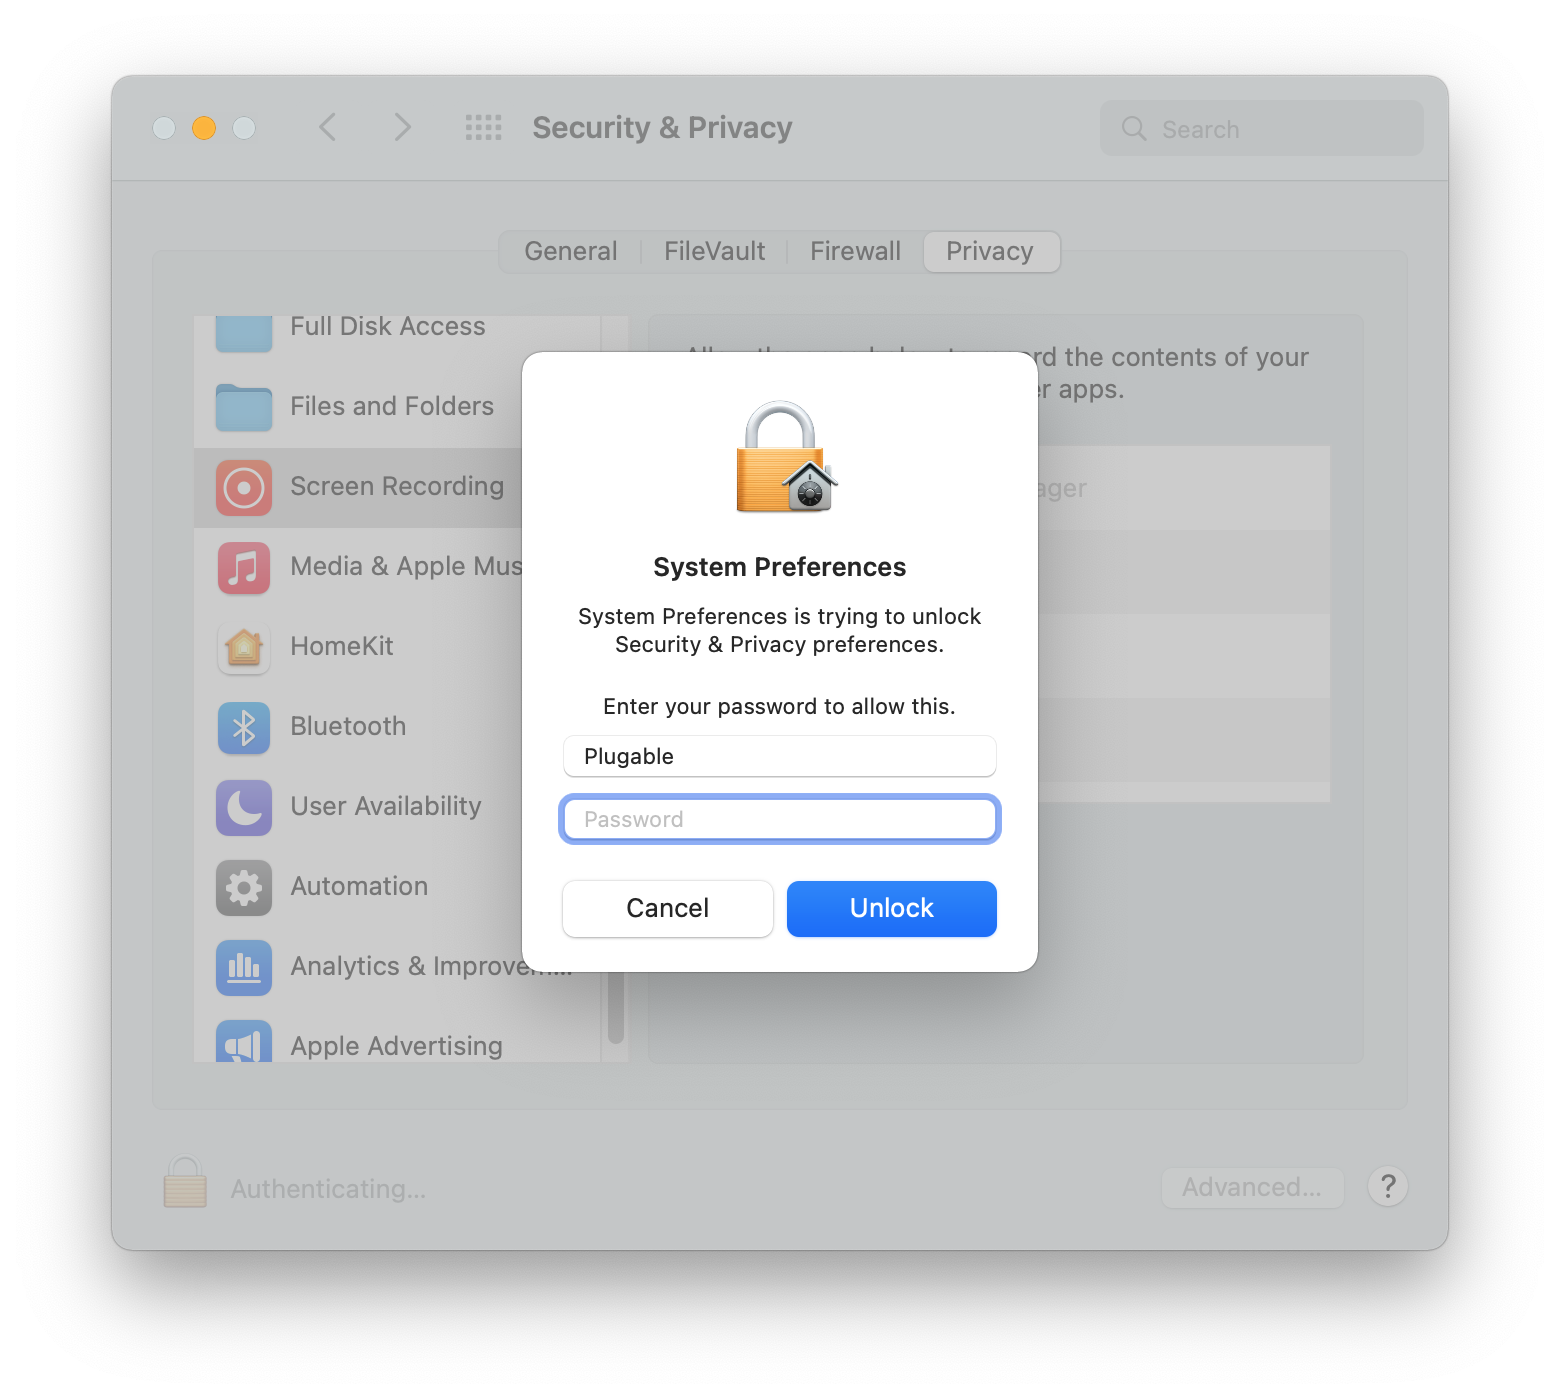
13. 画面左下にある黄色い鍵マーク(「変更を加える」)を押し、編集ができるようにします。
14. パスワードを入力するか、指紋認証します。
15. 「DisplayLink Manager 」の横にあるボックスをチェックします。
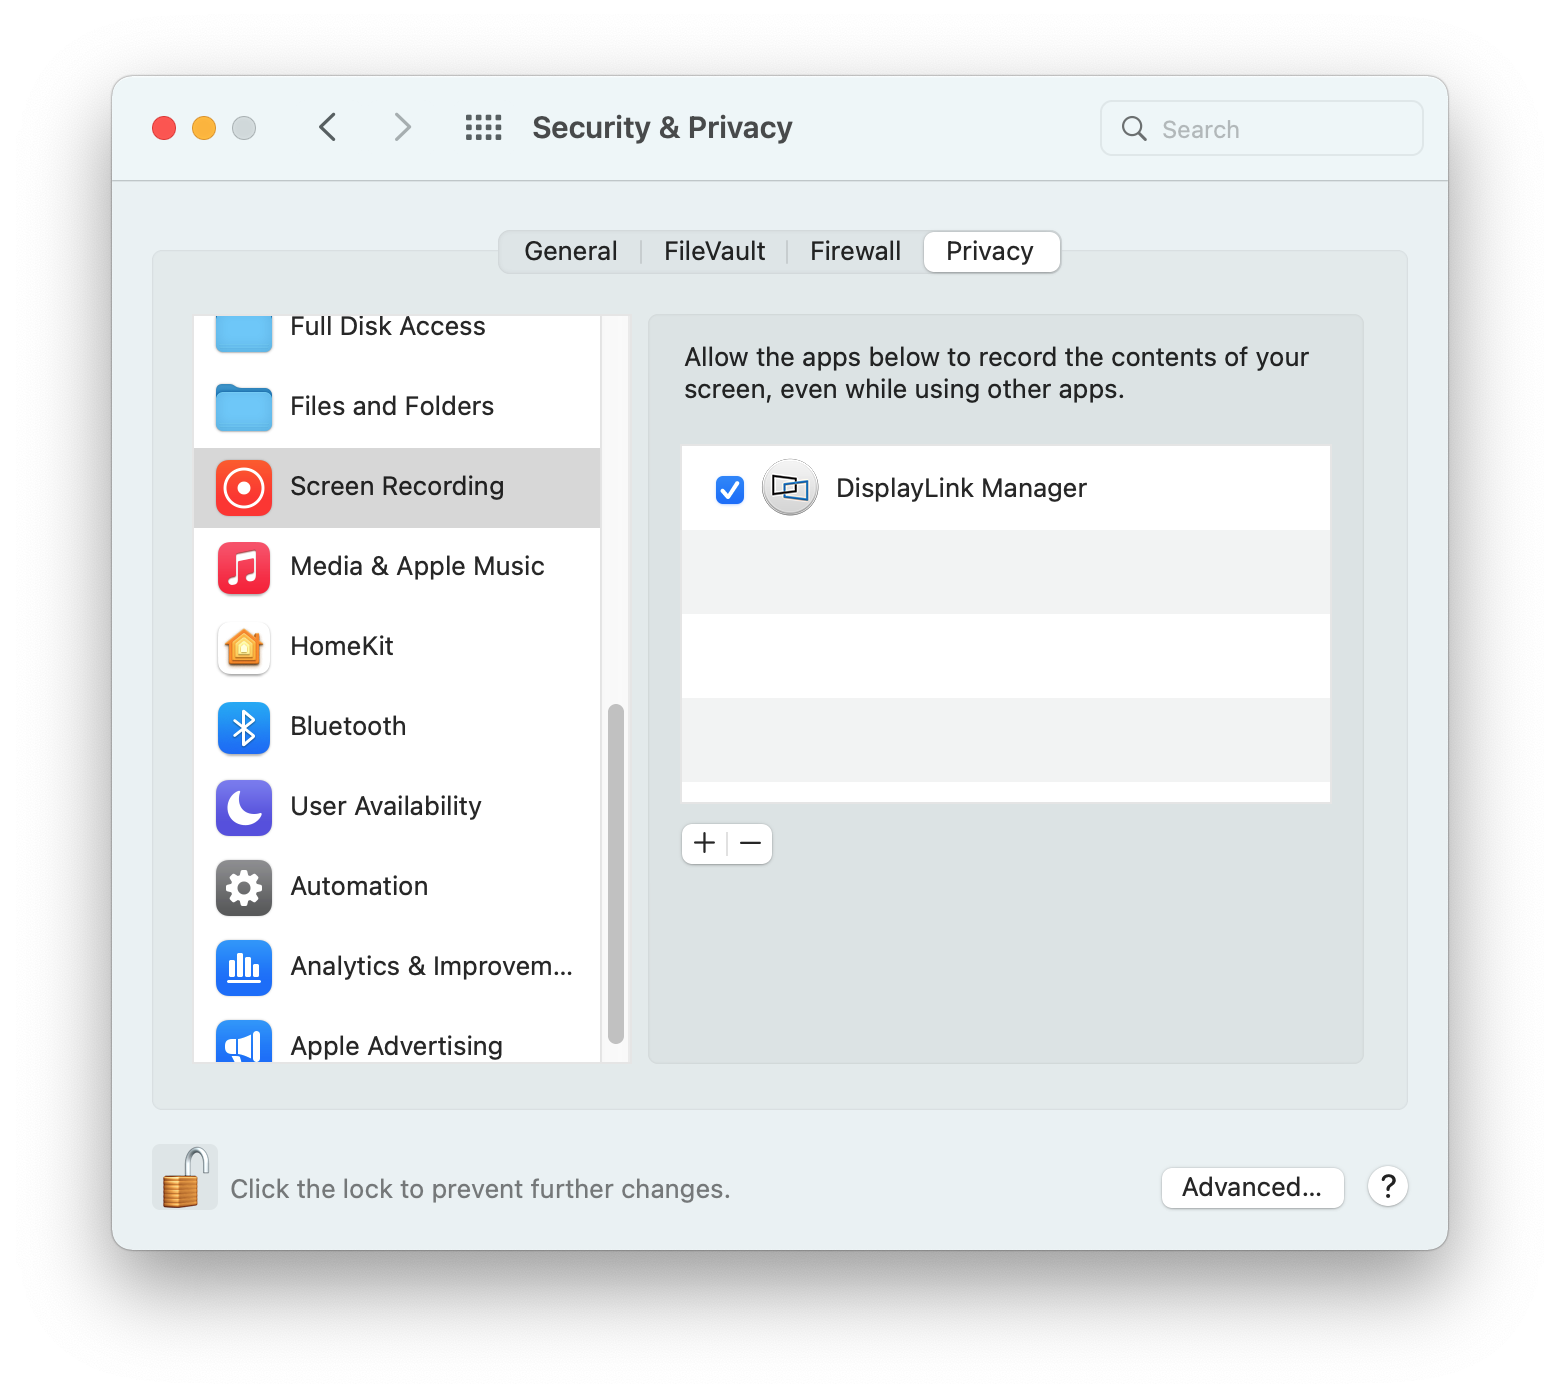
16. プロンプトが表示されたら「終了して再開(Quit & Reopen)」ボタンを押します。
18. この変更が完了すると、DisplayLink 技術機器を介してシステムに接続されたモニターが自動的に表示されます。
** 注意: DisplayLink 機器が正しく機能するためには「画面収録(Screen Recording)」を有効にする必要があります。これが有効になると、DisplayLink ドライバはミラーリングまたは拡張スクリーンをレンダリングするために必要なピクセルにアクセスし、コンピュータから DisplayLink モニターに USB 経由でピクセルを送信できるようになります。ただし、DisplayLink 機器が表示画面の内容を保持したり、実際に録画したりすることはありません。 **
19. 画面上部の Apple メニュー内にある DisplayLink Manager アプリケーションのアイコンをクリックします。アプリケーションのステータス画面が表示されます。
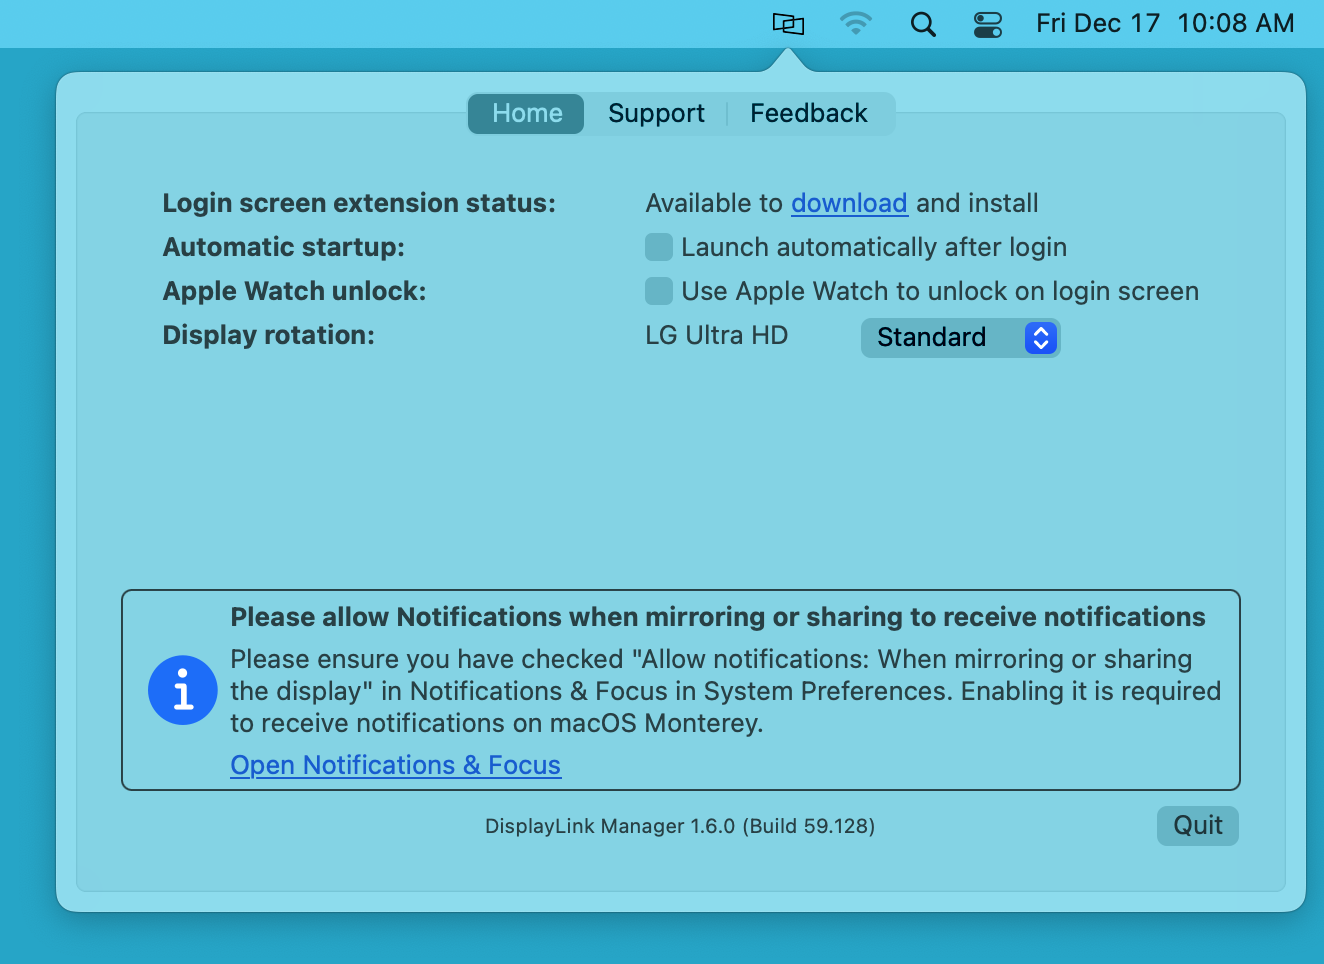
20. この画面内の「自動的に起動」の右側にある「ログイン後アプリケーションを自動的に起動する」のチェックボックスをオンにします。これにより、Mac システムにログオン時に自動的に当アプリケーションが機能するようになります。

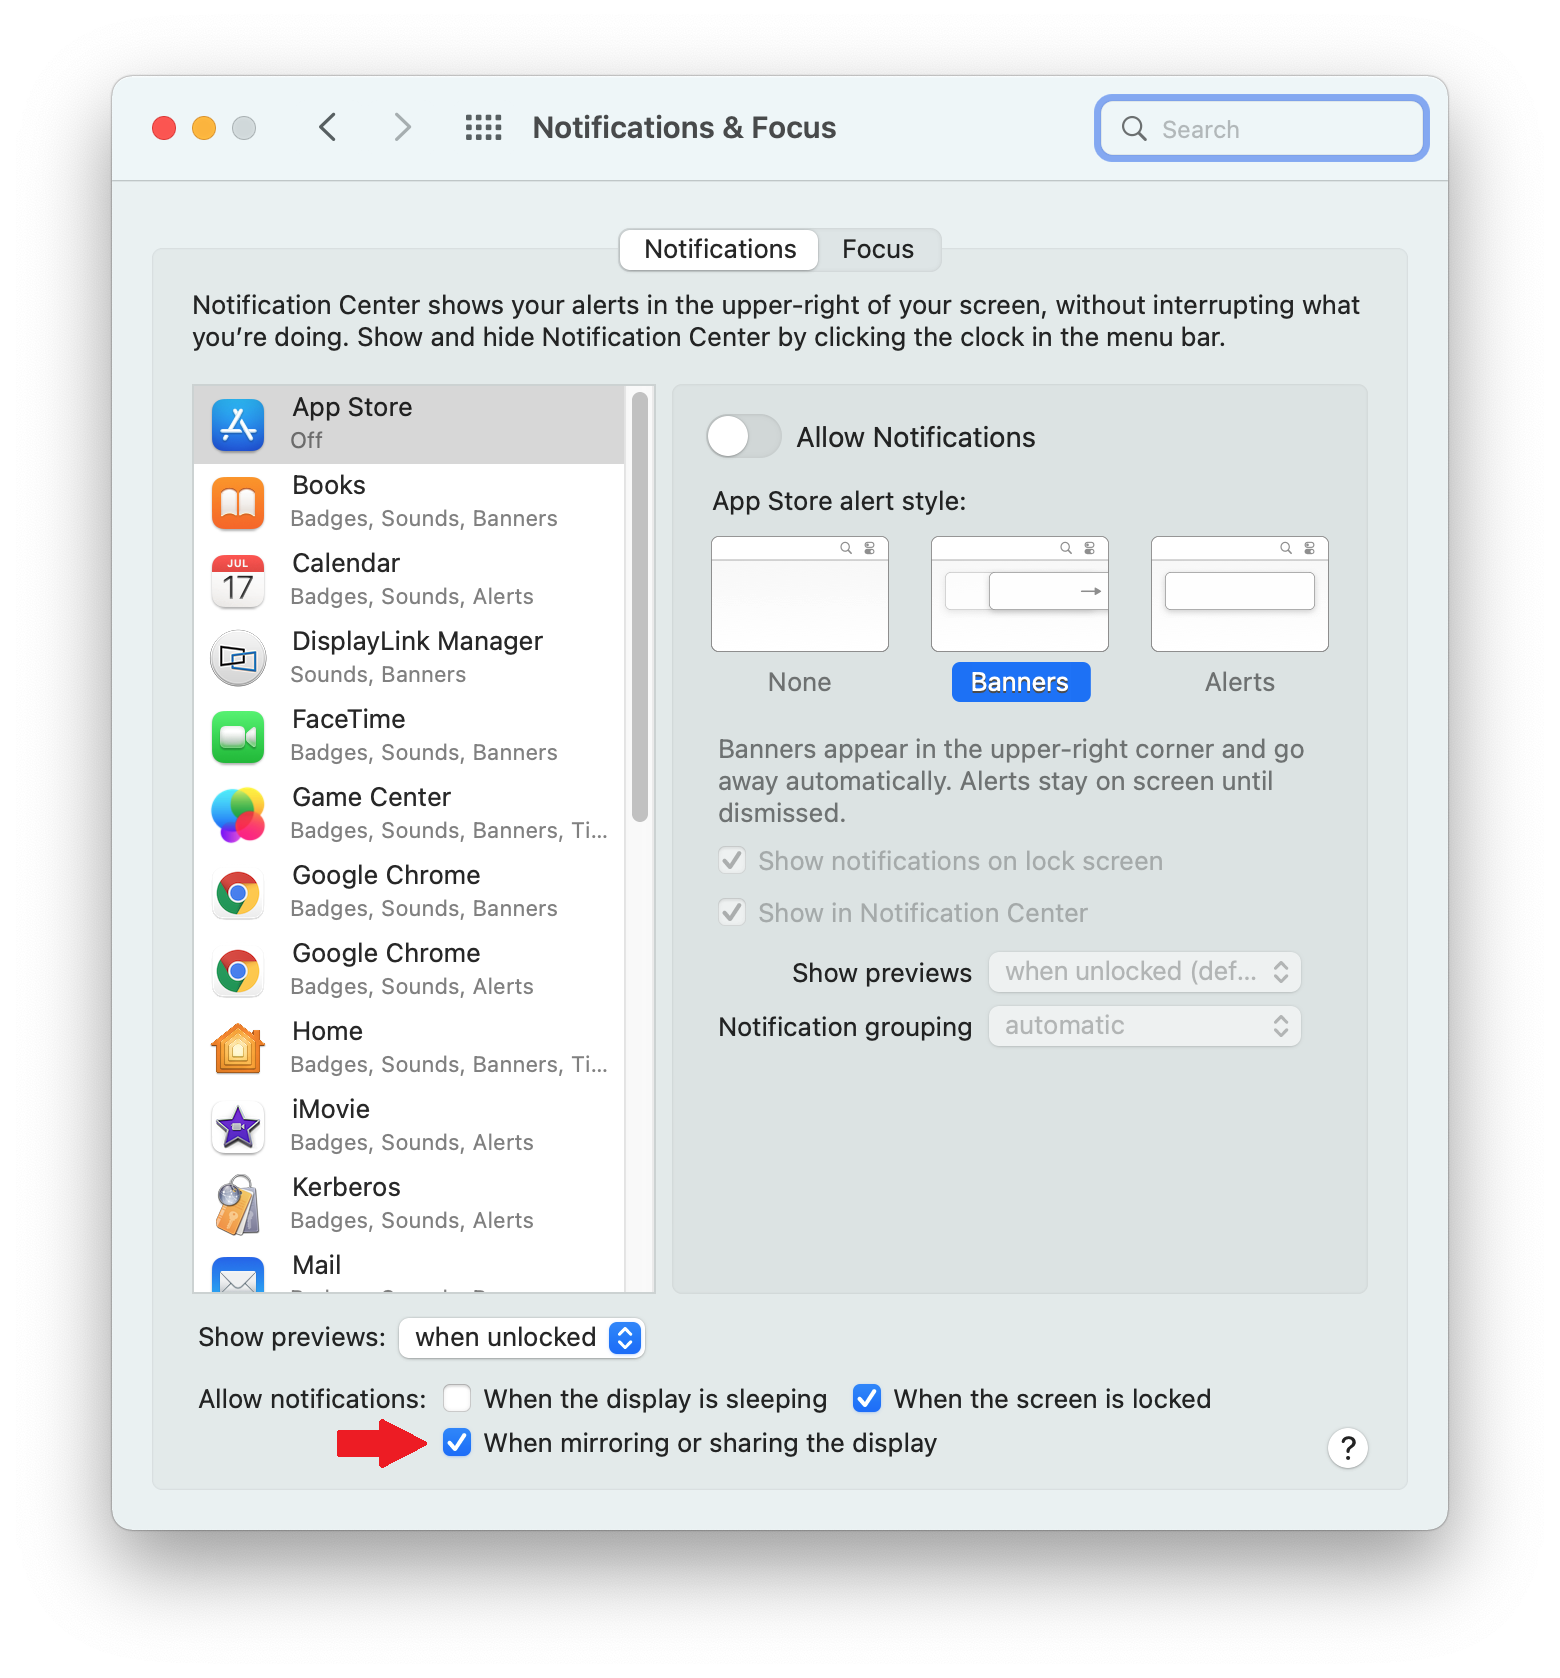
21. 次に、Mac システムに DisplayLink 機器が接続されている際の通知を表示するため、システム環境設定内の「通知と集中」設定を変更する必要があります。
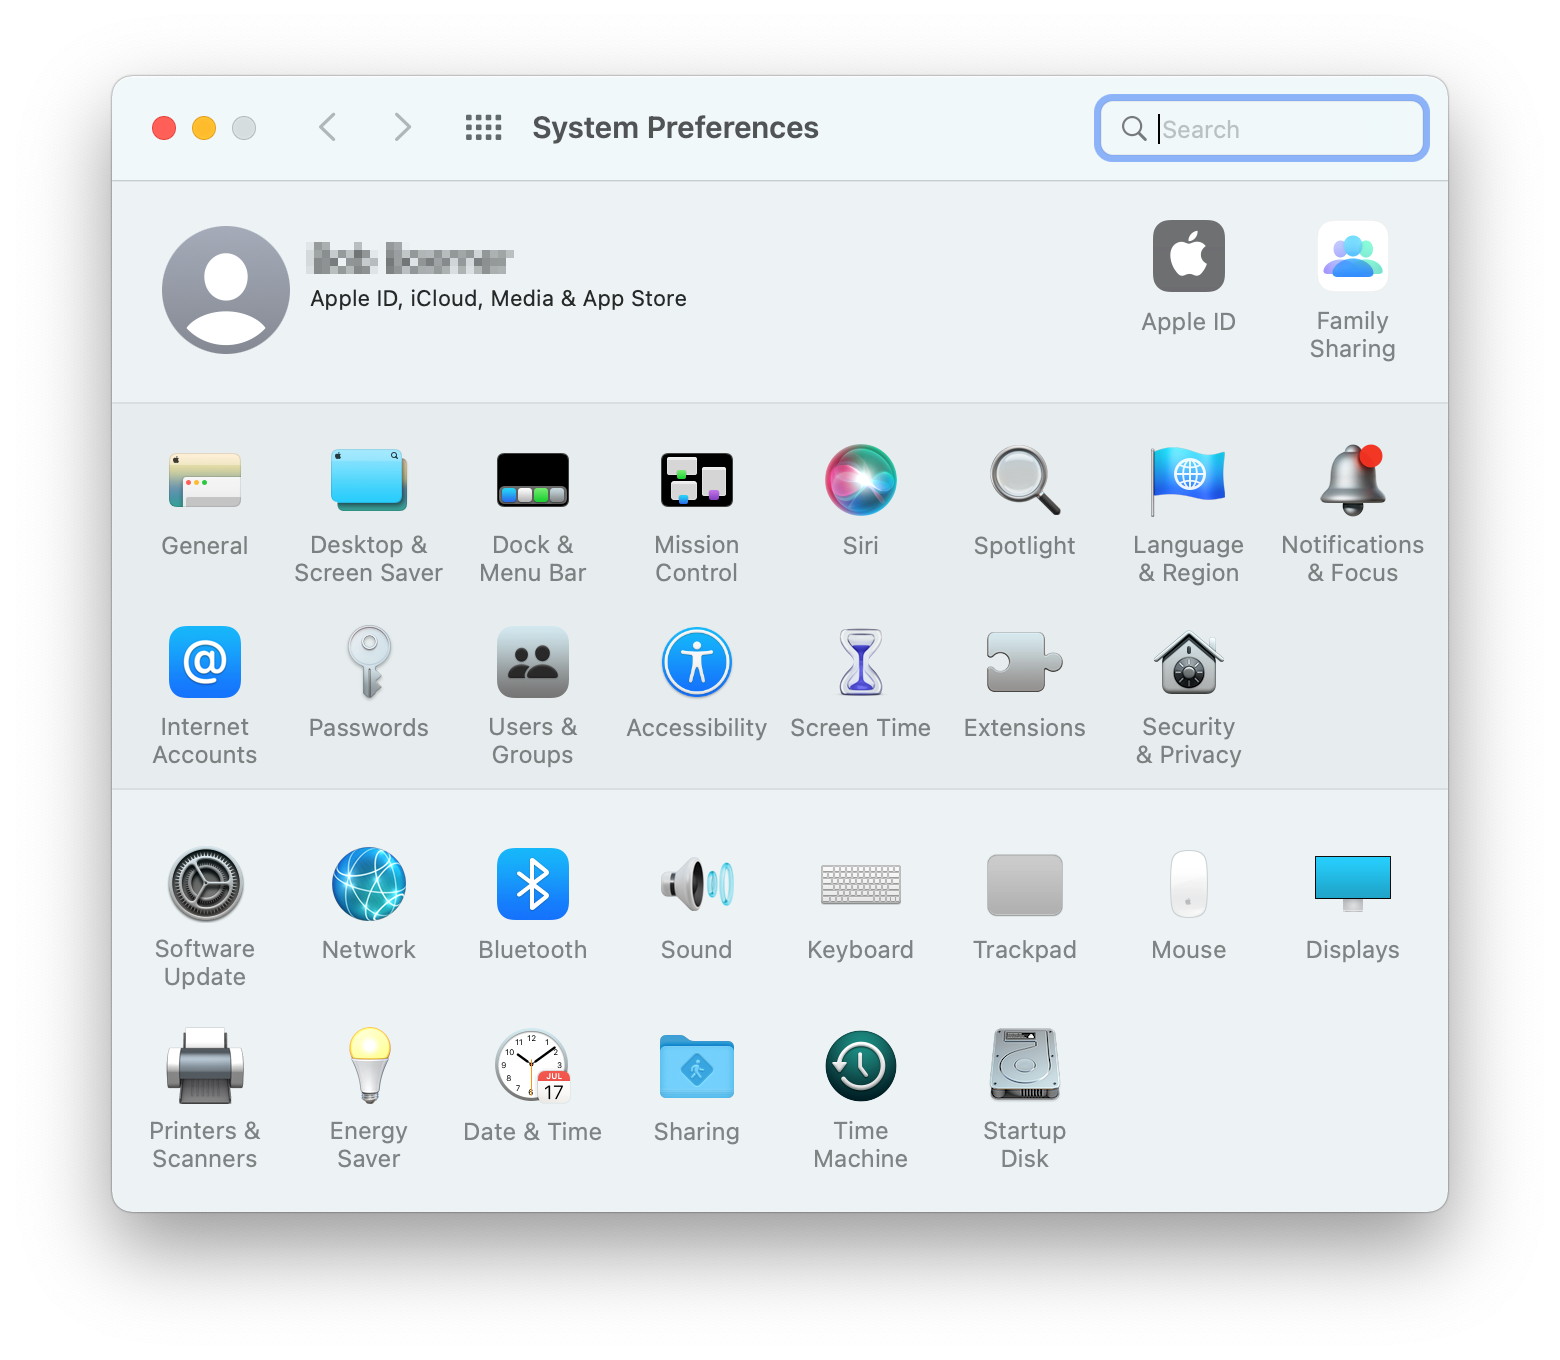
「システム環境設定」を開き、「通知と集中」をクリックします。
22. 画面内の「通知」タブ中の「通知を許可」のチェックボックスをオンにします。こうすることで、DisplayLink 機器が接続されている間に macOS が通知するメッセージが表示されるようになります。
23. 以上のステップをすべて行うと、インストールは完了です。
DisplayLink Manager for macOS の使用手順
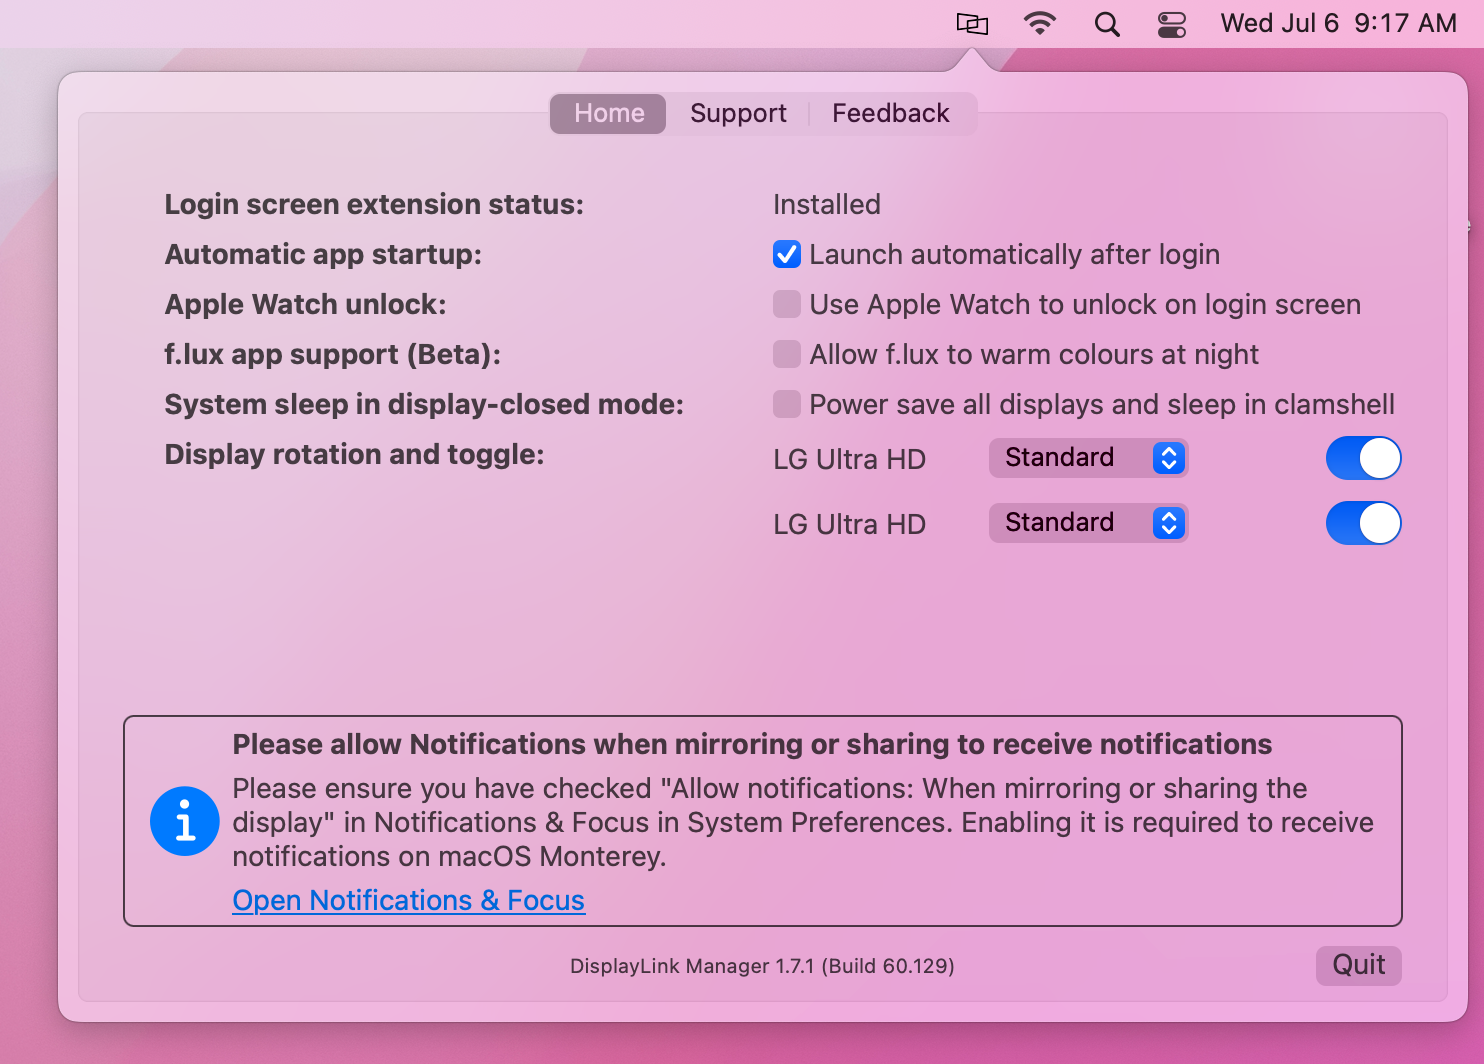
DisplayLink Manager アプリケーションをインストールすると、画面上部の Apple メニューバー内に作成された「DisplayLink Manager アプリケーション」アイコンから、アプリケーション・ステータス画面を表示できるようになります。下記は、バージョン 1.7.1 の画面です。
** アプリケーションが起動していないと、メニューバー内に「DisplayLink Manager」が表示されません。そのような場合は、Finder の「アプリケーション」フォルダに移動し「DisplayLink Manager」をダブルクリックして、アプリケーションを手動で起動してください。**
「DisplayLink Manager」の「ホーム」タブ内には、いくつかのオプション項目が用意されています。この画面に表示される項目は、導入されている DisplayLink Manager アプリケーションのバージョンによって多少異なります。
1. ログイン画面拡張(Login screen extension status)
a. 製品説明
Mac システムの電源を入れて起動しログイン画面が表示された時点では、サードパーティアプリケーション(「DisplayLink Manager」もその一つ)はまだ実行されていません。 そのため、DisplayLink 機器を経由してシステムに接続されたモニタは何も表示できません。
しかしこの「ログイン画面拡張機能」オプションを使用すると、システムログイン後アプリケーションがロードされるより前に、外部モニタを有効にすることができます。
この機能の使用は任意で DisplayLink 機器を使用するために必須ではありません。 しかし、Mac システムに接続されたモニターが DisplayLink 接続だけの場合などの、特定の状況下で有用といえます。
既定値では、「Login screen extension status: (ログイン拡張画面機能の状態)」の値は「Available to download and install(ダウンロードおよび導入可能)」となっています。この機能を導入後には、状態が「Installed(導入済み)」となります。
b. 導入手順
- DisplayLink Manager のホームタブ内、「Login screen extension status」の右にある「download」リンクをクリックして、当拡張機能をダウンロードします。
- 拡張機能をインストールします。
- インストールが完了すると、この拡張機能は「installed」と表示されます。
2. 自動起動(Automatic app startup)
「ログイン後に自動的に起動する」オプションの横にチェックマークを付けると、システムの電源が入るたびに DisplayLink Manager アプリケーションが自動的に起動するようになります。
DisplayLink 機能を使った機器はアプリケーションが起動していないと機能できませんので、効率化のためにこのオプションにはチェックを入れておくことをお勧めします(規定値ではオンになっています)。
3. Apple Watch アンロック (Apple Watch unlock)
「Apple Watchを使用してログイン画面でロックを解除する」にチェックを入れると、DisplayLink デバイスに接続した状態で Apple Watch を使用し、Mac のロックを解除ができます。
この機能については、Apple 社の技術サポートページ「Apple Watch で Mac のロックを解除する」を参照してください。
** 注意:この「Apple Watch アンロック」機能は、スクリーンセーバーと併用できません。この機能を使用したい場合は、スクリーンセーバーを無効にしてください。 **
4. f.lux アプリケーションのサポート(ベータ版)
Mac システムでは、時間帯によってディスプレイの色を自動調整してブルーライトの影響を最適化できる、サードパーティ製の「f.lux」というアプリケーションが使用できます(訳注:日本語版は提供されていません)。
macOS にこの f.lux がすでに導入されている場合にこの「f.lux app support (Beta)」にチェックをいれると、DisplayLink 機器経由で接続したモニターでもこれを有効にできます(バージョン 1.7.1 以降)。ただし、下記の重要な注意点に留意して使用を検討してください。
- この機能は、1.7.1 の時点ではベータ版のため、完全には正しく機能しないことがあります。
- この機能は DisplayLink 社の DL-3xxxx、DL-5xxx、DL-6xxxx チップセットを搭載したグラフィック機器で対応していますが、DL-6xxx チップセットでは DisplayPort 出力にのみ限定されます。DL-6xxx チップセット使用の機器の HDMI 出力には非対応です。(例: Plugable 社製 USBC-6950U / USBC-6950UE グラフィック変換アダプターの HDMI 出力ポートは非対応だが、DisplayPort 出力ポートは対応)
5. ディスプレイを閉じてシステム・スリープ(System sleep in display-closed mode)
この機能は、macOS 12 Monterey 以降を搭載したラップトップモデルで DisplayLink 技術製品を使用する際に有効です。
Mac システムでは、ラップトップモデルのディスプレイを閉じて内蔵ディスプレイをオフにし、外部モニタのみを有効にして使用することができます。これは「クラムシェルモード」と呼ばれます。DisplayLink 機器経由で接続した外部モニタをこのモードで使用するためには、「外付けマウス、キーボードおよび電源が接続されていること」が必須です。
このクラムシェルモードが可能なシステム構成でディスプレイを閉じた際に、逆にシステムをスリープにしたい場合があります。DisplayLink Manager 1.7.1 で追加された「System sleep in display-closed mode」の右側にあるチェックボックスをオンにすると、システムはクラムシェルモードにならず、Mac システム全体がスリープするようになります。
6. 画面の回転と切り替え(Display rotation and toggle)
a. 概要
DisplayLink Manager 1.6 以前では、M1 Mac システムに DisplayLink デバイス経由で接続したモニターは、画面回転をすること(縦置きにするなど)ができませんでした。(Intel システムにはこの制限はありません。)しかし、macOS 12.x システムと DisplayLink Manager 1.6 以降の組み合わせでは、この M1 / M2 Mac システム固有の問題が解消しています。
重要:M1 / M2 Mac における画面回転設定は「DisplayLink Manager アプリケーション」内で設定する必要があり、macOS 11.x 以前では使用できない点に注意してください。
b. Intel チップ搭載の Mac システム
Intel Mac システムに DisplayLink 機器経由でモニタが接続されている環境では、モニタ名がこの「Display rotation and toggle」の右側にリストされます。複数外部モニターが接続されている場合は、各モニターの名前にマウスポインタを合わせるとそれぞれ区別することができます(選択したモニターの中に赤い識別ボックスが表示されます)。
この DisplayLink Manager 内でモニタ名の横にあるトグルボタンをオンにすると、それぞれのモニタを回転できるようになります。
この状態にしてから、macOS システム環境設定の「ディスプレイ」内で、画面の向きを回転してください。
c. M1 / M2 チップ搭載の Mac システム
M1 / M2 Mac システムに DisplayLink 機器経由でモニタが接続されている環境では、画面の回転は macOS 12 Monterey 以降でのみ可能です。また、macOS のシステム環境設定ではなく、DisplayLink Manager 内で回転設定をする必要があります。
複数外部モニターが接続されている場合は、各モニターの名前にマウスポインタを合わせるとそれぞれ区別することができます(選択したモニターの中に赤い識別ボックスが表示されます)。 リストされているモニタ名の横にあるドロップダウンから、適切な値(Standard、90°、180° 、270° )を選択してください。
当機能の詳細については、DisplayLink 技術の開発元である Synaptics 社の情報(英語)「DisplayLink Manager App Rotation for Apple M1 on macOS 12+」ページを参照してください。
