Quick Links
Update – September 25, 2023 – We’ve tested and validated a new DriverKit DEXT v2.4.0 for the ASIX AX88179 chipset that we use in our wired USB3-E1000 and USBC-E1000 Ethernet adapters to restore functionality in macOS 14.x Sonoma.
Click the button below to download the drivers for macOS 14.x Sonoma. Then, scroll down to the Installation Instructions section for instructions to uninstall the current driver before installing the latest version.
Update – October 29, 2021 – We’ve tested and validated a new DriverKit DEXT v2.0.0 for the ASIX AX88179 chipset that we use in our wired USB3-E1000 and USBC-E1000 Ethernet adapters to restore functionality in macOS 12.x Monterey.
Click the button below to download the drivers for macOS 12.x Monterey. Then, scroll down to the Installation Instructions section for instructions to uninstall the current driver before installing the latest version.
**Update – October 27, 2021 – We're aware of an issue affecting the installation and use of the ASIX AX88179 drivers on macOS 12.x Monterey, and are working towards a resolution. This issue affects our USB3-E1000 and USBC-E1000 adapters. Please stay tuned to this article, and our main blog post as we investigate the issue.
**Update – August 18, 2021 – We’ve tested and validated a new DriverKit DEXT v1.3.0 (Beta 1) for the AX88179 chipset that we use in our USB3-E1000, and USBC-E1000 adapters to restore functionality to M1 Systems running macOS 11.5.1 and any users running the macOS 12 Monterey Beta.
Click the button below to download the drivers, and then scroll down to the new Update for M1 Systems, and macOS 11.5.1+ or macOS 12 Monterey section for instructions to uninstall the current driver before installing the latest version.
**Update - July 28, 2021 - We're aware of an issue affecting the installation and operation of these drivers on M1 Mac systems running Big Sur 11.5.1, and are investigating the issue and potential solutions. Please stay tuned to our blog post and our website for further details as we investigate this emerging issue.
Thank you!
**Original Article - May 28, 2021 - For the full background regarding the history of ASIX drivers for the Plugable USB3-E1000 and USBC-E1000, please visit our blog post for further details.
Click the button below to download the drivers.
Installation Instructions
Download the driver from the link above in the Driver section. This download should automatically go into your Downloads folder. Do not plug your Ethernet Adapter into your computer until prompted!
Follow these steps after you’ve downloaded the installation file. (Please note, that these screenshots show the previous v1.2.0 version of the drivers, but the steps will work with the new drivers)
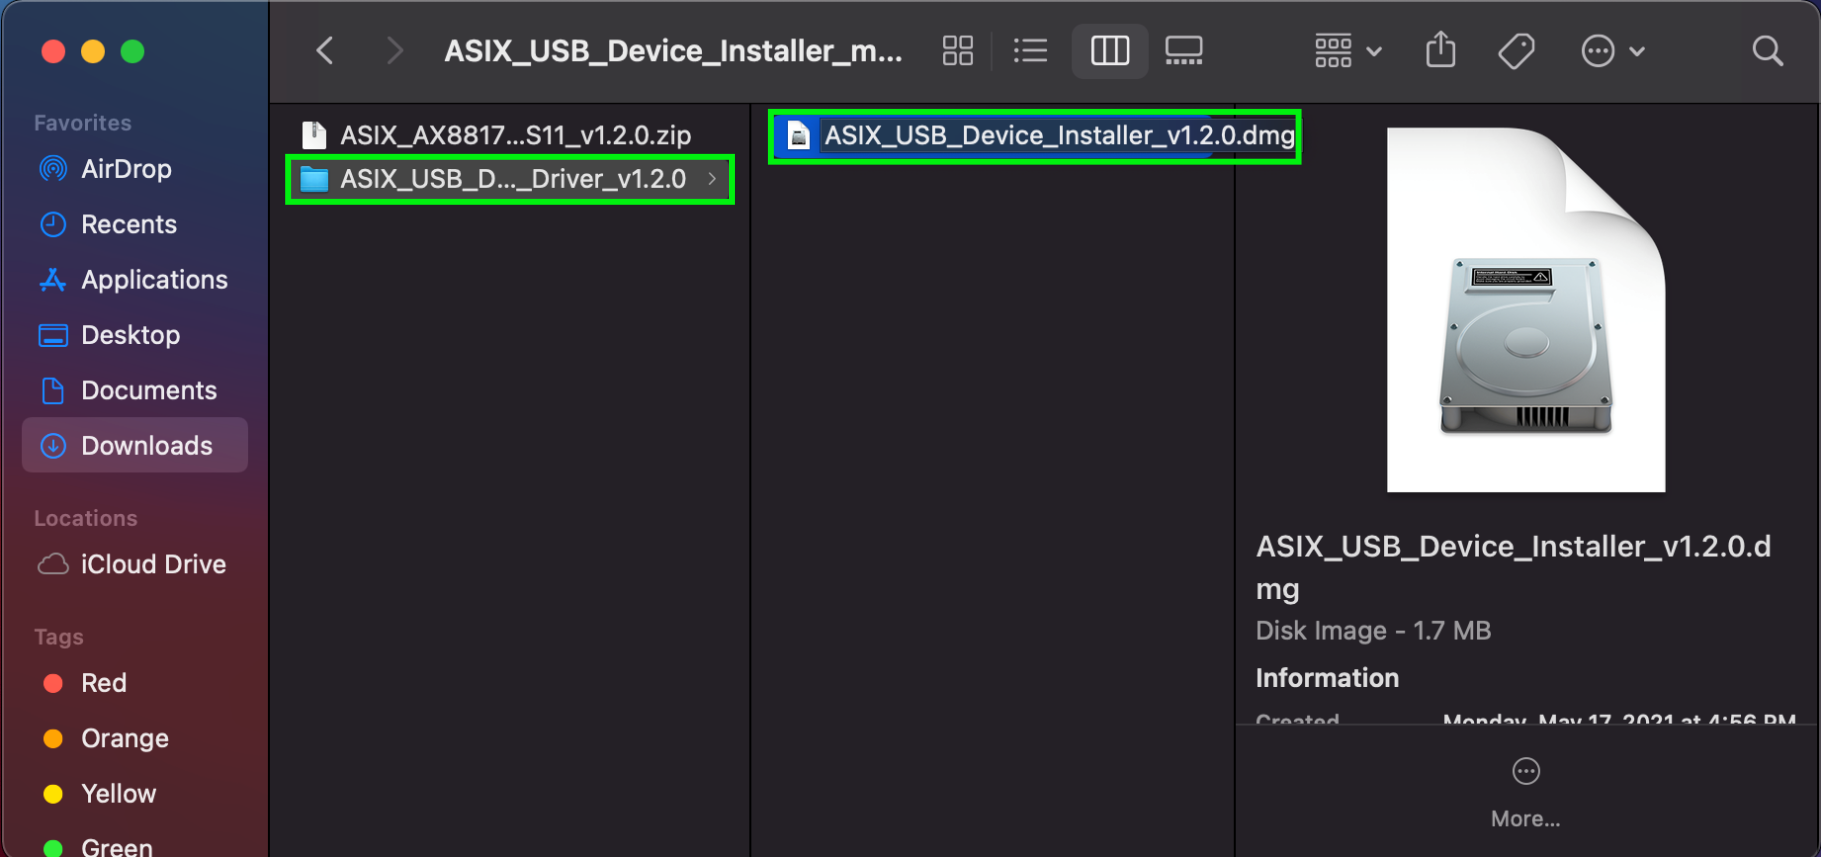
- Go into your Downloads folder, open the .zip archive, the folder within, and then double click on the ASIX_USB_Device_Installer_v1.2.0.dmg disk image file.
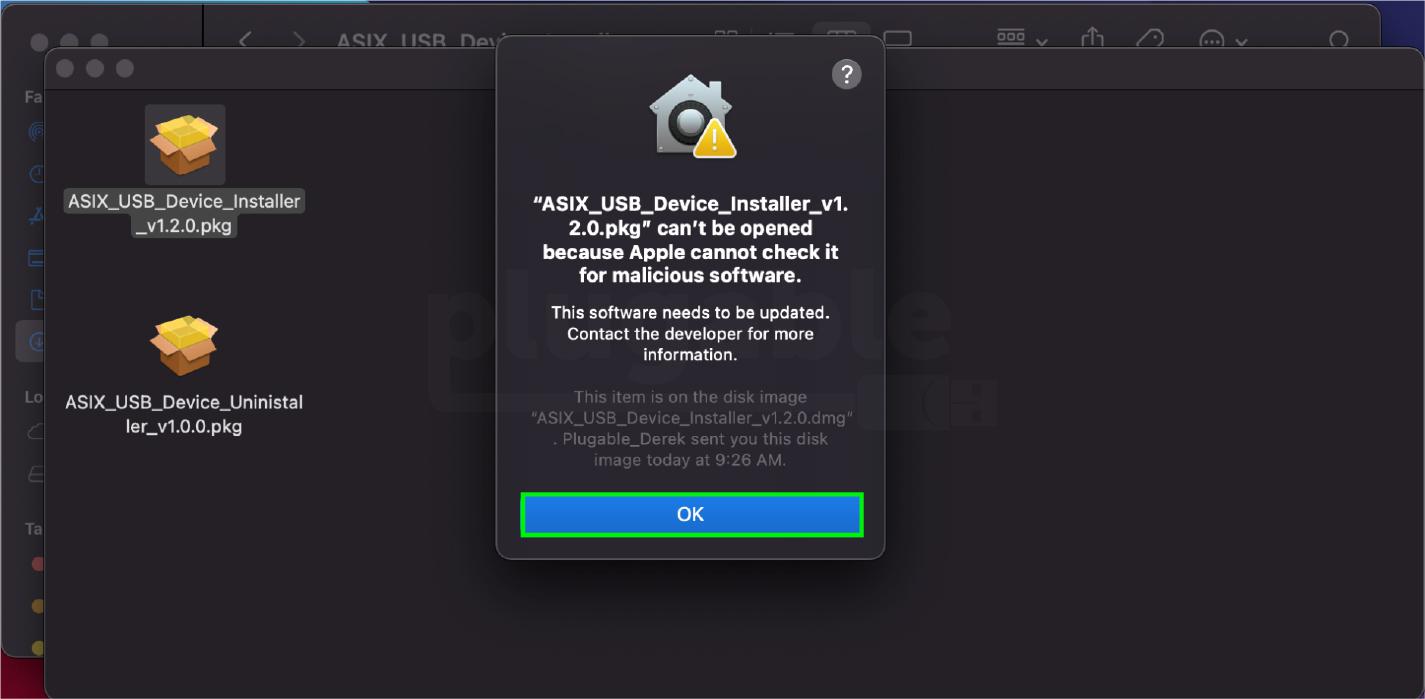
- Next, double click and open the ASIX_USB_Device_Installer_v1.2.0.pkg package. You may see the following screen pop up stating that Apple can’t check the software package for malicious software. To be clear, these drivers are safe, validated, and code-signed by Apple. But, since the download hasn’t come directly from Apple’s servers, this message will display. Click OK to proceed.
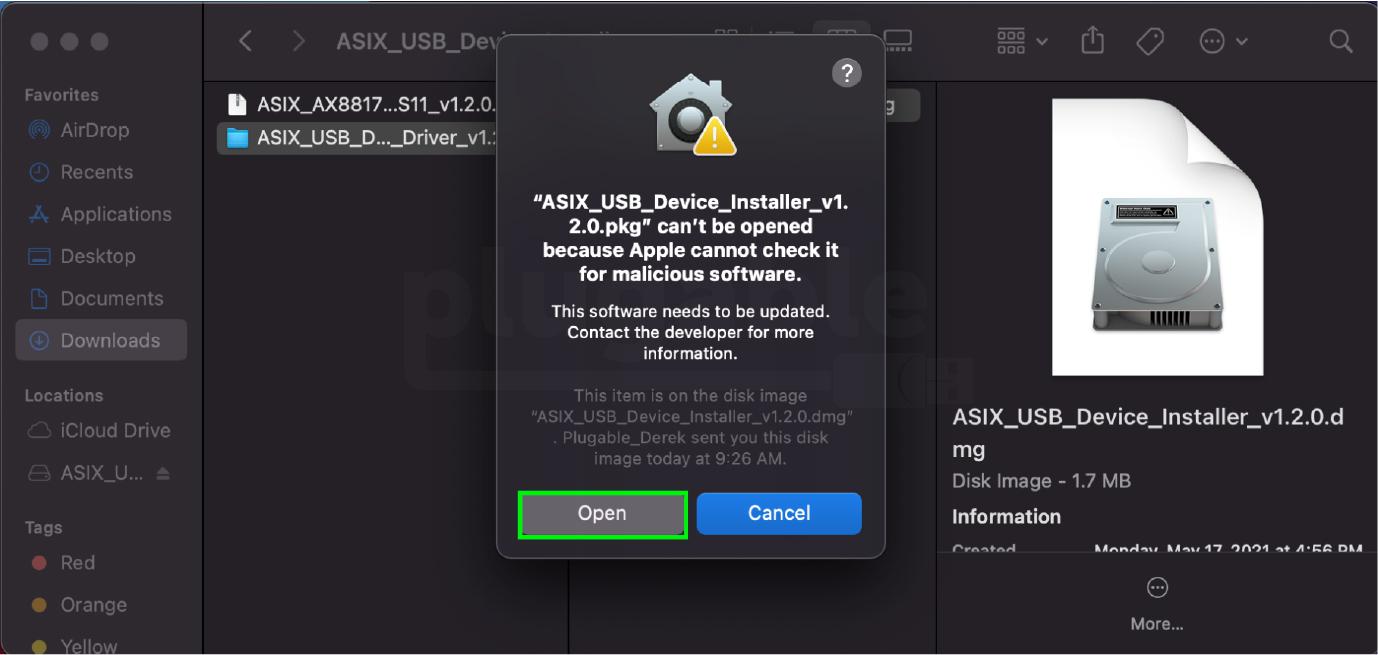
- Next, click Open.
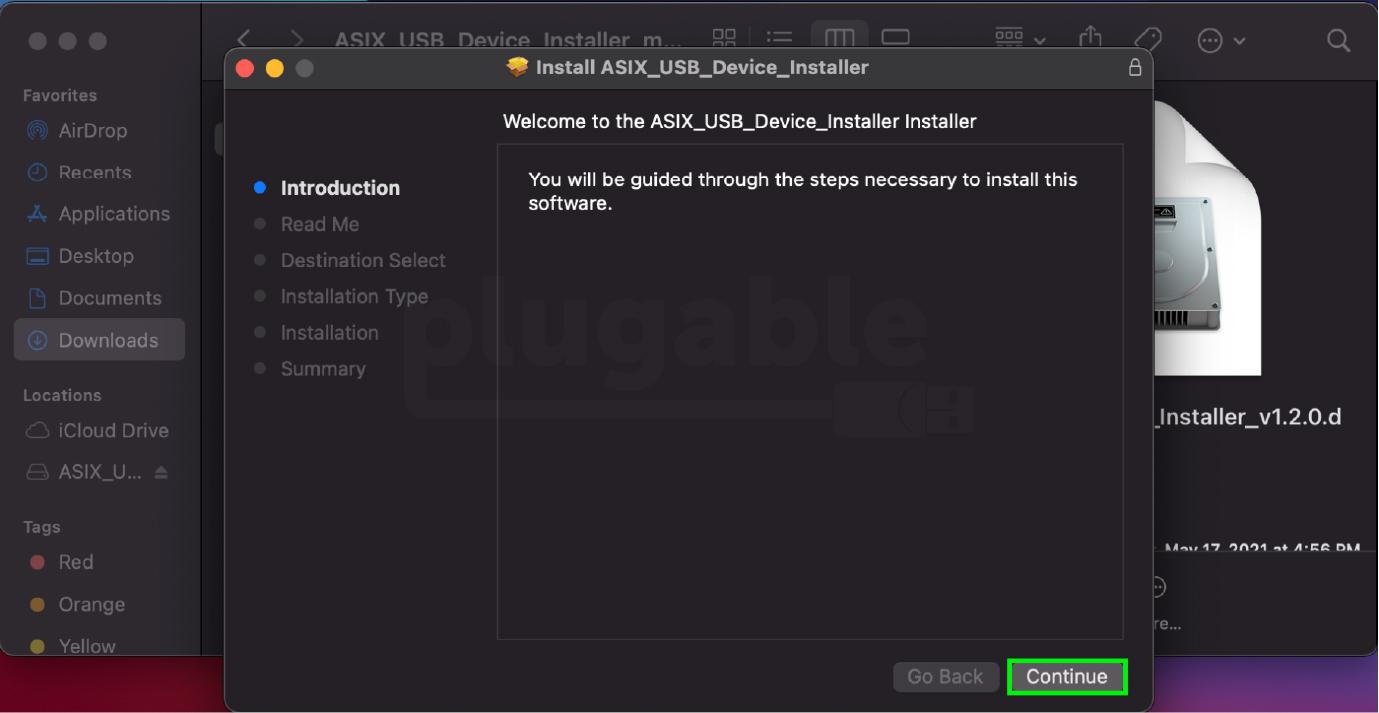
- Click Continue through the the next screens until prompted to install.
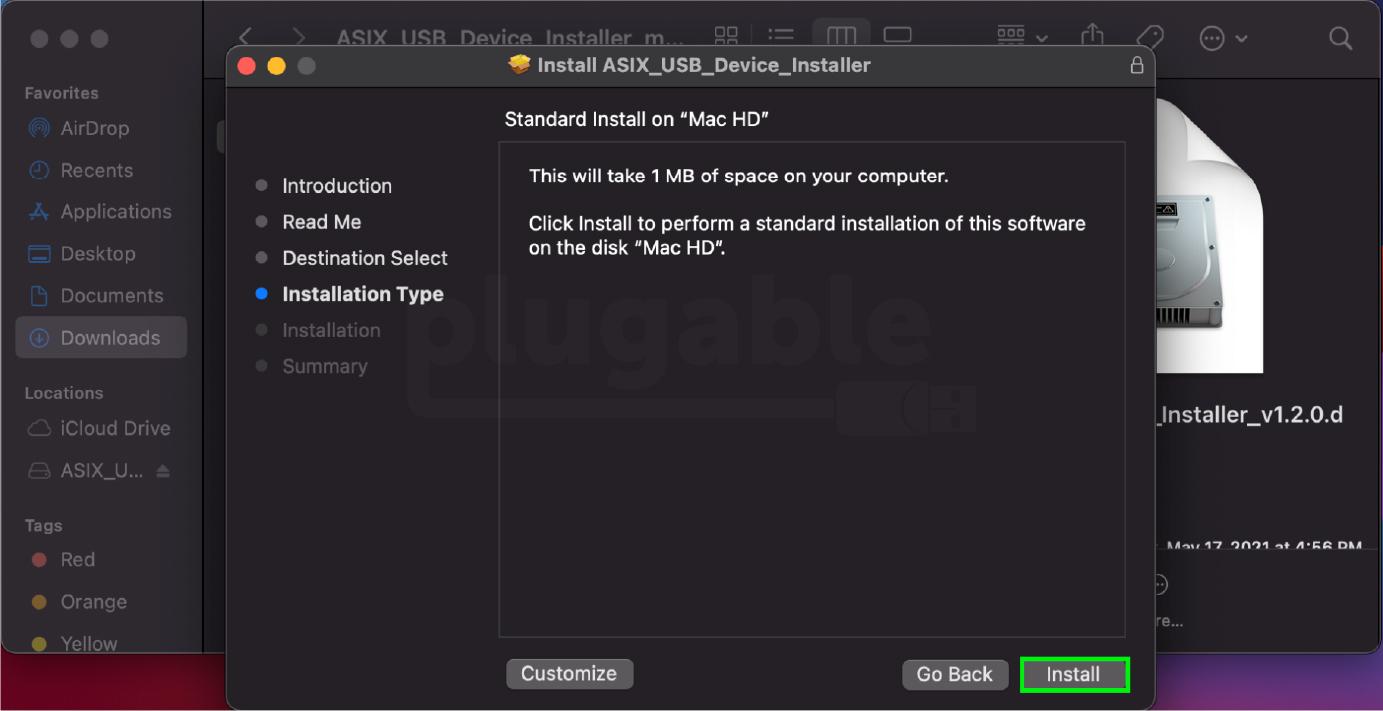
- Then, click Install to begin the installation.
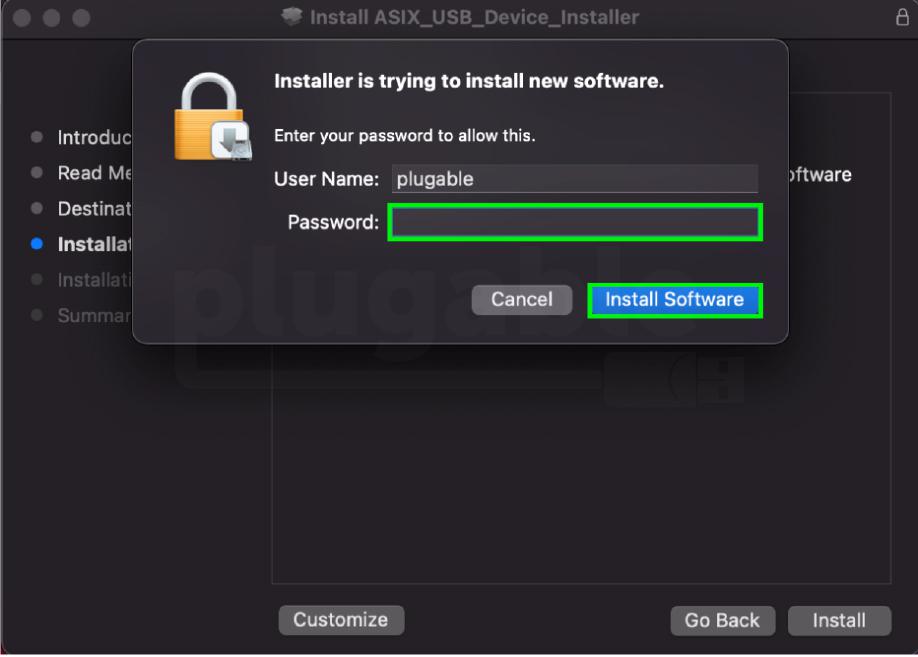
- You will be prompted to put in your password. Enter your password into the box, and then click Install Software.
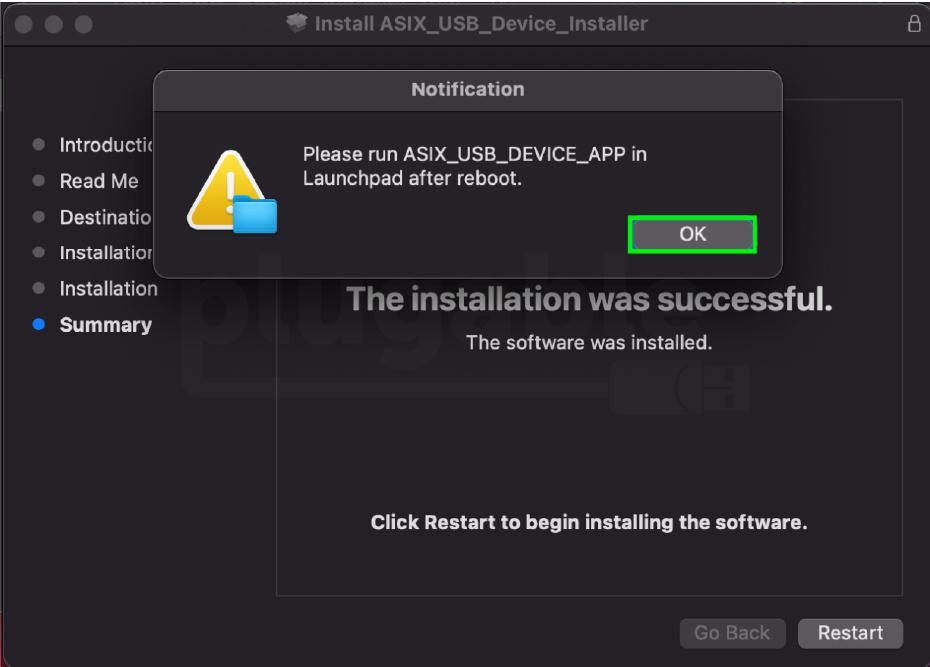
- After you enter your password, the installation will begin. Once it has finished, you’ll see this message to run ASIX_USB_DEVICE_APP in the launchpad after rebooting. Click OK to acknowledge this warning, and then click Restart to complete the installation.
-
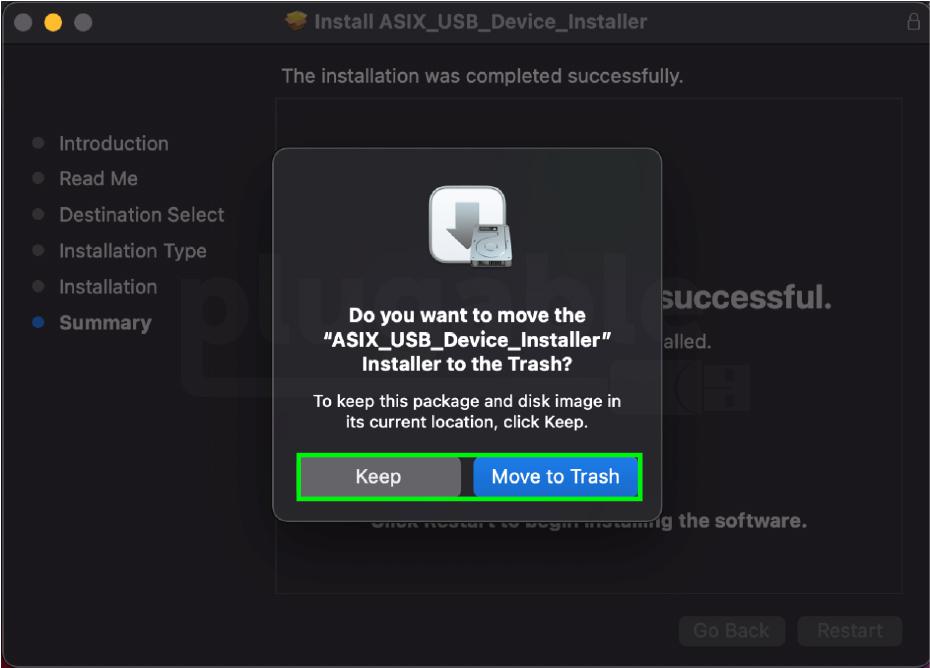
OPTIONAL - After you click Restart, another window should ask if you would like to give the installer access to the Downloads folder. If you allow the installer to have access, you can automatically move the package file to the trash, or you can do it manually later if you'd like.
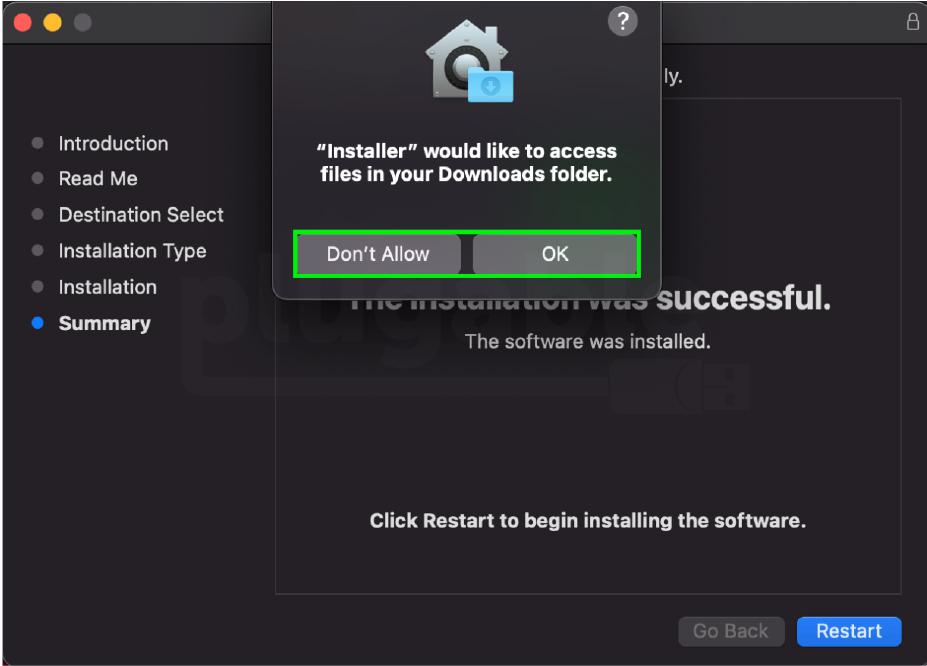
- After making your selection to keep the file or move it to the trash, your computer will Reboot. Next, we need to run the ASIX_USB_DEVICE_APP as we saw in step 7.
Post-Reboot Steps
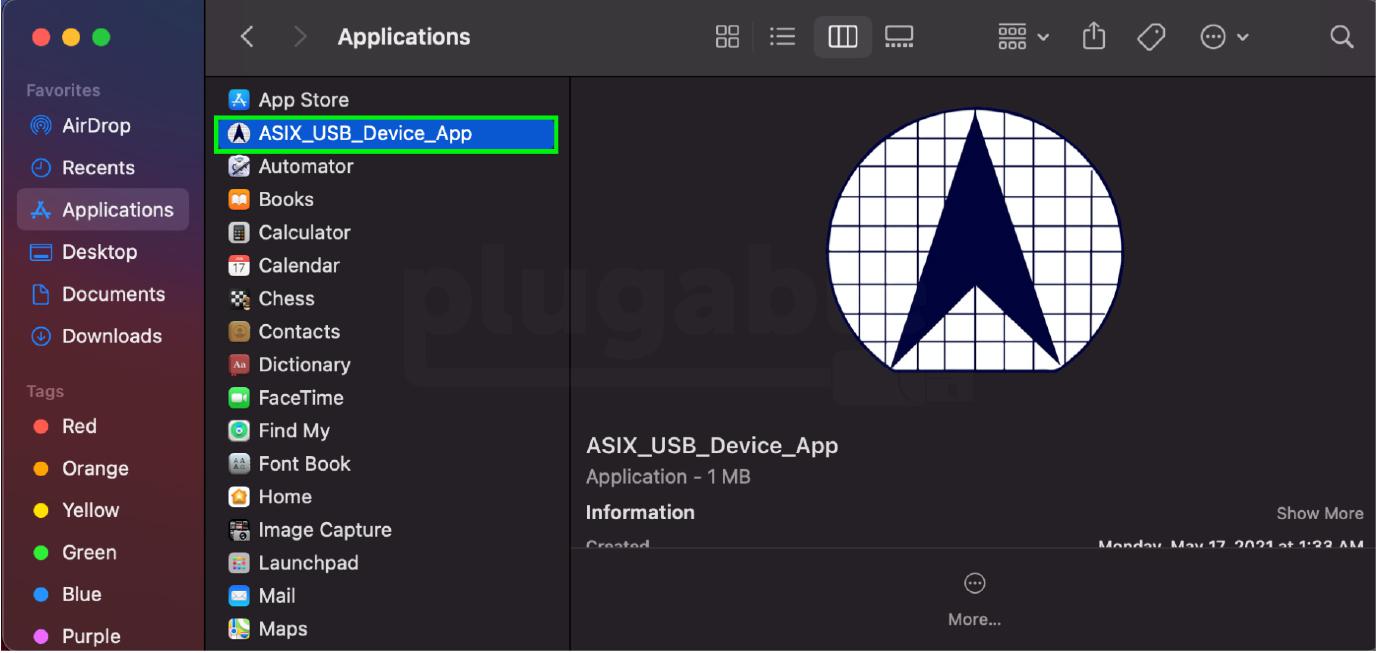
- Open a Finder window, click on Applications and then double click on the ASIX_USB_DEVICE_APP item in your Applications folder
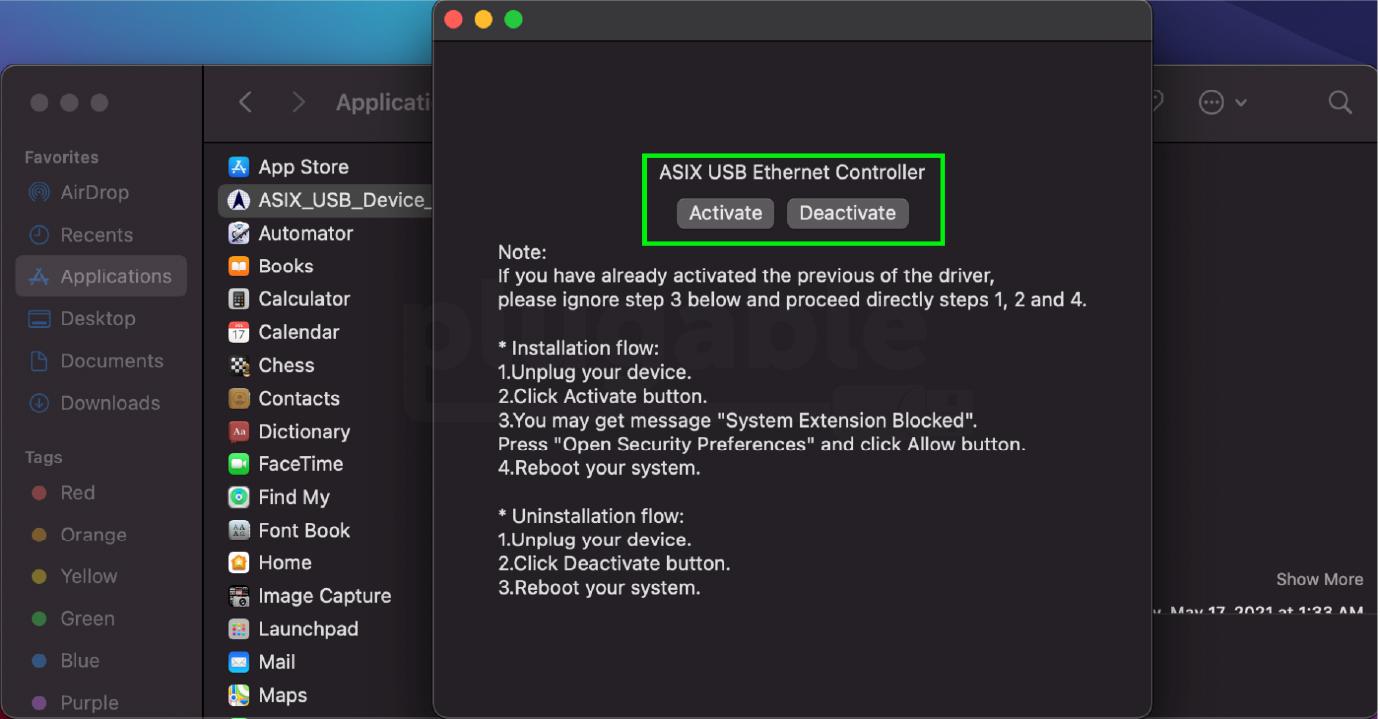
- A screen will pop up with details about activating the driver installation. These must be followed to completion for functionality! This includes not plugging your Ethernet adapter in until after step 4 in their instructions. Click Activate to continue.
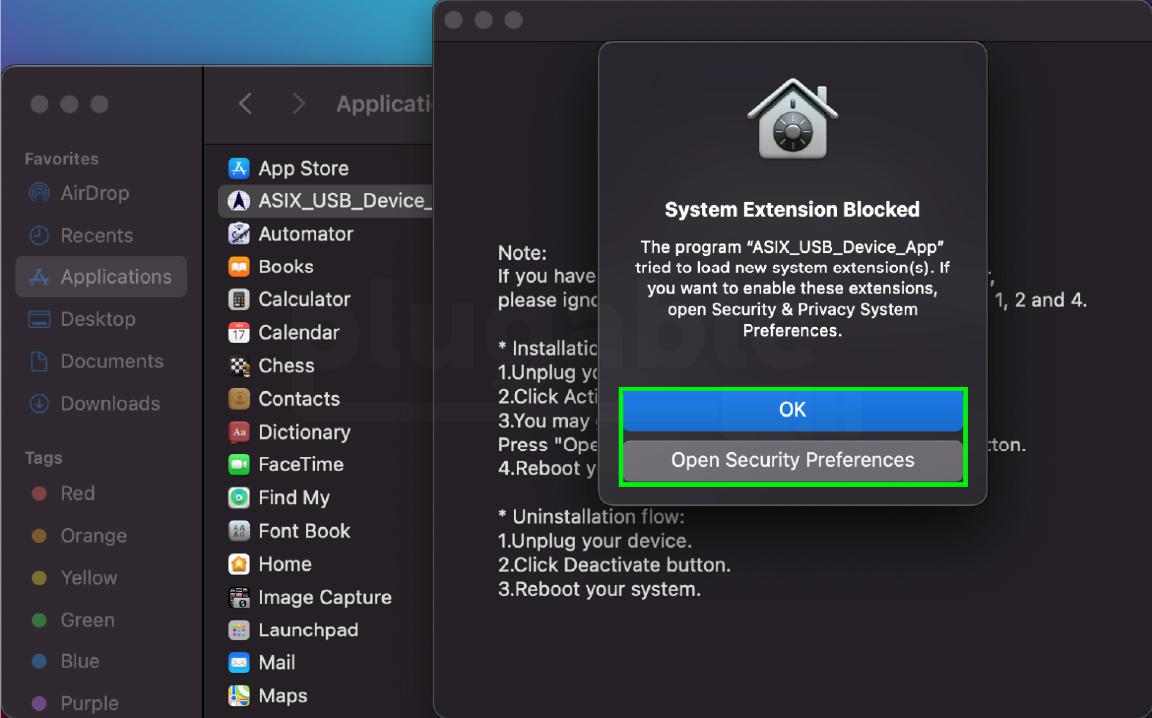
- You’ll receive a message pop up stating that the System Extension is Blocked. Click Open Security Preferences. (Note: This will occur the first time you install the new ASIX DEXT driver. Subsequent installs or updates to the driver package should not require a repeat approval of the activation.)
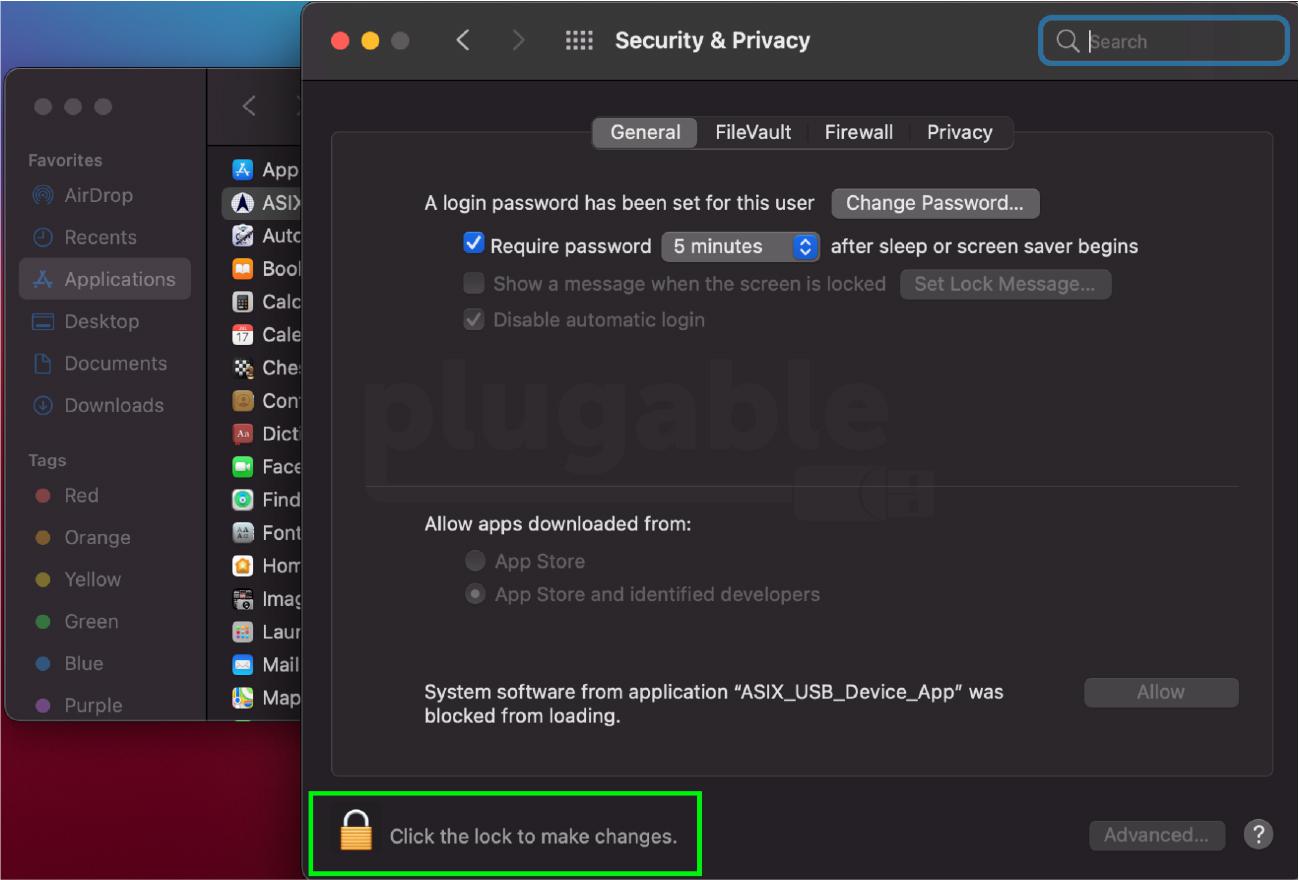
- This will take you to the Security & Privacy preferences (Apple menu > System Preferences > Security & Privacy > Network > General). Look down to the bottom left of the window, and you’ll see a Gold Lock. Click the lock, which will open a prompt asking for your password.
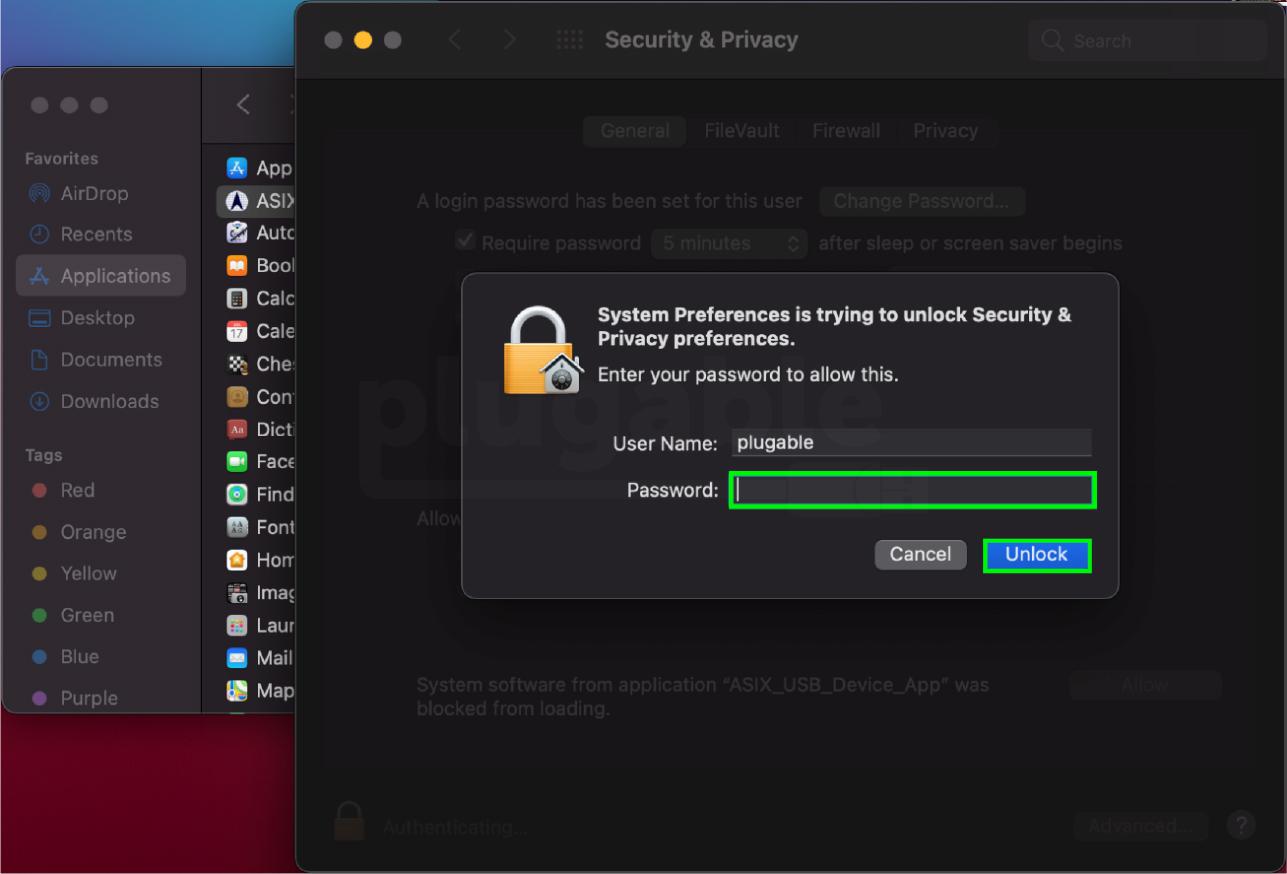
- Enter your password in the box to open the lock, and click Unlock when you’re finished.
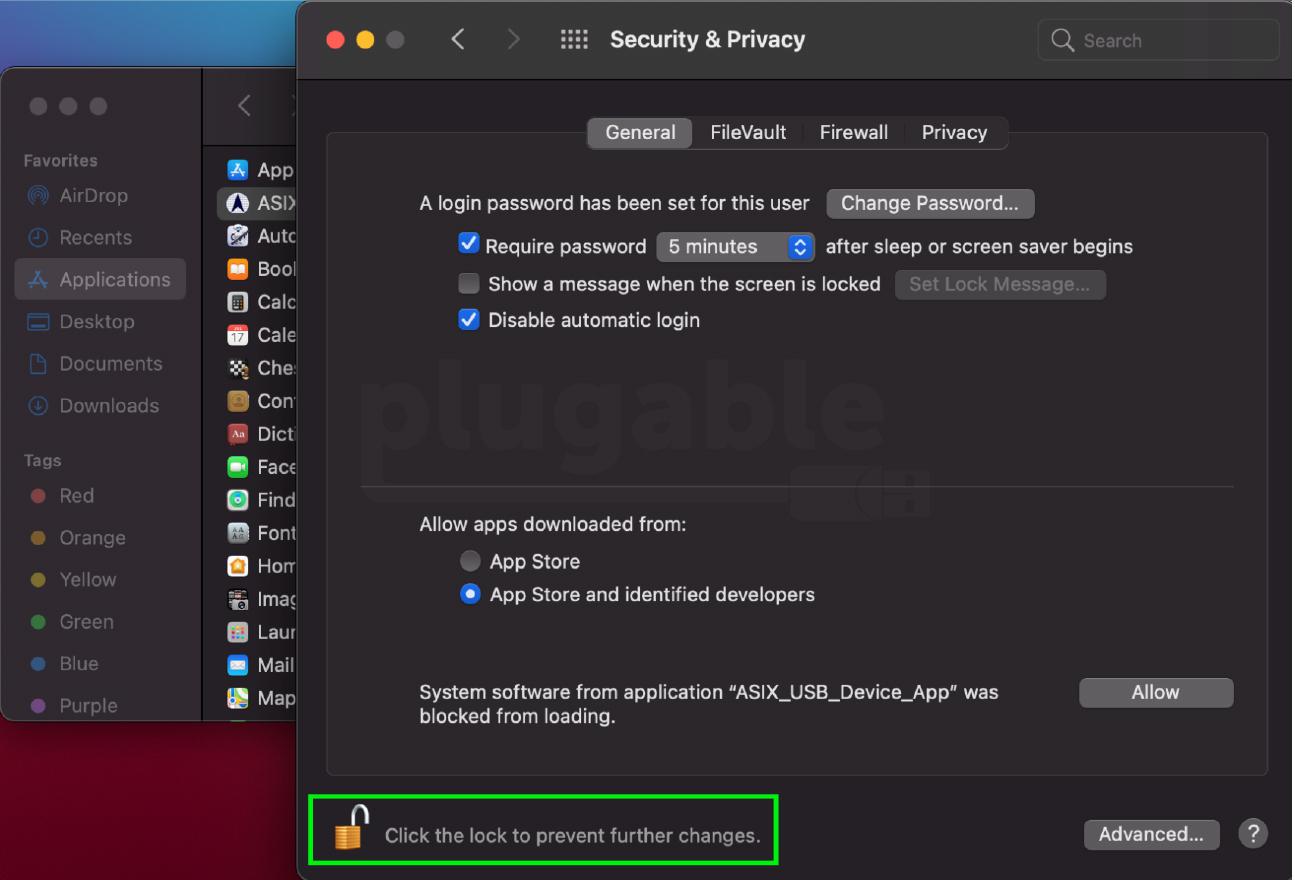
- Now, with the lock open, click Allow to allow the driver extension to proceed. Then, exit System Preferences and the ASIX Application, and Restart your computer.
- Once you have restarted your computer, please plug the Ethernet adapter with Ethernet cable into your computer, and let’s check for an active connection in the Network pane(Apple Menu > System Preferences > Network)
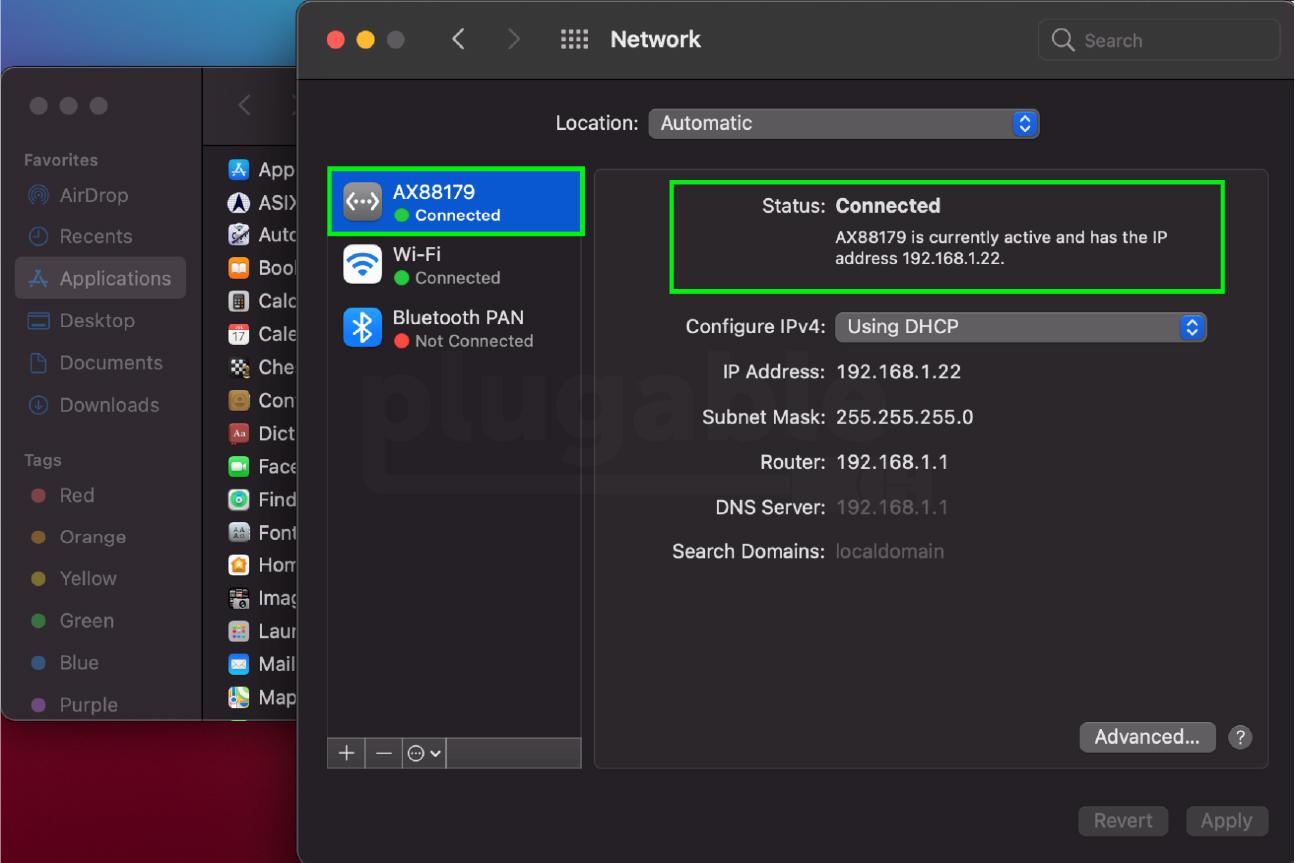
After checking your network status, you may still have the ASIX application running on your dock. You don’t need to keep the app open for network functionality, but you cannot delete the application at this time. This is a requirement for DEXT functionality.
Uninstallation Steps
- After downloading the installation file from above, go into your Downloads folder, open the .zip archive and then double click on the disk image file:
- ASIX_USB_Device_Installer_v1.3.0.dmg for macOS 11.x Big Sur
- ASIX_USB_Device_Installer_v2.0.0.dmg for macOS 12.x Monterey
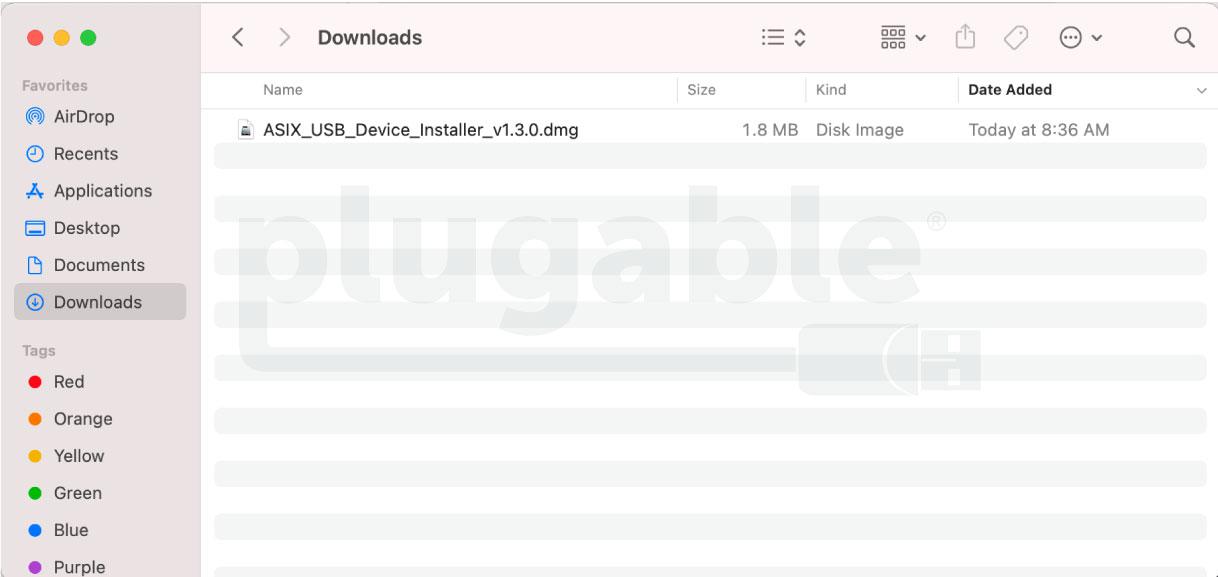
- We need to uninstall the current driver set before installing the new one. Double click on the ASIX_USB_Device_Uninstaller_v1.0.0.pkg package and a screen for the Uninstaller will appear. Click Continue, to move to the next screen
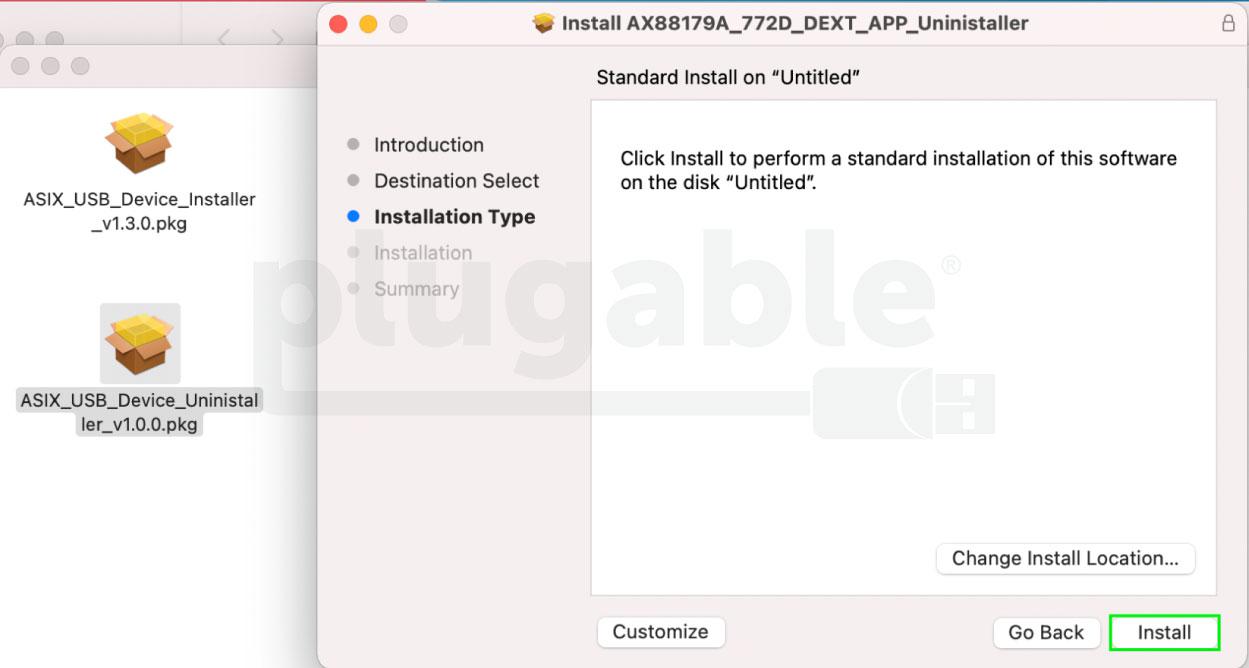
- Click Install to move on (Some of these next screens say, "install", but don't worry, it will actually uninstall the driver!). A screen will pop up asking you for your password. Enter in your password, and then click Install Software to move on.
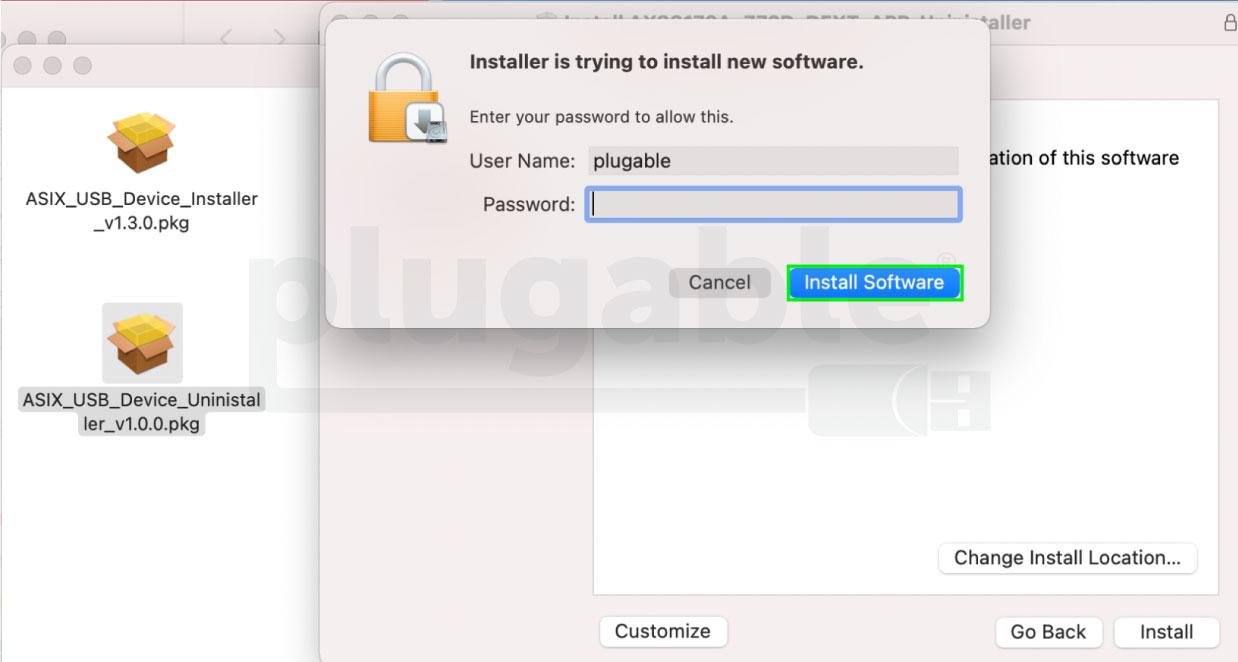
- Next, click Install Software and continue through the next screens until the installation is complete. Restart the computer after the installation has finished
- After restarting, open the .zip archive again, and double click on the ASIX_USB_Device_Installer_v1.3.0.dmg disk image file. Run the Installer this time, and follow the installation process through to the end.
Please note, the screenshots and steps in the Installation Instructions section reference the v1.2.0 of the drivers that we uninstalled earlier.
Known Issues
ASIX has been alerted to these issues and continues to investigate these behaviors while working towards a resolution. If you encounter any additional issues that you can reproduce, please let us know the steps to reproduce the problem and we will work with ASIX on investigating the behavior.
- DHCP Lease - There are a few issues that may come up after installation and require manually adding the adapter to the Network list, and or renewing the DHCP Lease.
- If the adapter shows up in the Network list but is disconnected
- If the adapter doesn't show up in the Network list
- These tasks are easy to do, and we have steps laid out in another article that you can see if you click here.
- M1 Sleep - We have observed inconsistencies in the adapter's functionality during Sleep / Power Nap in macOS 11 on Apple M1 hosts. This includes the network connection not being picked up during Sleep and the wired connection not restoring to the host after the system Wakes from Sleep. In most cases, simply reconnecting the Ethernet adapter to the host has solved the problem. However, in some instances, the computer required a restart.
We hope this was helpful! If you have additional questions, or encounter any issues installing the drivers or using the adapter, please reach out to us directly at support@plugable.com, and we'll be happy to help!

