
Note, for those who prefer a visual answer to this question, Plugable has produced a video that demonstrates how to fix this issue:
For those that prefer a written explanation and solution, please continue reading.
In brief, the source of the issue is due to a phenomenon we refer to as a ‘phantom display’. Making a few quick changes within the Windows Display Settings application will resolve the issue.
To expand further, docking stations based on DisplayLink technology allow a video signal to be transmitted over a USB data only connection. This type of technology is often referred to as an ‘indirect display’ technology. This is to say that the external display is NOT connected directly to the graphics processing unit (GPU) within the host computer, for example to a HDMI video output on the back of the desktop computer.
Modern Windows-based desktop computers will typically assume that at least one monitor is directly to the system’s built-in GPU. In instances where the only external displays connected to the computer are via an indirect display technology such as DisplayLink, the host computer may incorrectly assume that one display is connected directly to the host computer’s built-in video output, even though that is not in fact the case. This display is what we refer to as the ‘phantom display’.
In the scenario described in the Question section of this document, the host computer is making the phantom display the ‘Main’ display within the Windows Display Settings application. For reference, the ‘Main’ display is where Windows by default will place desktop icons, open application windows and present the Windows login screen.
Because Windows is making the ‘phantom display’ the ‘Main’ display, this is why desktop icons and application windows are not visible within the displays connected to the Plugable docking station.
The solution to this issue is to mark the ‘phantom display’ as ‘Disconnected’ within the Windows Display Settings application and make one of the docking station connected displays the ‘Main’ display.
While there is more than one way to accomplish this task, in our experience the most straightforward way to do so is described below.
Please note, our example presumes that:
A. The desktop computer using Windows 11 is already running
B. There are no monitors connected directly to any of the video outputs built-in to the host computer
C. A Plugable DisplayLink-based dock is connected to the computer
D. The Plugable DisplayLink-based dock has two external displays attached
Please also note, while the process outlined below looks lengthy and complicated, in reality the process is fairly simple and can typically be accomplished in under a few minutes.
1. As a preparatory step, please watch our video that describes how to use keyboard shortcuts to move applications within Windows --> https://youtu.be/HBkUG3OLbtw?si=x9O-KQHwIVNQOdWA
It's relatively short (around three minutes) and demonstrates how to move application windows using keys on the keyboard as opposed to using the mouse, and this information will be used later in the process.
2. Once familiarized with how to move application windows using keyboard shortcuts, please right-click on an empty space within one of the two displays connected to the Plugable DisplayLink docking station, and within the context menu that appears please left-click on the 'Display Settings' option.
More than likely, the 'Display Settings' window will not be visible within one of the displays connected to the Plugable docking station. However, a small icon within the Windows taskbar at the bottom of the displays will be visible indicating that the application has been opened.
3. Left-click on the 'Display Settings' icon within the Windows taskbar in order to ensure that the application is selected (most likely it will still not be visible after the click).
4. Once the application is selected, use the Windows keyboard shortcut demonstrated within the aforementioned video (Windows key + Shift key + Right arrow key) once.
Once the key combination has been pressed, the 'Display Settings' application window should appear within one of the displays connected to the Plugable docking station.
*** Note - it may be necessary to use the keyboard shortcut a few times in order to make the window appear as it moves between the displays ***
To put all of that another way, the Display Settings application opened within the phantom display. Once opened and selected as active, the keyboard shortcut moved it from the phantom display into one of the real displays connected to the Plugable docking station.
5. Now that the Display Settings application is visible, at the top of the Display Settings application there should be three numbers visible located within boxes.
The numbers within the boxes represent each display detected by the desktop computer. Two of the numbers represent the real displays, and one of the numbers represents the phantom display.
Click the 'Identify' button that should be visible near the boxes.
When doing so, identification numbers will appear briefly within each display, for example '1', '2' and '3'.
Make a note of the identification number that does NOT appear. This number represents the phantom display.
For this example, we will assume that display '1' represents the 'phantom' display that the desktop computer 'thinks' is there even though it really isn't.
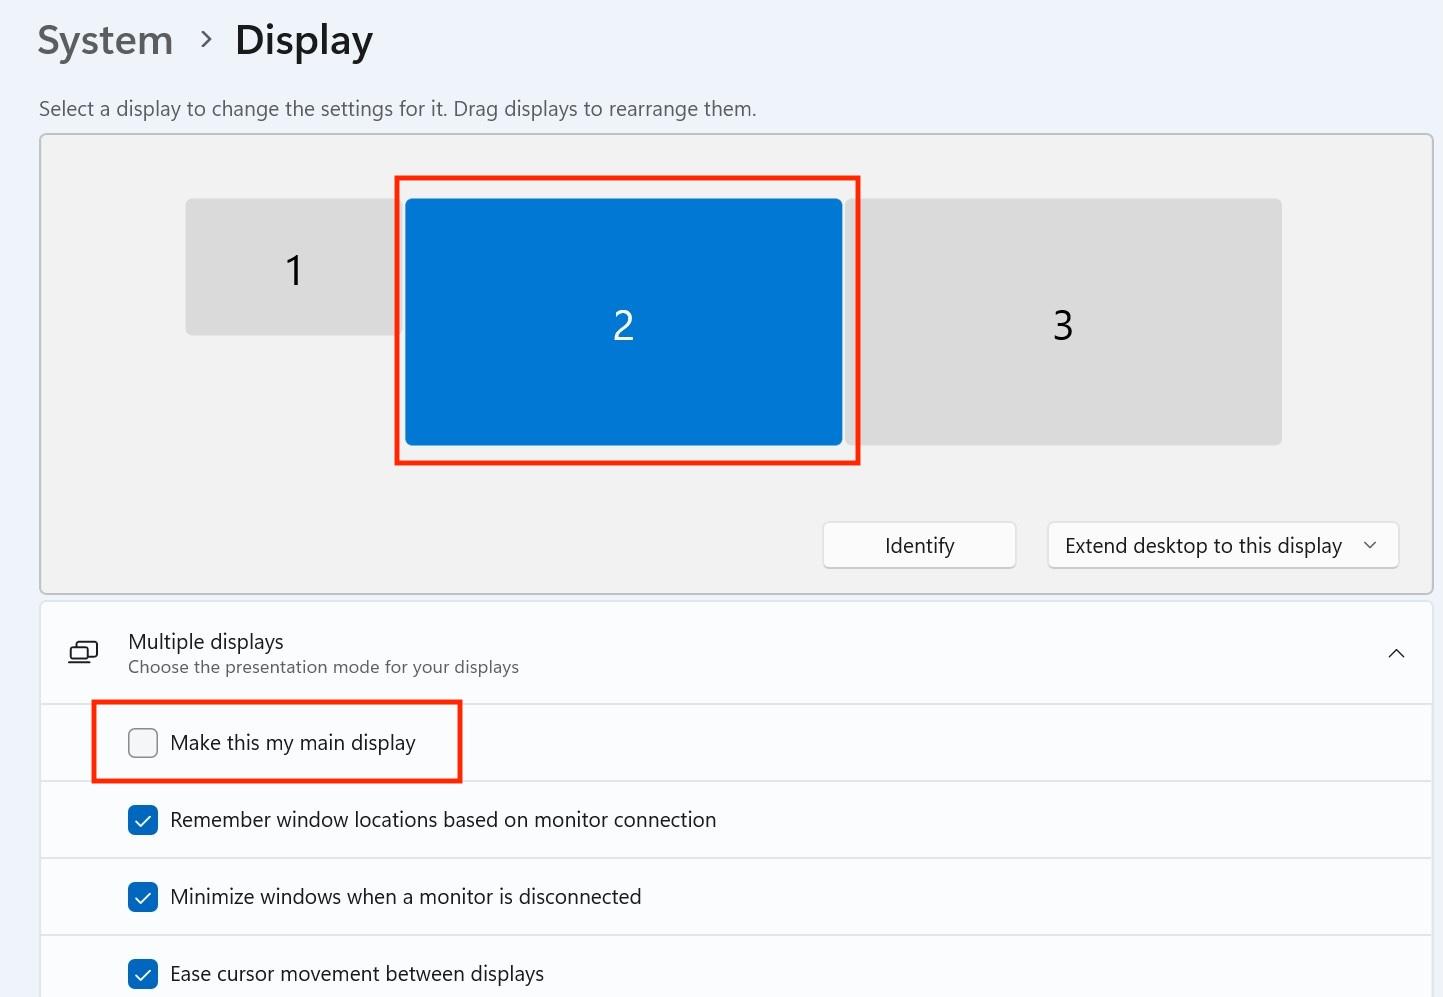
6. Click on the box at the top of the Display Settings application window labeled '2' (one of the displays connected to the Plugable docking station) in order to select it. Once it is selected, the box should turn blue in color.
7. Configure display '2' as the 'Main' display. As a reminder, the 'Main' display is by default where the Windows login screen, desktop icons and application windows will appear.
This is accomplished by placing a check mark next to the ‘Make this my main display’ option below the display numbers
8. Next, click on the box at the top of the Display Settings application window labeled '1' (the 'phantom' display) in order to select it. Once it is selected, the box should turn blue in color.
9. Click on the drop-down box located below the display numbers and change the phantom display’s configuration from 'Extend this display' to 'Disconnect this display'.
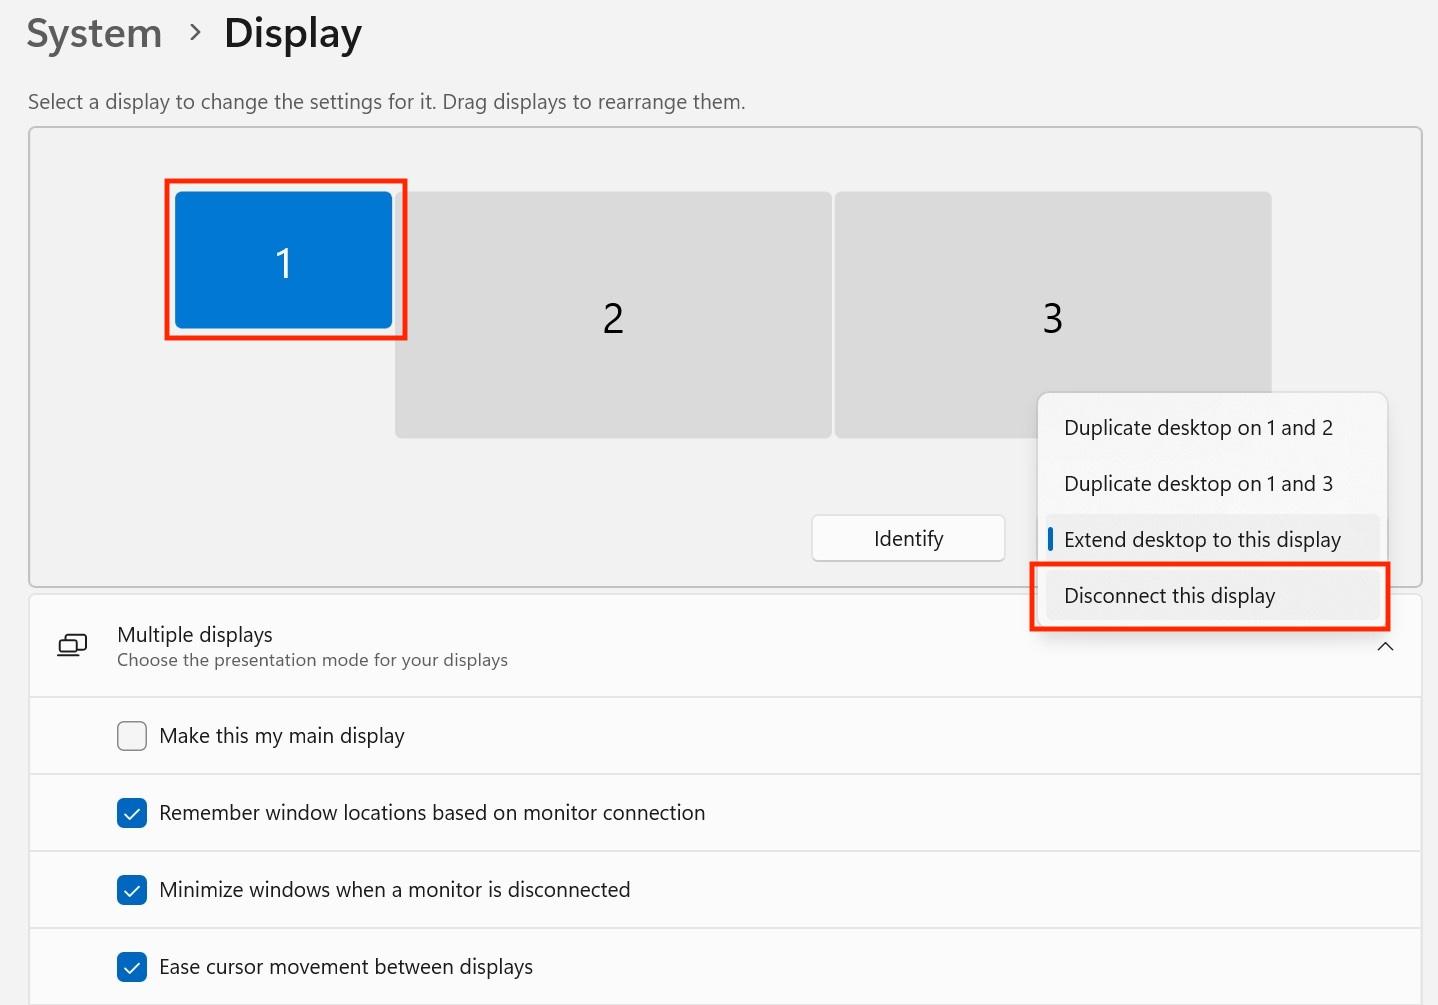
After making this change, a confirmation prompt will appear. Please confirm the change.
The net result is that the 'phantom' display will be 'disconnected' (in other words, we have told Windows not to use it).
The final result is that one of the two external displays connected to the Plugable docking station is configured as the 'Main' display, and the desktop icons and application windows should now appear within it. The 'phantom display’ will be disabled or 'Disconnected', which will prevent application windows or desktop icons from becoming ‘lost’ within the ‘phantom display’
*** Please note - even though we have in effect 'Disconnected' the 'phantom' display, the number representing this display will still be visible within the Display Settings application (although it will appear physically smaller in size to represent the fact that it is Disconnected).
This is expected behavior, and unfortunately the 'Disconnected' display cannot be completely hidden from view within the Display Settings application ***
