
What is a Virtual Machine, and why would I want to run one?
Virtual Machines! In this article we're going to talk Virtual Machines, and set up a Virtual Machine in Windows. You may have heard people talking about Virtual machines and wondered what in the world they were talking about. Maybe you've heard people say things like, "I just started up a new Virtual Machine", "I'm glad I tested that problem in a Virtual Machine and not my production unit!", and so on.
So, what is a Virtual Machine? Software, that's it! A Virtual Machine is just software that mimics a computer and operating system. An emulator for operating systems, if you will! Virtual Machines are a great way to try different operating systems and versions, test and reproduce issues in a closed environment, and learn more about computers all without actually committing permanent changes to your computer.
What to expect from this guide
We're going to set up and run our first Virtual Machine in Windows! Here's what we need to do:
- Download and install the platform software
- Download the operating system image
- Create the virtual machine in the software
- Install the operating system image onto the virtual machine
This may sound like it's complicated, but, it really isn't! We'll go step-by-step, and get you up and running a Virtual Machine before you know it. Ready? Ok, let's go!
Step 1 - Download and Install Virtual Box
The first thing we need to do is download and install Virtual Box. There are many virtualization software managers out there, but I suggest to use Virtual Box by Oracle for now. Virtual Box is easy to setup and use, has a wide compatibility with operating systems, and doesn't put a big strain on your computer while you're running a Virtual Machine.
You can download the Virtual Box installation file from this link: Download Virtual Box . Look down the page slightly, and click on the button for Windows Hosts. This should start the download process.
Now's the time to save any work you may have open, and close open programs so we have a clean environment for installation and setup. Then, go to the folder where you downloaded the Virtual Box installation file and double-click on the file to get started!
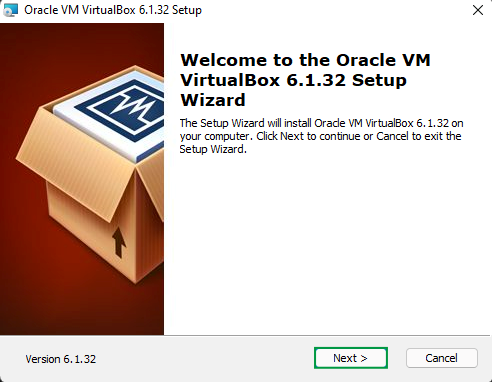
- You'll be greeted by this screen for the Virtual Box setup Wizard. Click Next > to begin.
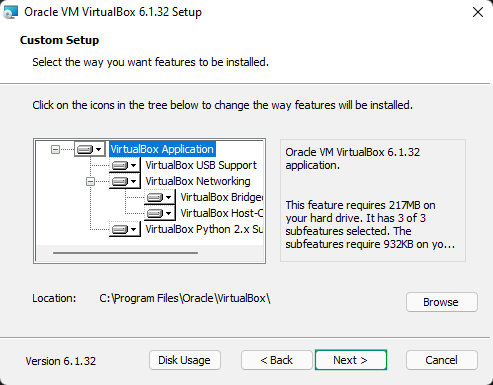
- This next screen will let you customize the program features and how you want them to be installed, but, let's stick with the default settings for now, and click Next >.
- Here are some other important features that we should leave checked, and click Next >.
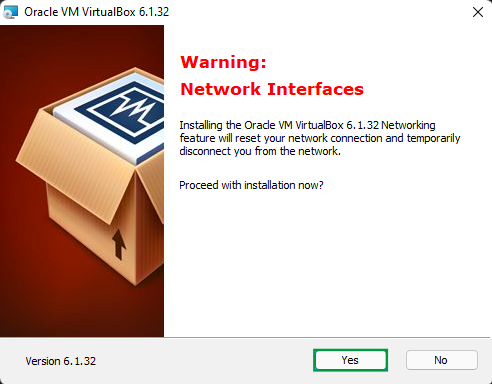
- This next message states that your network connection will be temporarily disconnected while finishing the installation. You should already have other programs closed as mentioned above, so once you're ready to move on, click Yes.
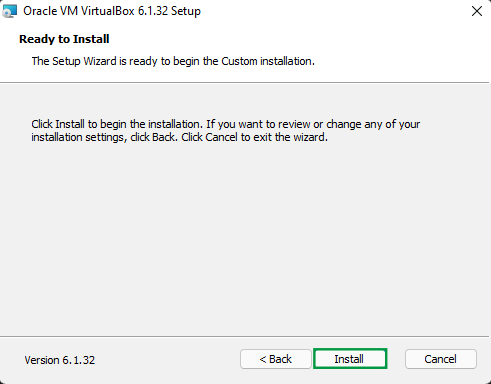
- This message is just letting us know that we're ready to start the installation! Let's click Install to begin.
- Great! Click Finish to complete the installation.
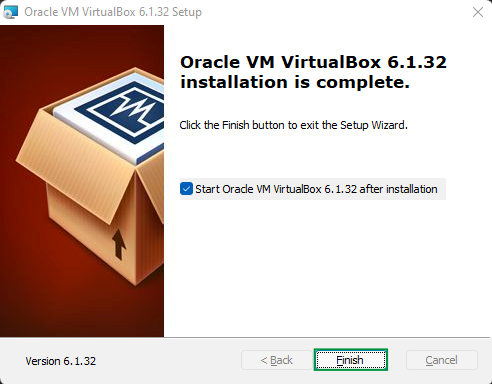
Let's give the computer a restart, and then we'll be ready to setup and install the Virtual Machine itself. See you in the next section!
Step 2 - Prepare the Virtual Machine
The timing couldn't be better for this tutorial as we're going to use the newly released Ubuntu Mate 22.04 LTS operating system image for this example! Ubuntu Mate is an official offshoot of the popular Ubuntu distribution, but uses an older desktop environment, and has modest system requirements, meaning it can run on a wider and older variety of computers.
Codenamed Jammy Jellyfish, this latest version was released at the end of April, provides Long-Term Support, and makes for a great first jump into Virtual Machines and Linux!
Let's head over to the Ubuntu Mate Download page at this link: Download Ubuntu Mate 22.04. I'd suggest click on the option to Direct Download the ubuntu-mate-22.04-desktop-amd64.iso file. Make a note of where you downloaded it to, and we'll begin setting things up!
- Welcome to the main screen for Virtual Box! We are greeted by Tux, the Linux Penguin. Later on I would suggest to take some time and familiarize yourself better with the options, especially as some will be specific to your computer.
For now, let's click New, to add our new Virtual Machine. We've said "Virtual Machine" enough for one day, so we'll call it VM going forward which is the commonly used term!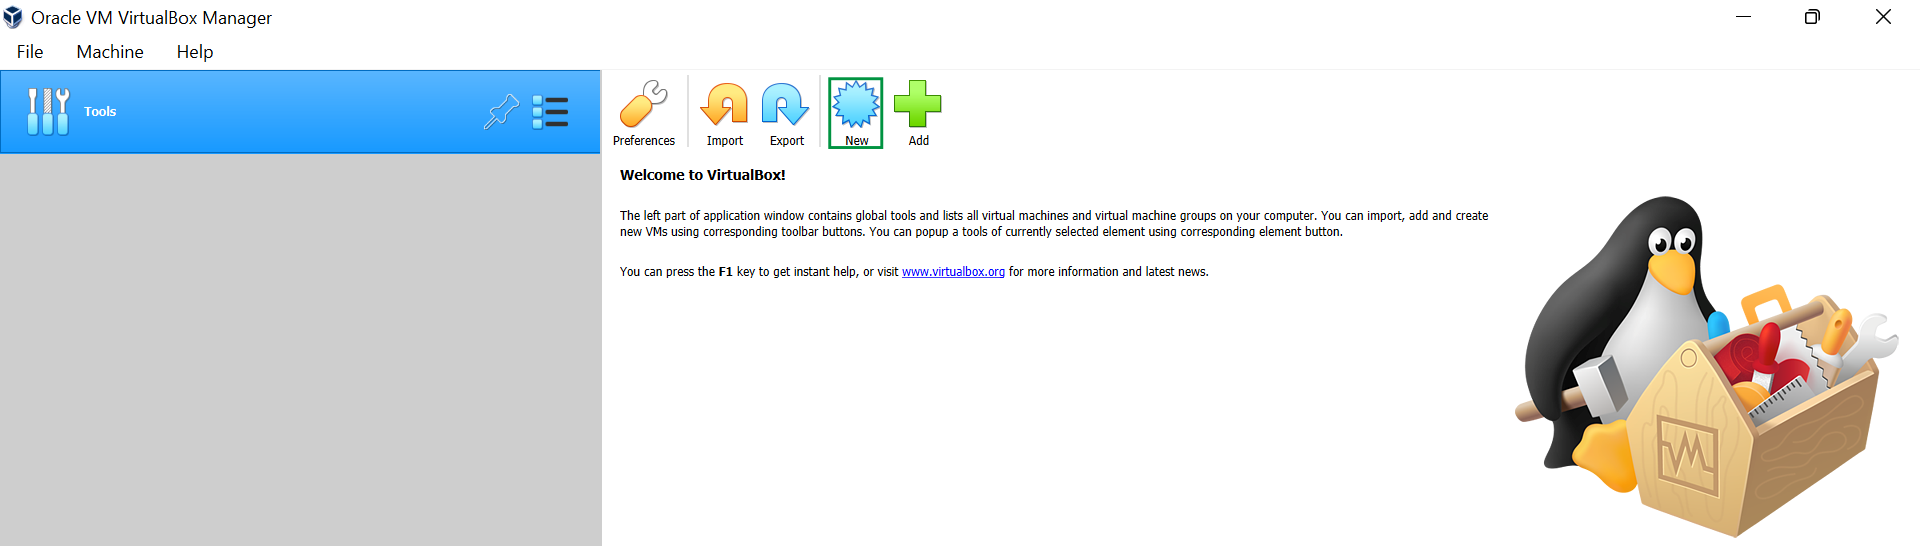
- We'll be presented with this with spaces for us to put in information about our new VM!
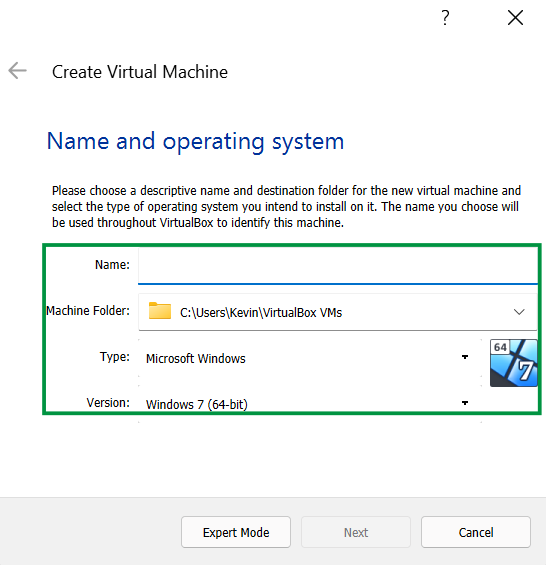
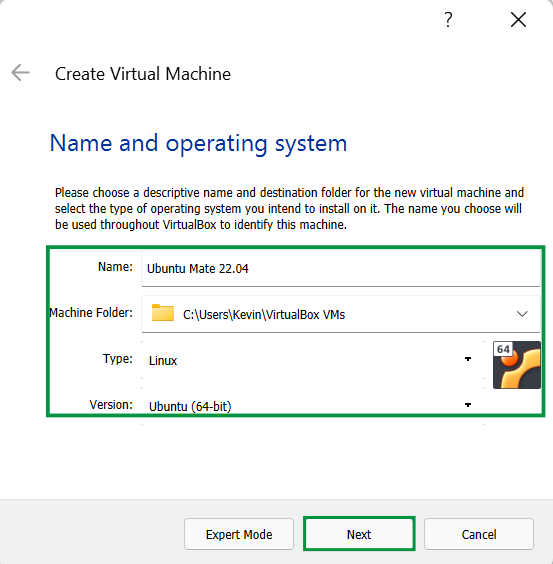
- We need to give the system a name, and we should make it something easy to identify. I'm going to call this VM
Ubuntu Mate 22.04, just to make things easy. We need to confirm some other details on this screen:- The installation path will default to C:\Users\Username\VirtualBox VMs. But, you can change the location to another folder if you click the little drop-down arrow in the Machine Folder field. That will open up a file browser window, and you can select a different file location.
- Click on the drop-down arrow for Type, and pick Linux. The version should automatically be set to 64-bit. But if it isn't, click the drop-down arrow , and pick the option for 64-bit. Here's my completed information screen below.
- Click Next, to move on.
- The installation path will default to C:\Users\Username\VirtualBox VMs. But, you can change the location to another folder if you click the little drop-down arrow in the Machine Folder field. That will open up a file browser window, and you can select a different file location.
- Now, we need to allocate memory (RAM) to the VM for it to run. This computer has 16 gigabytes (GB) of RAM total, so I am setting aside a little over 11GB of RAM for the VM when it is running. You can click and drag the little cursor over to an the amount of RAM you want to use, or, click in the box and enter in a specific number if you'd like.
Windows still needs to run in the background even when we're in our VM, so we need to leave enough RAM. The best rule of thumb is to use the guide the software provides, and don't going over into the red. Once you've set the right amount of RAM for your computer click Next to move on.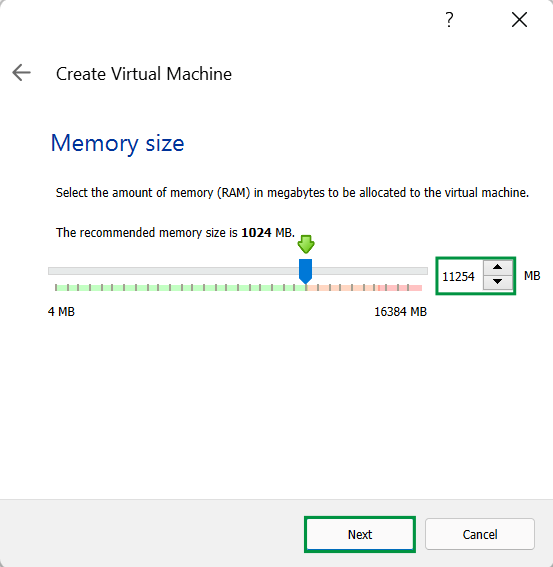
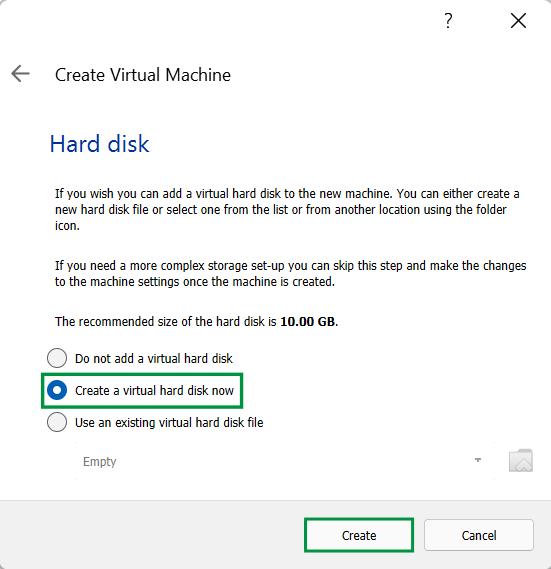
- Next up, we need to create the virtual hard disk to install our operating system on. Leave the choice on the default setting to Create a virtual hard disk now, and click Create, to move on.
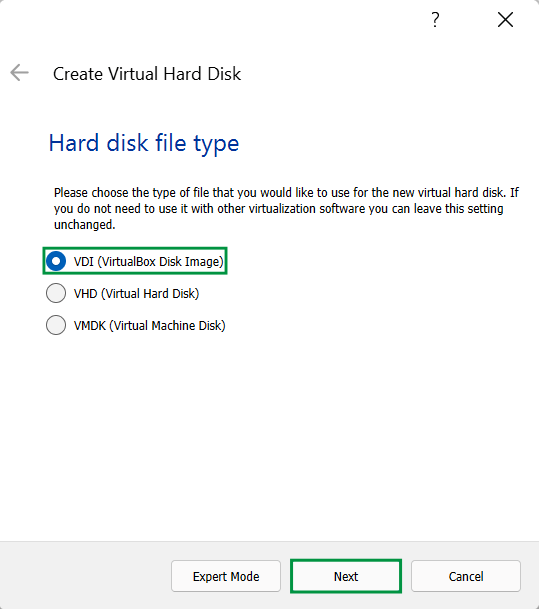
- Now, we need to select the Hard Disk File Type. Leave the choice on the default setting for VDI (VirtualBox Disk Image) format, and click Next, to move on.
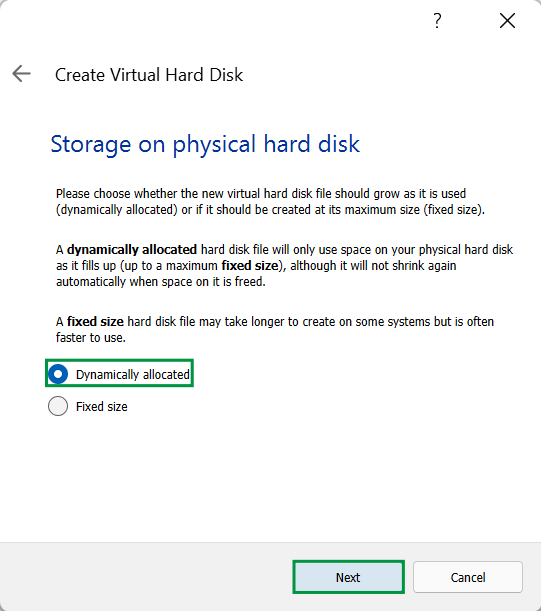
- We need to pick the storage allocation method. I suggest to leave the choice on the default, which is Dynamically Allocated. This reserves the space and fills it up as you add data to the VM. Note - The storage size will not decrease if data is removed from the VM. Once you're ready to move on, click Next.
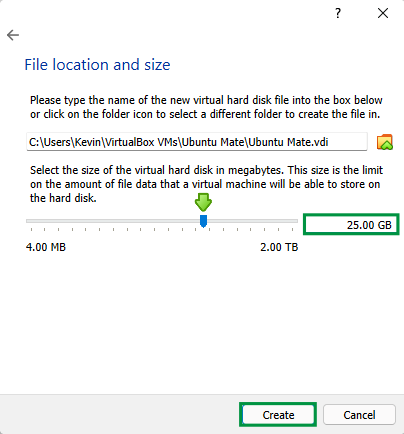
- We need to pick the file location and size for our Virtual Hard Disk. I'm going to set 25GB for the VM as we need to have space for software, updates, and files. You can definitely set more, but I wouldn't suggest to set any less 10gb. You can change the size by clicking and dragging the cursor, or click in the box and type in a number. Click Create to move on.
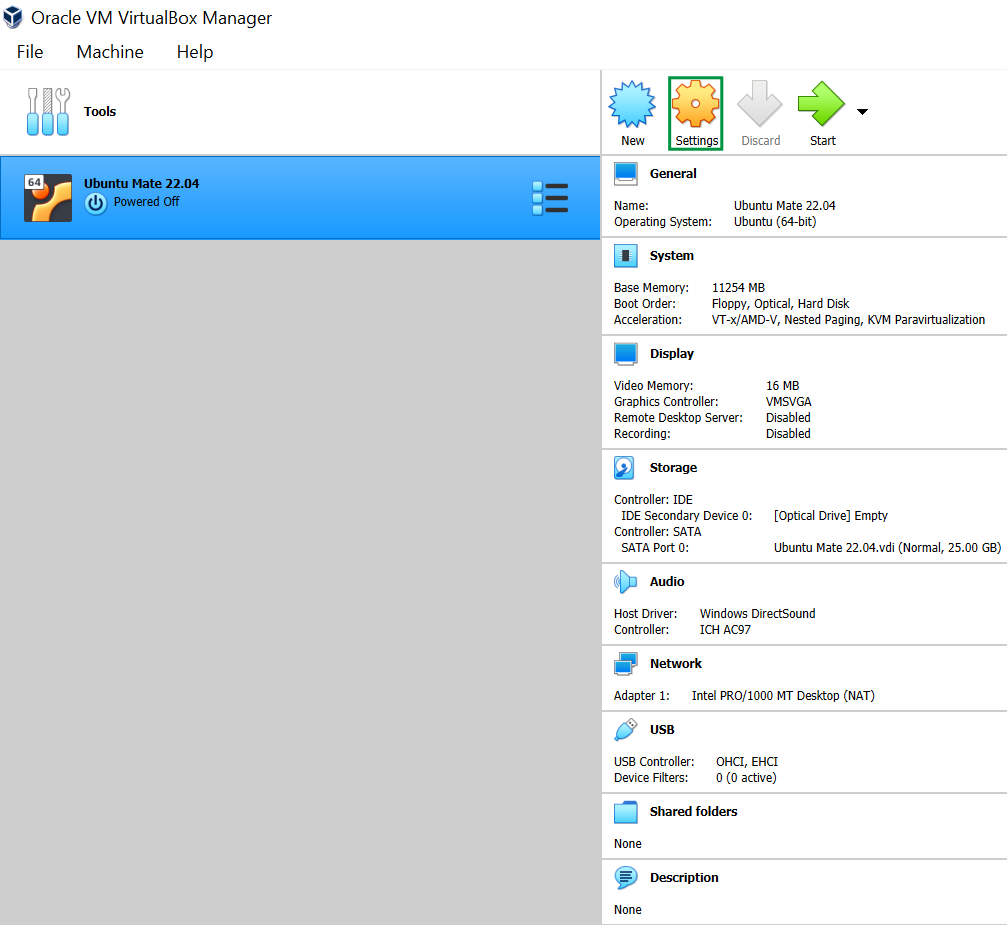
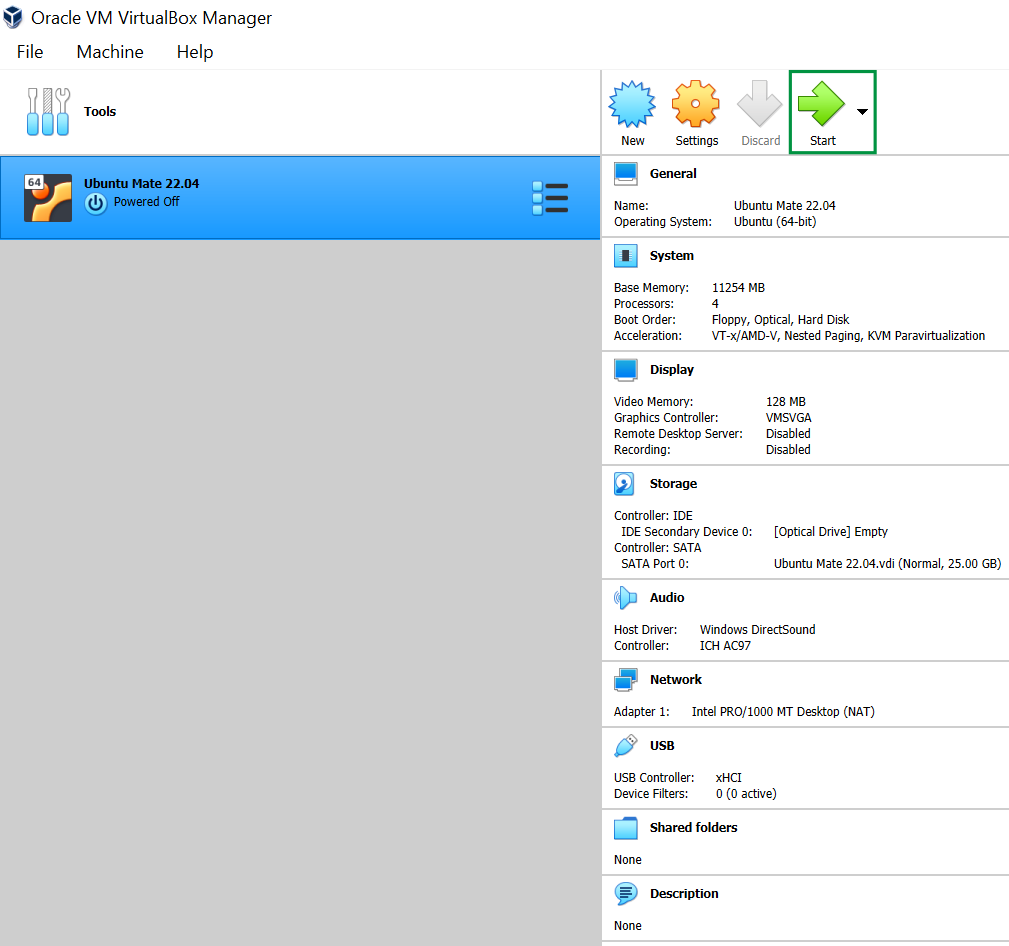
- Almost there! Now, we can see the information we've set for our VM so far. Click on Settings as we need to tweak a few other properties before we fire it up for the first time.
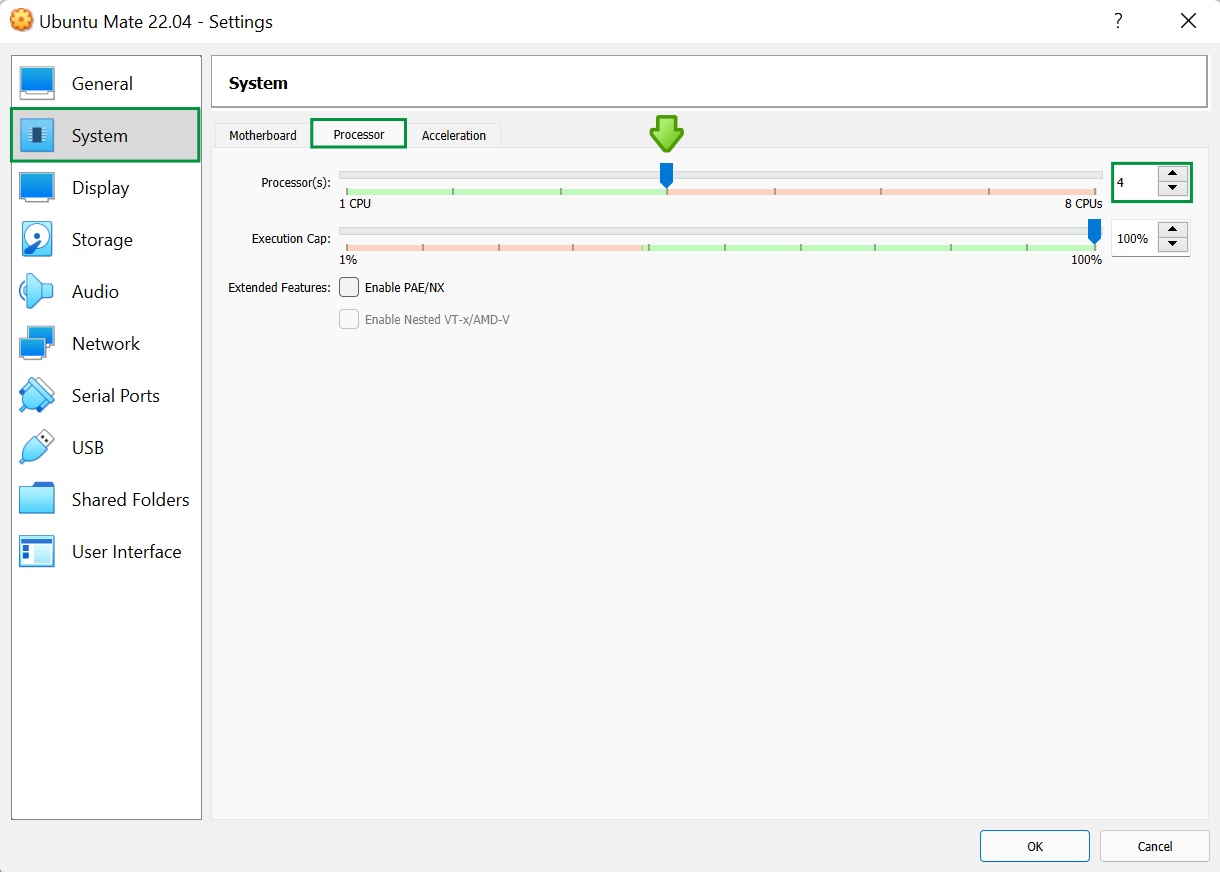
- Navigate to System > Processor. We need to make sure that tfhe VM can take full advantage of our processor while still leaving resources for Windows. Typically you'll find, that about half is the right number. Once again, use the guide the software provides and don't go over into the red.
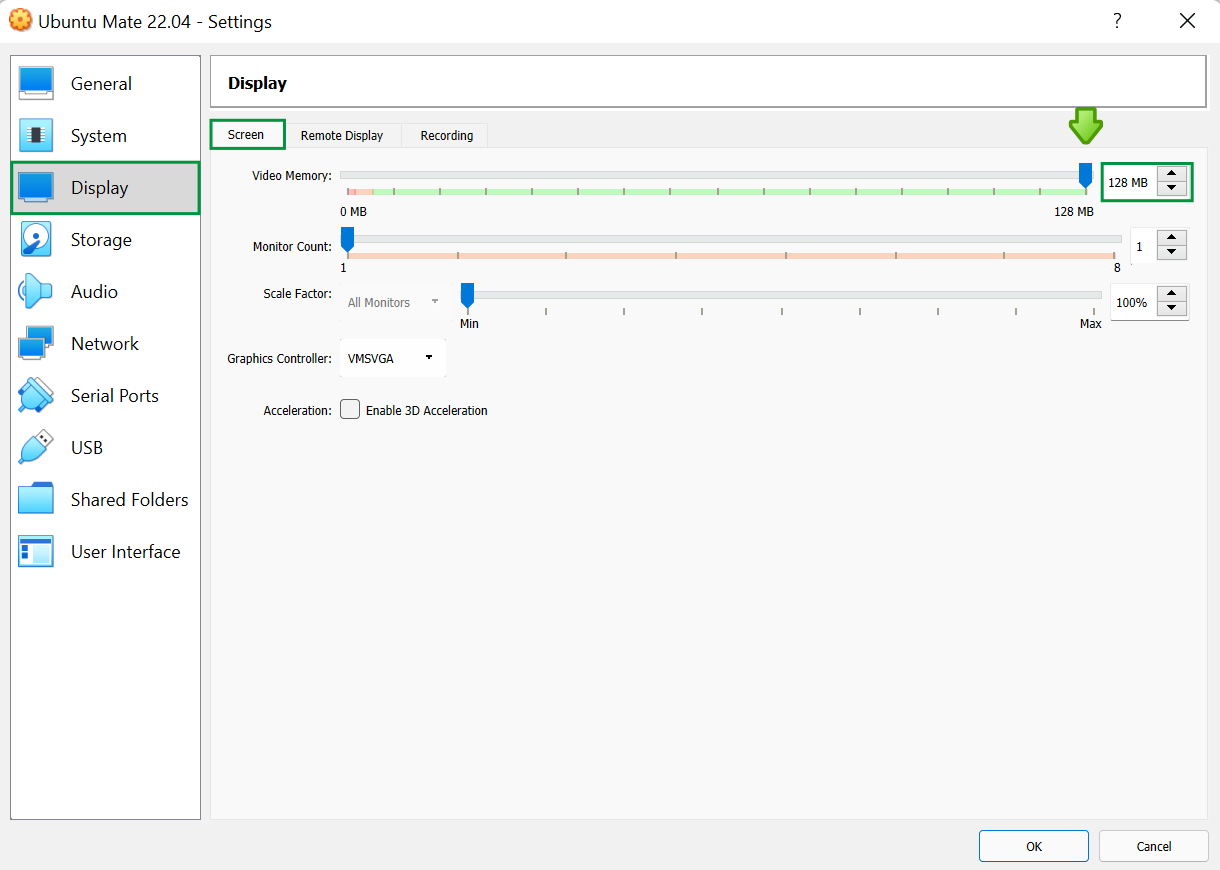
- We need to provide at least 128 megabytes (MB) of Video RAM (VRAM) to allow for a full screen display and other enhancements. This is a very small amount, so navigate to Settings > Display, and move the slider all the way over to the right side to 128MB or enter the number into the box.
- We should setup our USB ports. Click and navigate to Settings > USB and make sure to set the VM to be able to utilize USB 3.0 ports if your computer has them. Finally when you're done, click OK to save these changes, and you'll be ready to move on to the next section!

Next, we're going to install the operating system. See you there!
Step 3 - Install the operating system
In the last section, we setup the Virtual Machine (VM) properties to get ready for the operating system installation. Now, we are going to actually install and setup the operating system itself!
- First, let's take a look at this summary screen with information about our VM to make sure everything is correct. Once you're ready, click the green Start arrow to begin.
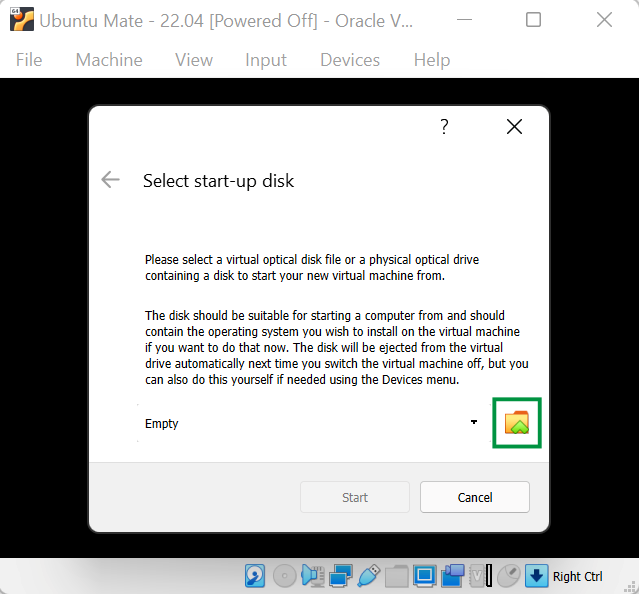
- Click the folder icon to open a file browser.
- Click Add
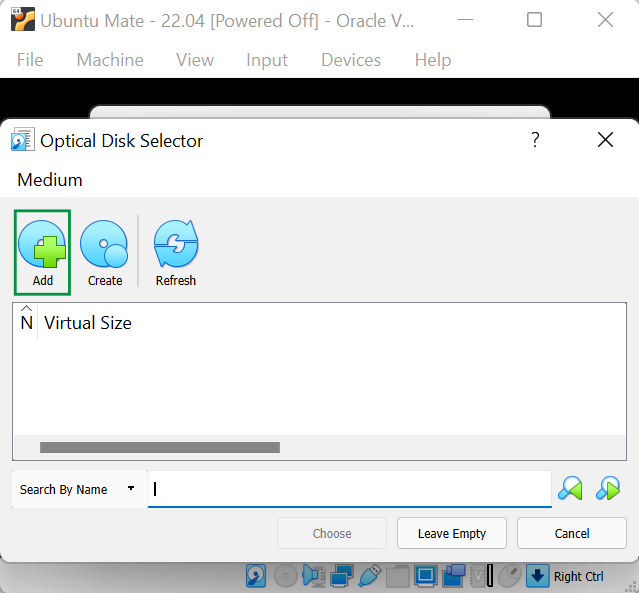
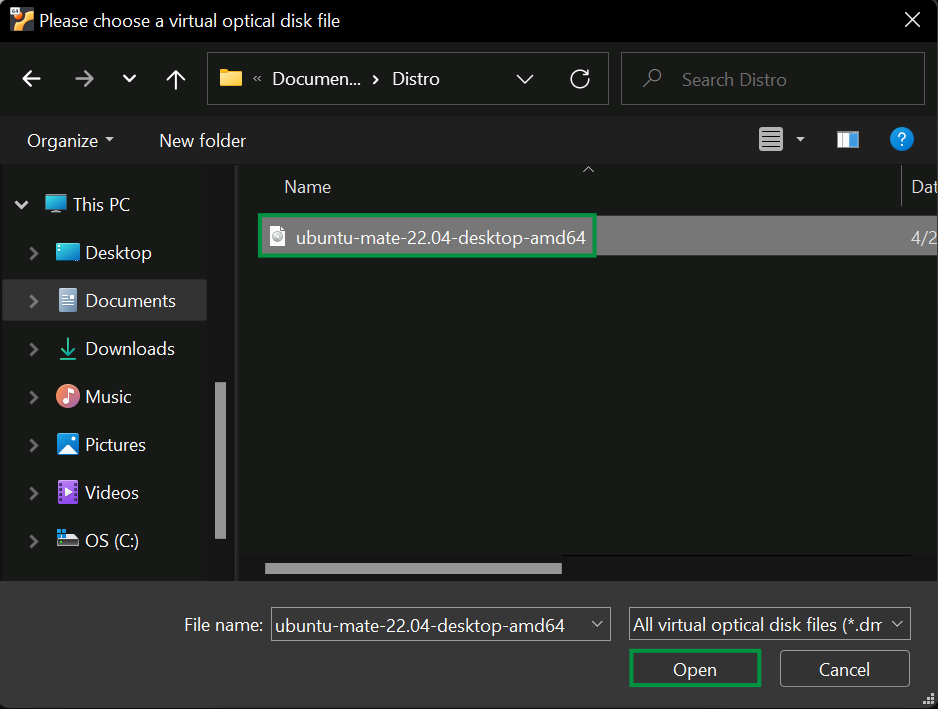
- Go to the folder where you downloaded the ubuntu-mate-22.04-desktop-amd64.iso image and select it. Then, click Open.
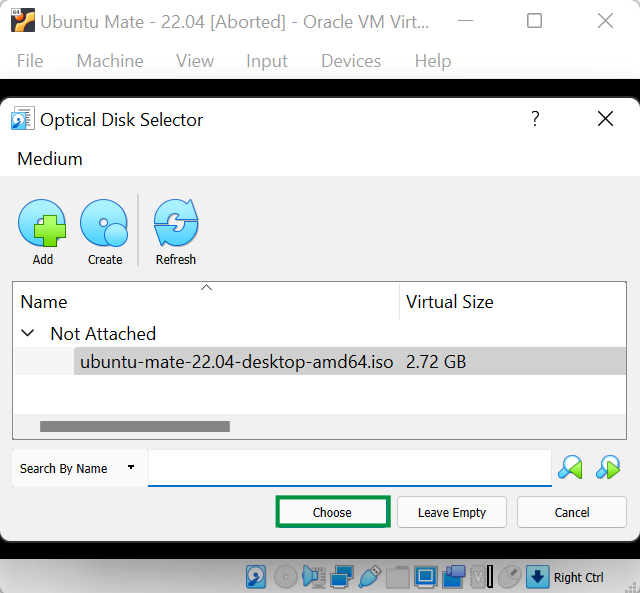
- Now, we see the image is in the Optical Disk Selector! Click Choose.
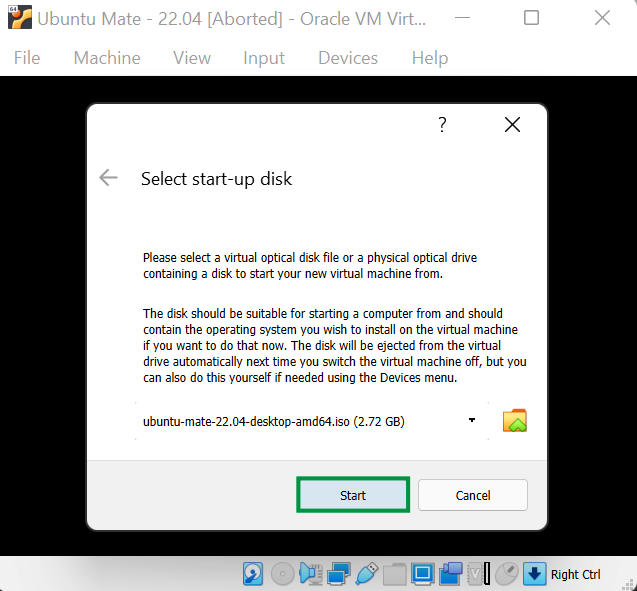
- Now, click Start
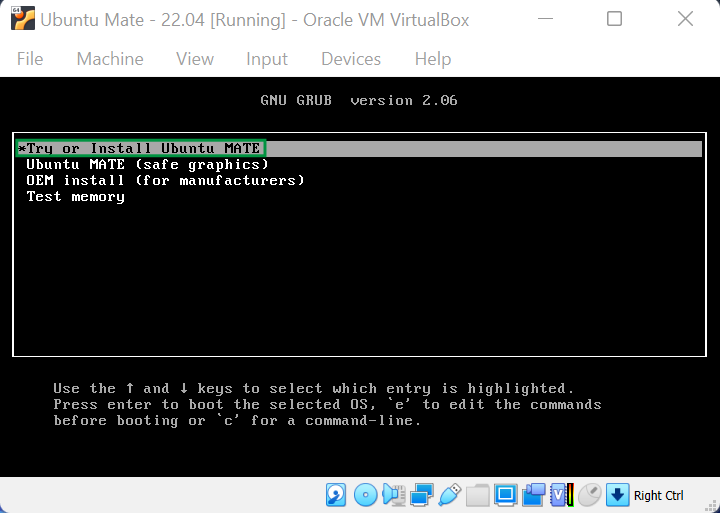
- We've come to the splash screen for GRUB (Grand Unified Bootloader). The default option is set to Try or Install Ubuntu MATE, so go ahead and press Enter on your keyboard and hold on tight!
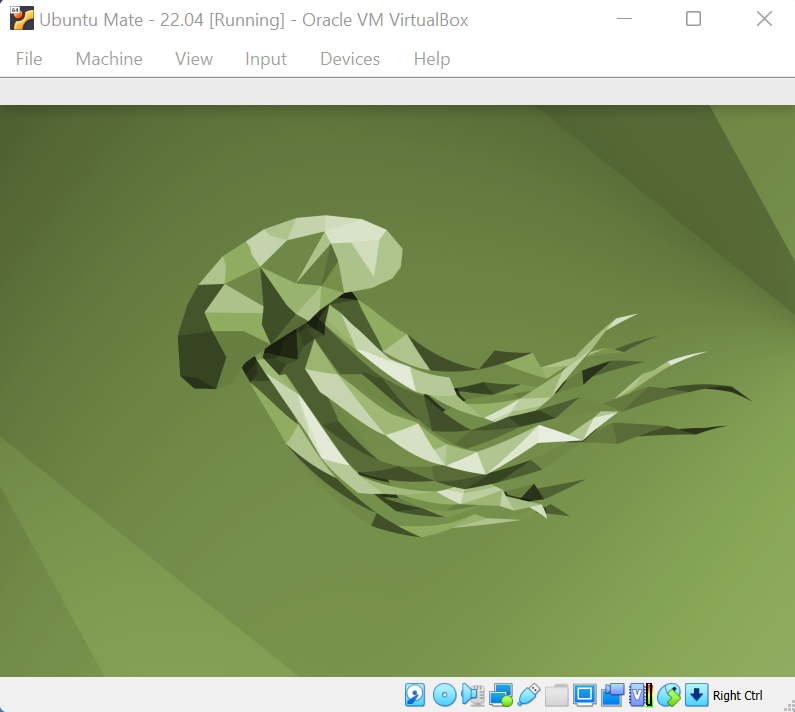
- Awesome! Just look at those wonderful shades of green. Oh, and there's the Jammy Jellyfish!
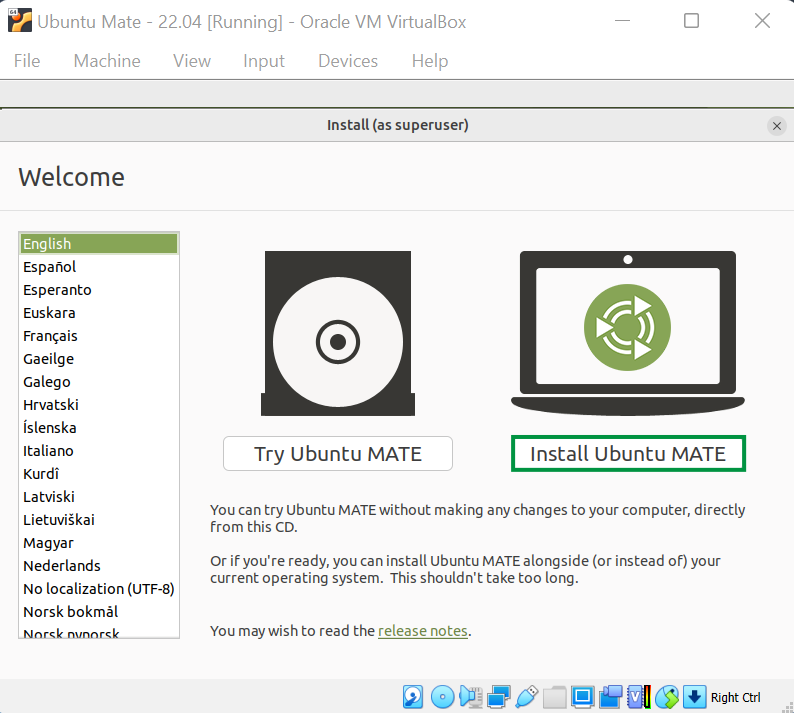
- Next, you'll see the Welcome screen. We didn't come this far to turn back now, so click Install Ubuntu Mate!
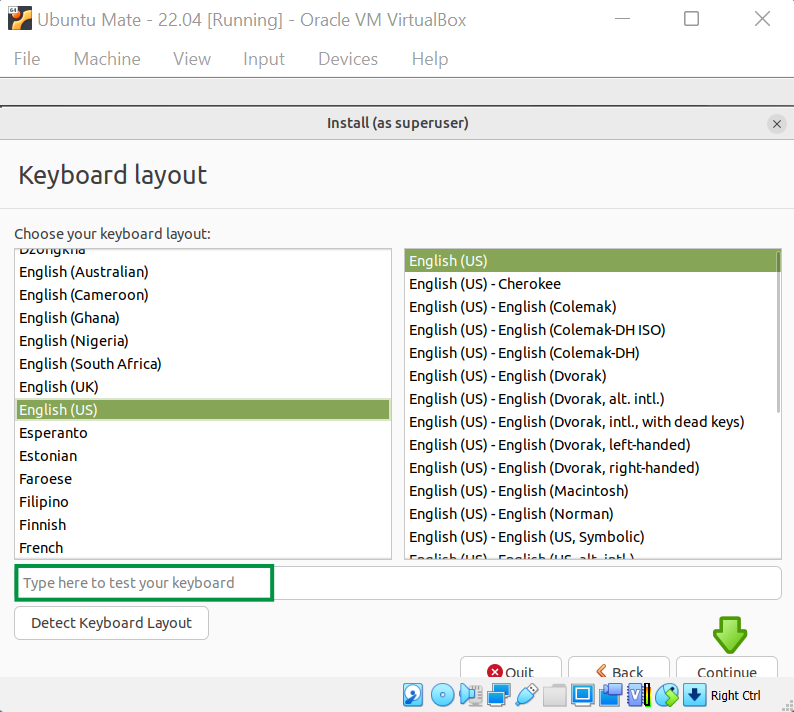
- Here, we can confirm our keyboard settings, and even test our keyboard out if we need. Once you've set things the way you need, click Continue, to move on. As you can see, the button is a little cutoff here. Don't worry, we'll fix that soon and get things full screen!
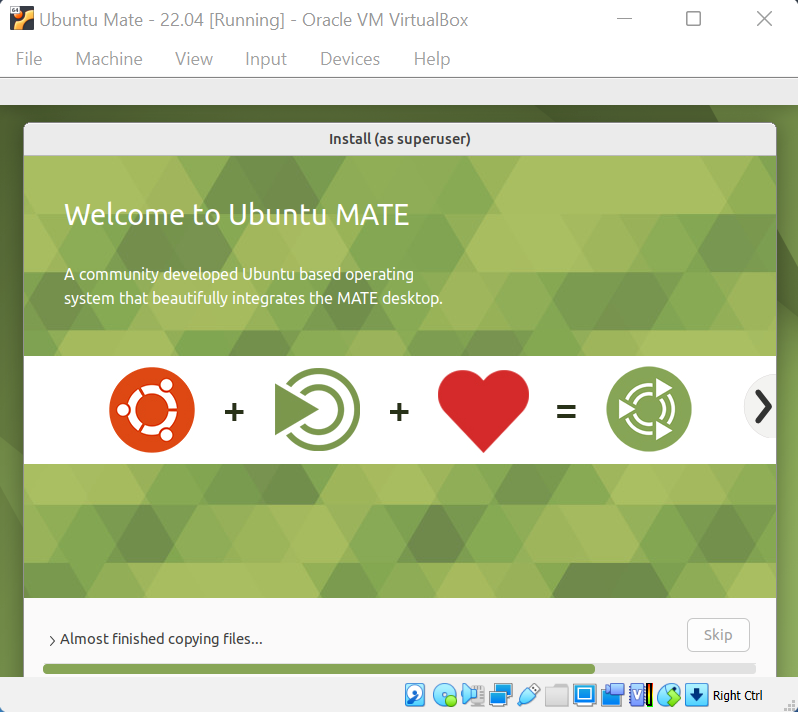
- Here, we're given the option to choose what we'd like to install, and if we'd like to download additional updates while installing Ubuntu Mate. For the first time setting up a VM and Linux, I suggest to do a Normal Installation, and click the box to let the system Download updates while installing Ubuntu Mate.
Downloading updates while installing will save us some time after the installation is complete. You can also click the other box below if you want to install third party software for additional media and features. This is optional, and can be done later. Click Continue, once you've made your decisions and are ready to move on.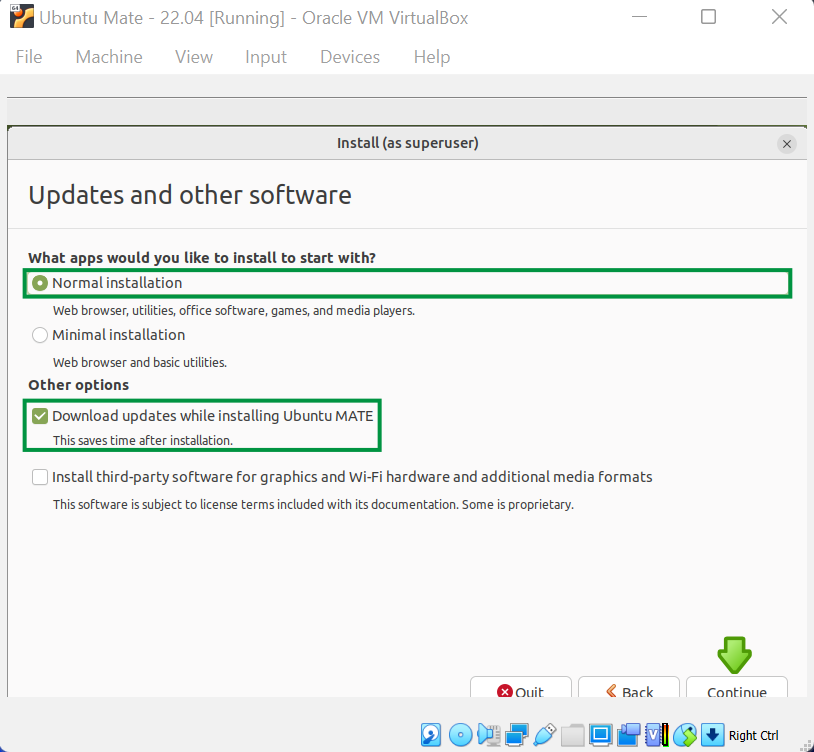
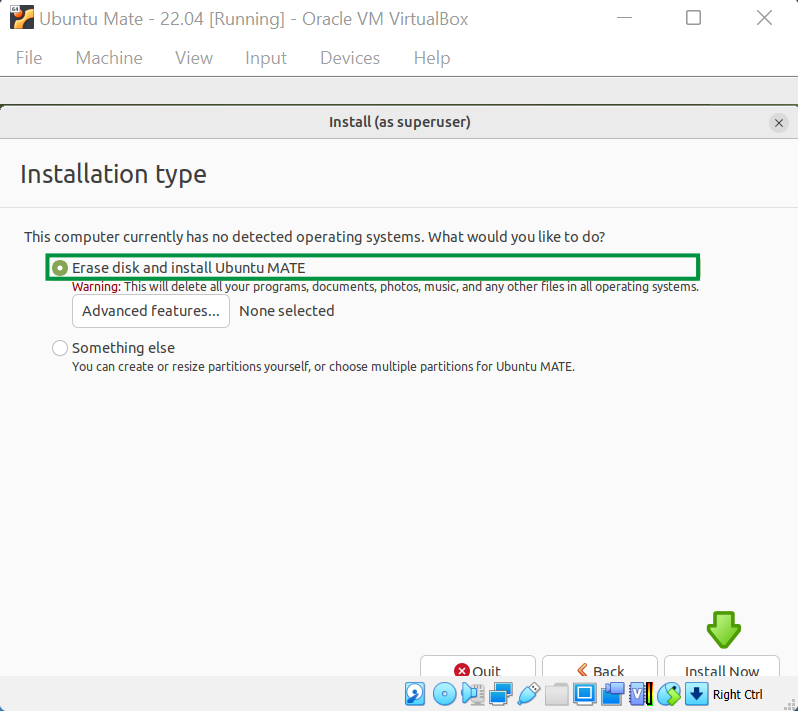
- The next screen is the Installation Type. The default is set to Erase disk and install Ubuntu Mate. Remember, we're not actually doing anything permanent to our computer since the hard drive is just simulated! Leave the option on the default, and click Install Now, at the bottom of the screen to move on.
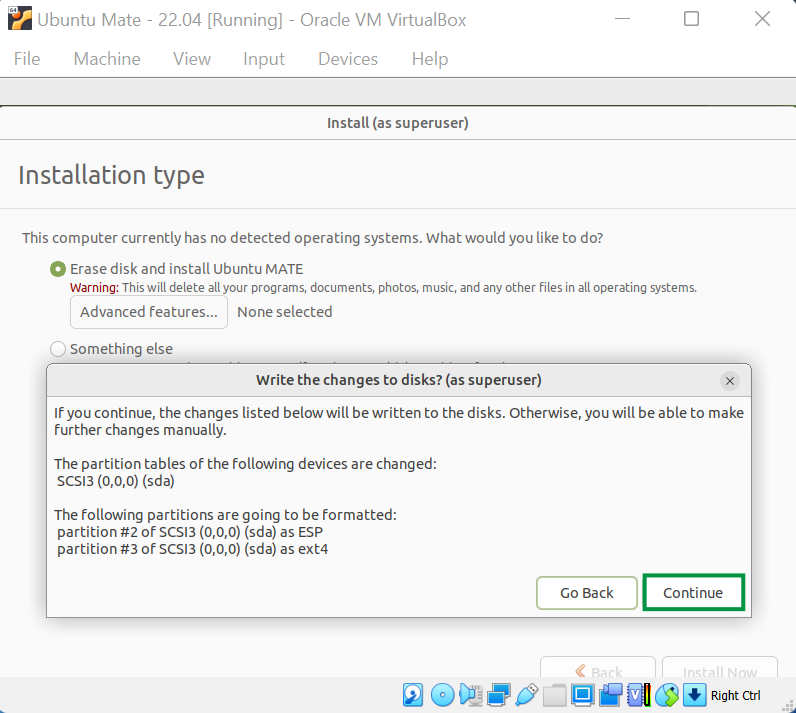
- This next screen is just confirming that we are indeed writing the changes our simulated disks. Click Continue, to move on.
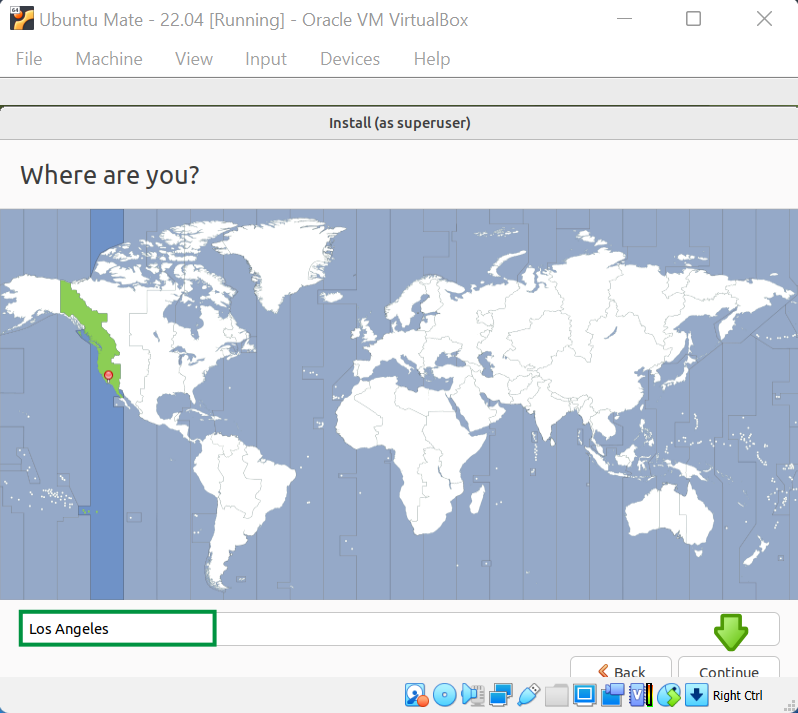
- Here, we can set our location. The location doesn't have to be precise, but it's best to set a location relatively close to the region you're in to be able to hit the closest servers for updates. Once you've set your location, click Continue.
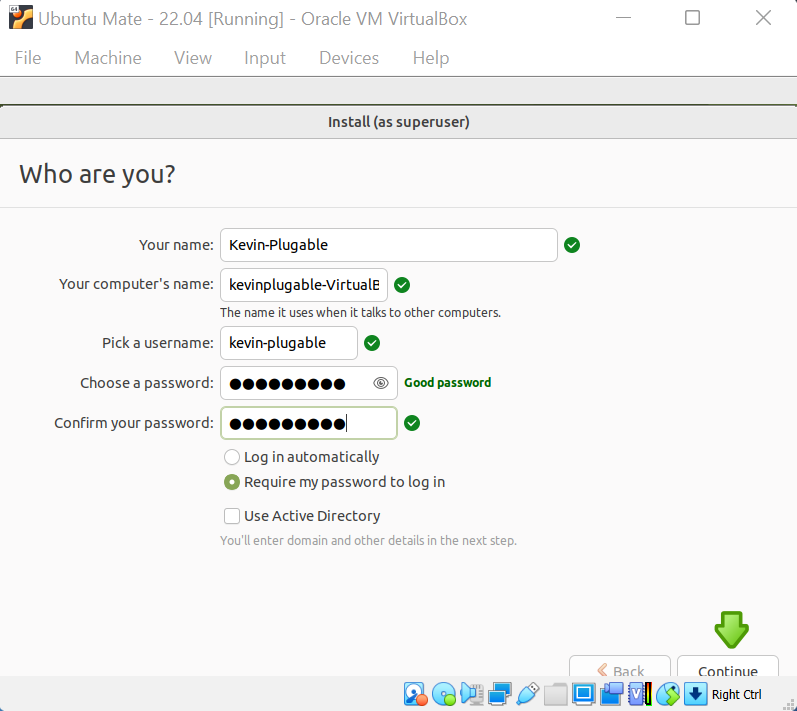
- Here, we will setup our initial account. Set your name, computer name, username (which will always be displayed in lower-case letters), and set a good and memorable password. The default login preference is to require a password to login, and I suggest to leave it that way for now. This is it, no turning back now! Once you're ready, click Continue to begin, and buckle up!
- You'll see a lot of file names and information fly by as the installation progresses. Check out the progress bar to see where you're at overall, and you can even click the little arrow to see further information in a terminal window.
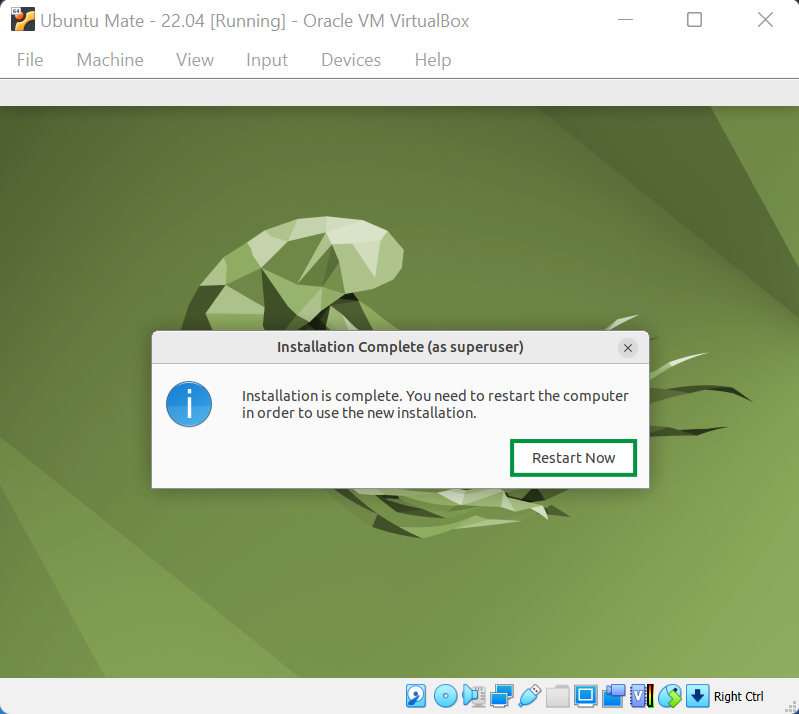
- Installation Complete! Great. Click Restart Now.
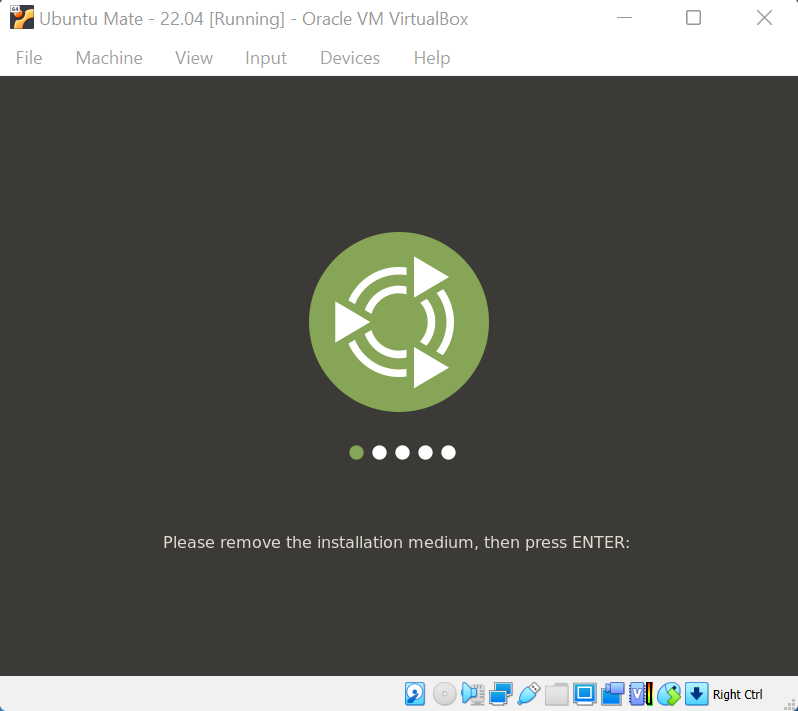
- This screen will ask us to remove the installation medium and press Enter. Since there's no actual medium or disc, just press enter to restart and get ready for Linux!
You are awesome! Now, it's time to use our new VM and dive into Linux. See you there!
Step 4 - Set up and use
Now that we've installed the OS, let's start using it!
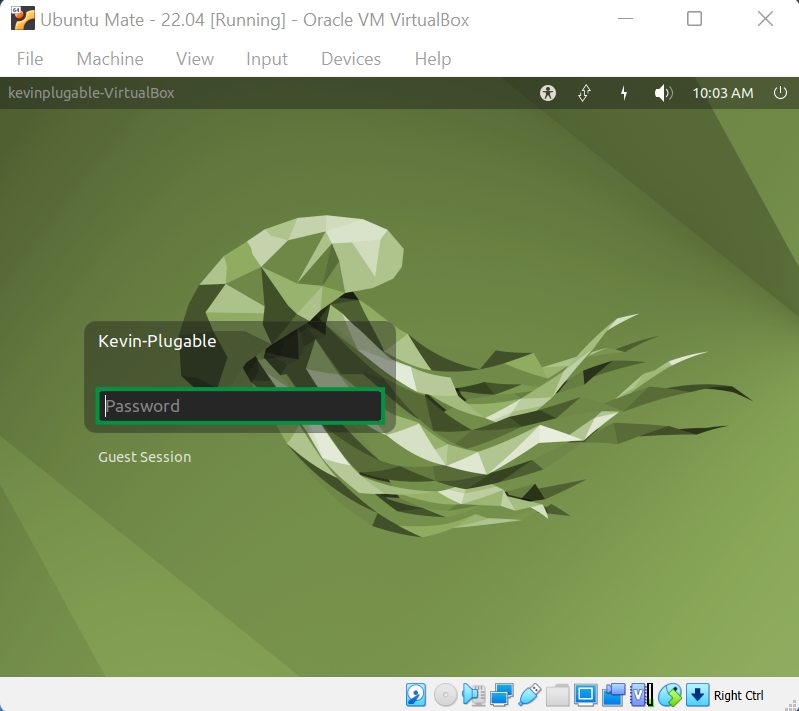
- We're now greeted by the login screen! Type in your password and press enter to login.
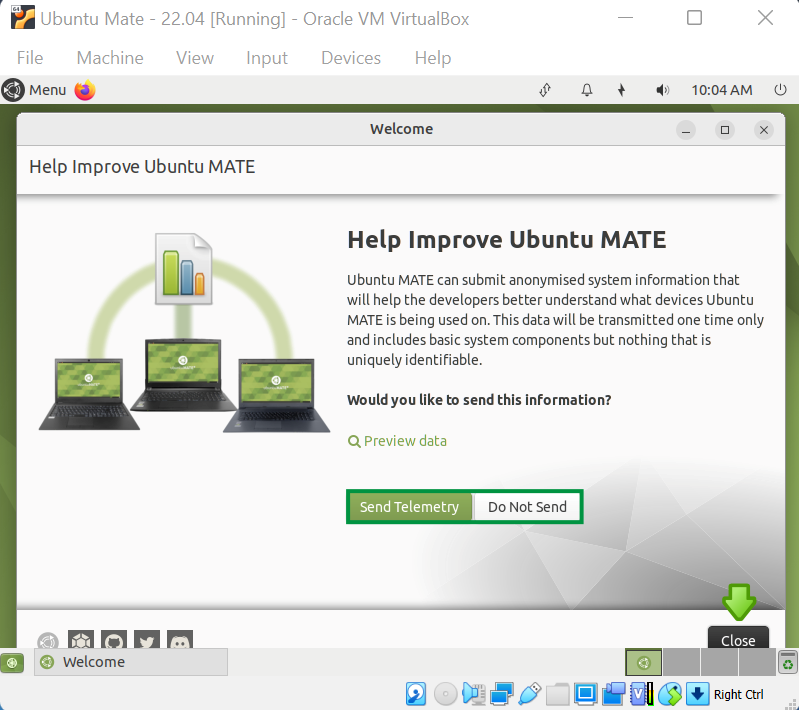
- This screen will pop up asking if you'd like to share anonymous system data with the Ubuntu team. This is completely optional. Feel free to click the magnifying glass to see what kind of data they will capture. When you're ready to make your choice, click to send, or do not send data. It's up to you! You can change these things later, so no need to worry.
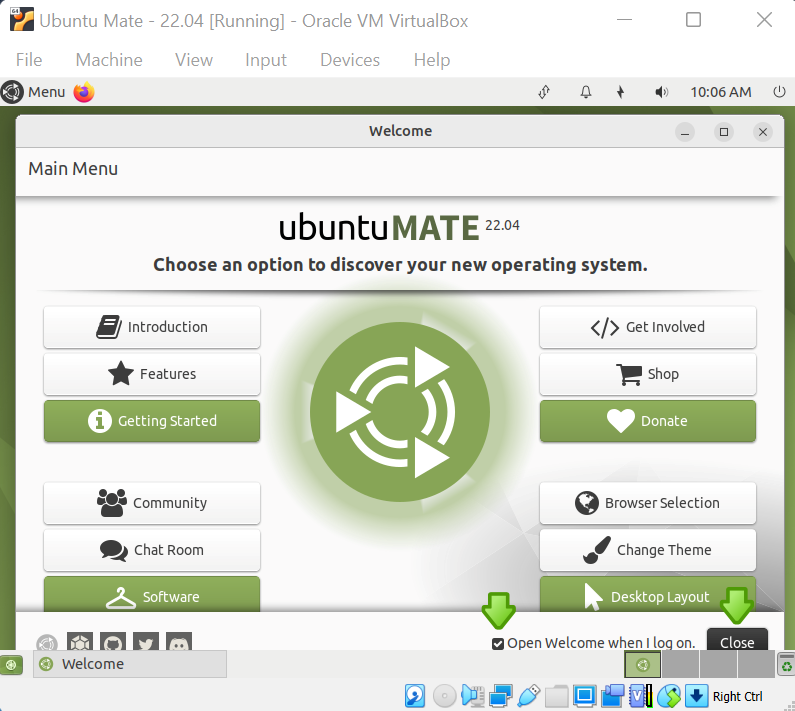
- Next, we're brought to the Welcome screen! This page is a great wealth of information for those who are new to Ubuntu and Linux, and still has helpful info for long time users as well. You can click the box that says Open Welcome when I log on if you don't want to see this screen each time. You may want to leave it as it is for a while. Click Close, to close the Window.
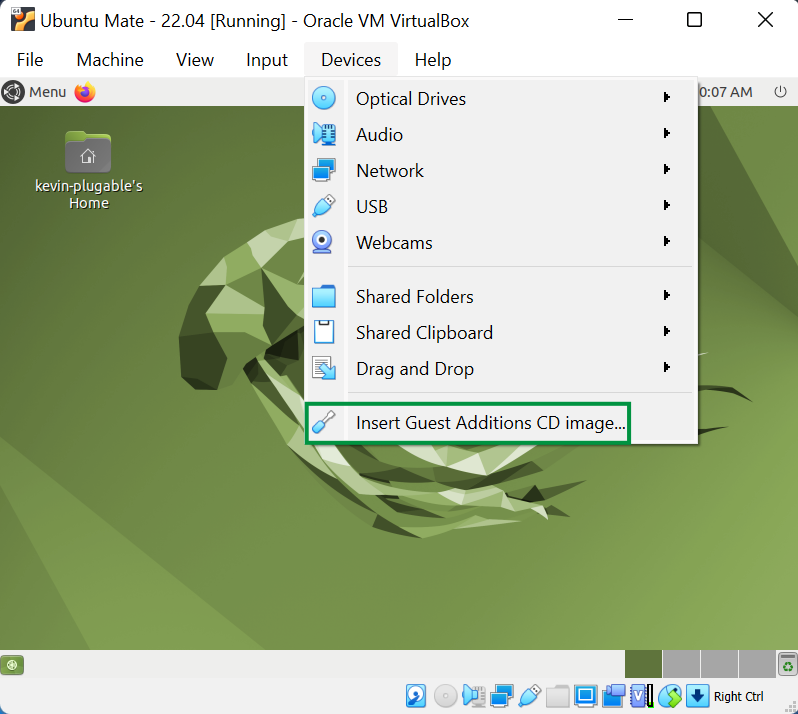
- Now we need to insert the Guest Additions "CD" so we can put the VM into full screen mode, and use other enhancements. Navigate to Devices > Insert Guest Additions CD Image, to "insert" the Guest Additions CD into the Virtual Drive.
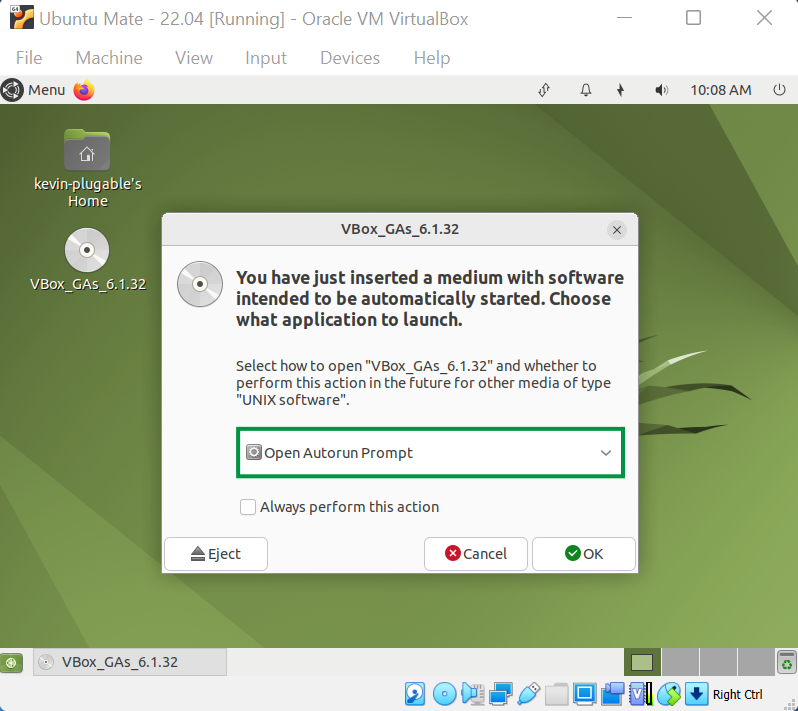
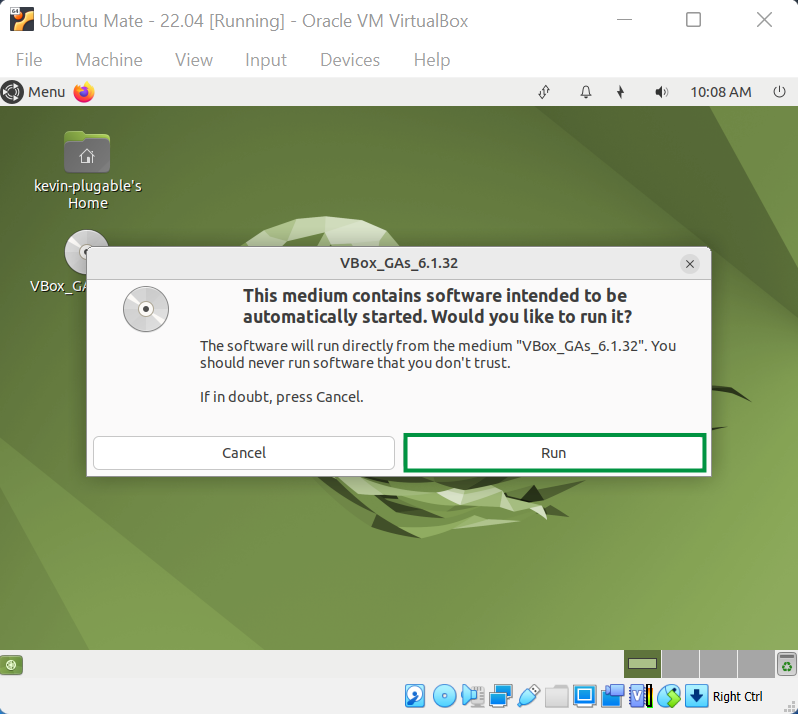
- An Autorun Prompt screen will pop up. Click Open Autorun Prompt and click OK.
- Next, click Run.
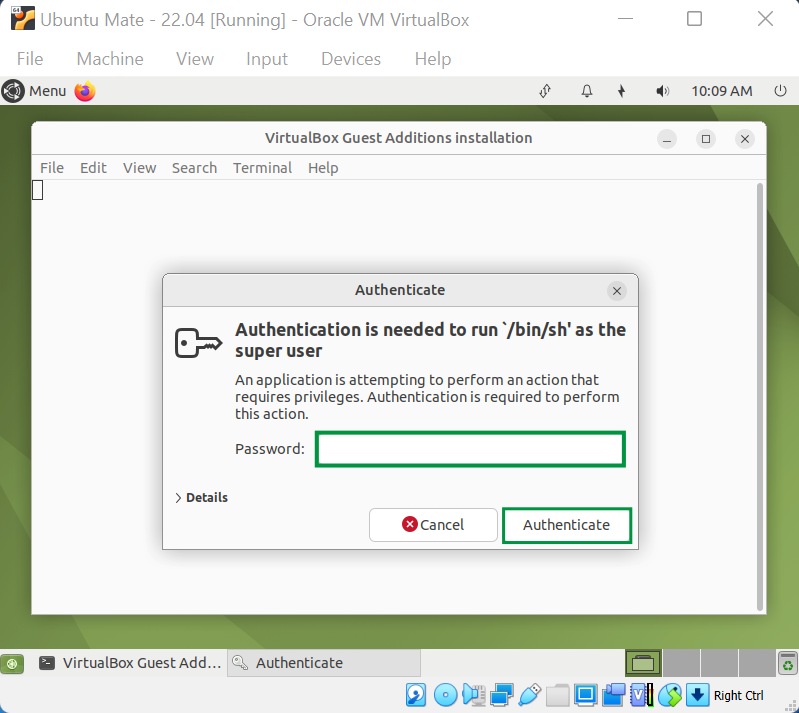
- You'll be prompted to put in your password to authorize the setup. Type your password in, and click Authenticate.
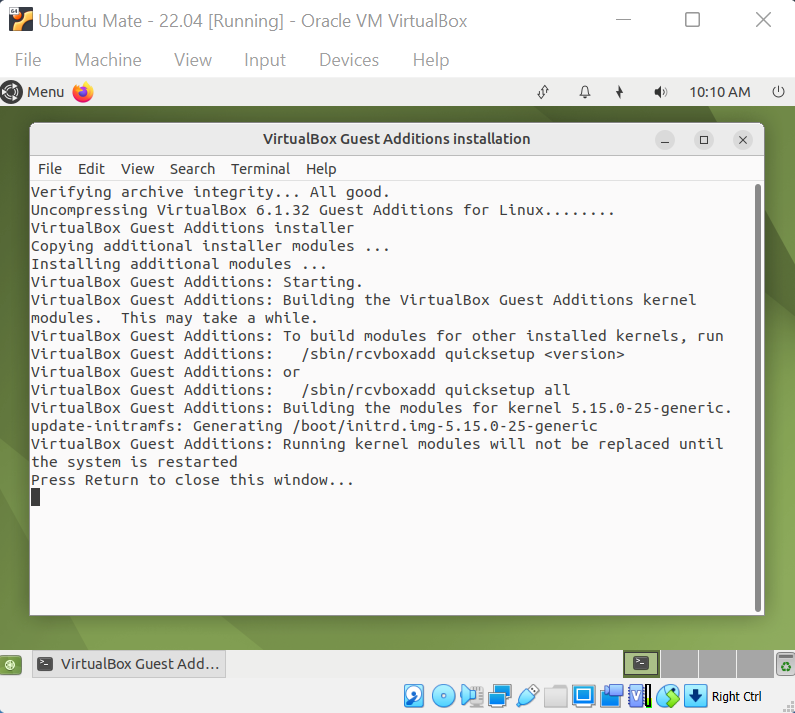
- A terminal window will open up with information about the installation. Once it's done, a message will pop-up stating that the changes won't take affect until the system is restarted. Press Enter/Return on your keyboard to close the window.
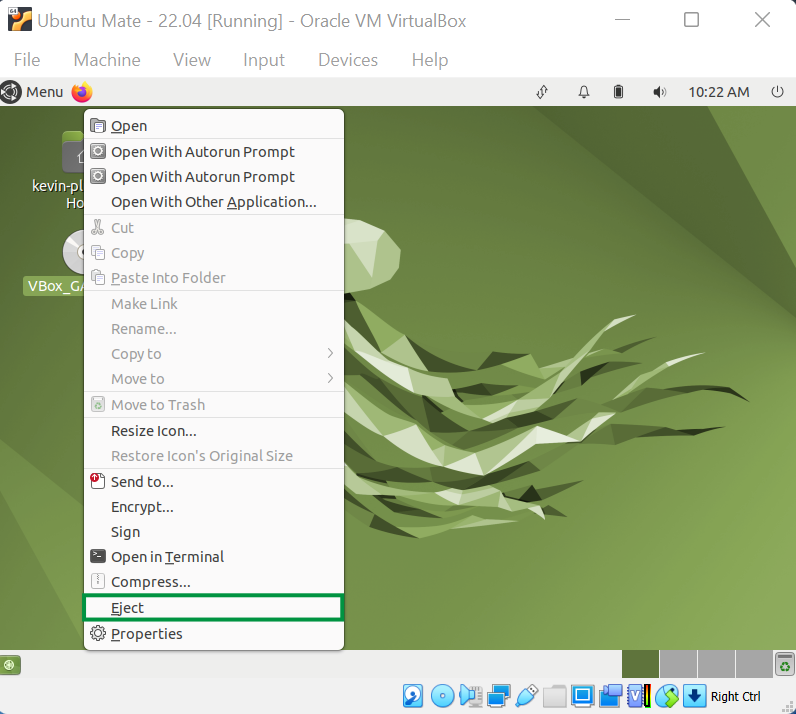
- After the installation, right-click on the disc icon, and click Eject. There isn't actually a disc inserted as you know, but we still need to treat the VM as a real computer.
 <
<
- Let's restart the VM to make the changes take effect! Now, we could click the power button in the top right corner to get restart and shutdown options, but that's so basic! We're in Linux, so let's get used to using the terminal!
Press Windows + T, (or CTRL + ALT + T) on your keyboard to open up a terminal Window. Typesudo rebootinto the terminal, and press Enter/Return on your keyboard. You'll be prompted to type you're password, and once you do the computer will restart!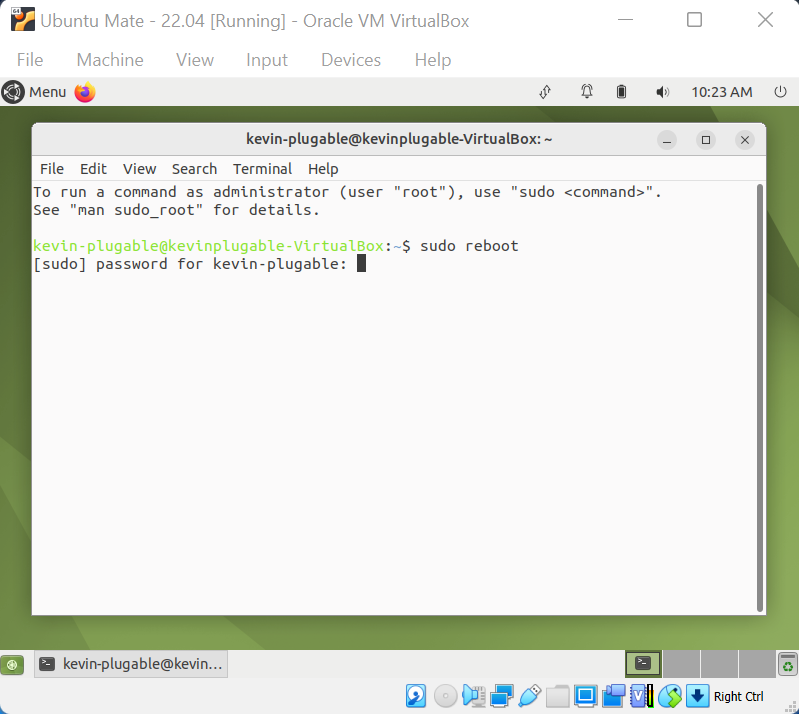
- Once the VM reboots, sign back in. Now, press CTRL + F on your keyboard to go into full screen mode.
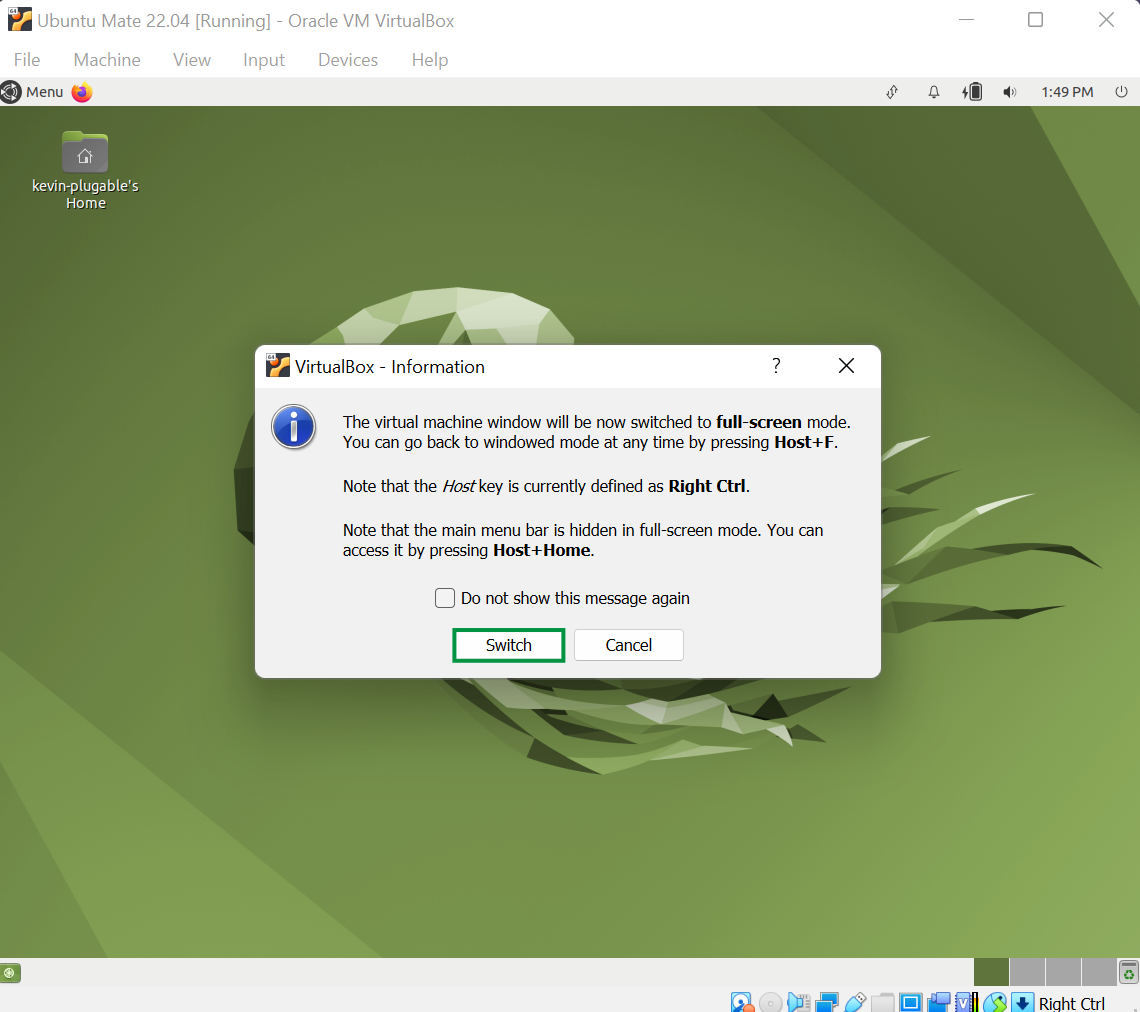
- Ah! So much better to be in full screen, right? Press CTRL + F anytime you want to leave full screen mode.
Your VM should be setup and ready to use! So, what's next? Well, that's up to you! The next section will give some helpful tips and and resources. The goal is to keep adding to this document with new, helpful information. So, check back from time to time to see what's new!
"What do I do now?"
That's the million dollar question! It really is up to you at this point. Think of your VM like a new computer, because that's what it is! VM's and Linux are like an open world game; go anywhere and do anything (within reason), make some mistakes, and just have fun! Here are a few more key things I suggest to do to really make the experience yours, and some resources to help you further:
- Setup your firewall with Gufw (Graphical Uncomplicated Firewall), which is already installed. You just have to turn it on and you may want to set up some rules if you need. These steps aren't ordered, but, setting up your firewall is always step #1!
-
Customize your appearance - Ubuntu Mate and Linux overall are highly customizable visual experiences. Easily move objects around, change the size of items, fonts and more.
-
Software Boutique - Get software from the Software Boutique! Here, you'll find everything from office and productivity software, multimedia software and games, as well as content creation and development.
- Update, and upgrade your OS! The Software Updater will prompt you with updates and upgrades when available, but, its so much more fun to use the terminal! Open a terminal window by pressing Windows Key + T, or CRTL + ALT + T. Then:
- Enter
sudo apt-get updateinto the terminal to search for available updates. - Enter
sudo apt-get upgradeinto the terminal to install any available updates and upgrade packages.
- Enter
- A comprehensive guide is available, and you can always get some support from the Ubuntu Mate Community. Search the community knowledge base by categories, or type in specific terms and questions. Someone may already have an answer!
Well, there you have it! Baton passed, and now you're ready to run! Remember that it can take some time to get used to Linux. Strange, confusing, and frustrating things may happen along the way. But, stick with it! You'll find a solution, have an "aha!" moment, and then laugh about it later.
